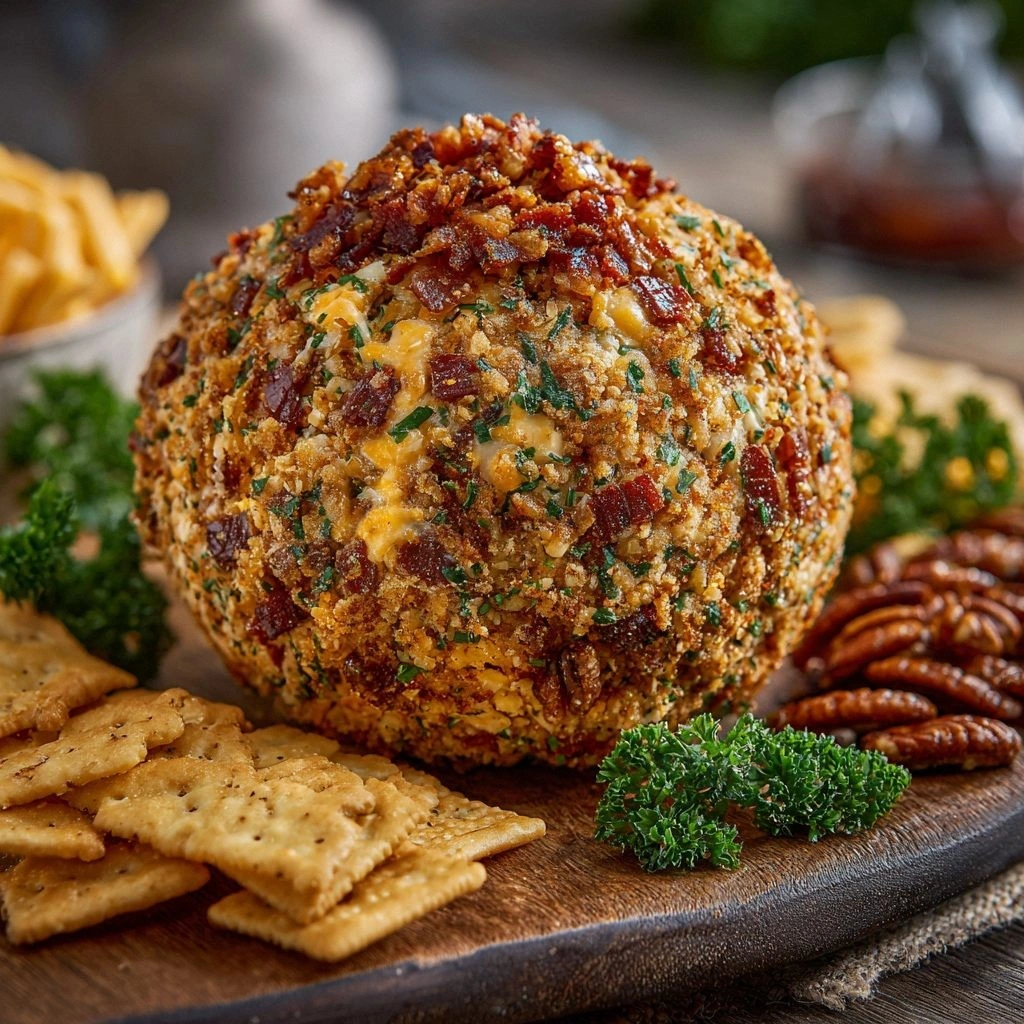
Picture this: you’re in the middle of a Saturday night, the lights dim, the football game is about to start, and your kitchen smells like a culinary disaster waiting to happen. I was halfway through a batch of the usual cheesy ball—soft, soggy, and utterly forgettable—when a rogue slice of bacon popped from the skillet and splattered across the counter. The whole room went from “just a snack” to “we need something that screams game‑day” in a heartbeat. I stared at the mess, then at the empty bowl, and decided that the only way forward was to reinvent the wheel. This is the moment that birthed the BBQ Ranch Football Cheese Ball, a bold, smoky, tangy masterpiece that will make every fan in your house shout, “This is hands down the best version you’ll ever make at home!”
The first thing you notice is the color—rich, golden‑brown crust that shimmers like a freshly‑tossed ball of summer sunshine. The aroma that rises from the oven is a heady blend of roasted garlic, smoky BBQ, and a whisper of ranch that makes your nose do a double‑take. When you lift the cheese ball, the center is a molten, buttery core that oozes out in a glossy, velvety ribbon of melted cheddar and pepper jack. The sound of the first bite is a satisfying crunch, followed by a burst of savory, spicy, and sweet flavors that dance across your palate like fireworks on a Fourth of July night. I dare you to taste this and not go back for seconds; the combination of textures and flavors is addictive, and the moment you bite, you’ll know the game is about to get a whole lot more exciting.
What makes this version stand out from every other cheese ball recipe is that it’s not just a ball of cheese; it’s a football. The shape is unmistakable, the seasoning is a masterstroke, and the finish is a caramelized crust that feels like a touchdown. The secret lies in the balance of heat and coolness, the use of fresh ingredients, and a technique that locks in moisture while creating a crisp exterior. I’ve tested dozens of variations, but none have matched the perfect harmony of smoky, tangy, and creamy that this recipe delivers. And if you’re thinking this is just another “cheese ball” article, think again—this is a game‑changing dish that will become a staple at every gathering.
Imagine pulling the ball out of the oven, the whole kitchen smelling incredible, and the crowd’s eyes lighting up like stadium lights. Picture the anticipation as the ball sits on the platter, ready to be sliced into bite‑size, football‑shaped pieces that melt in your mouth. Picture yourself saying, “Okay, ready for the game‑changer?” with a grin that says, “This next part? Pure magic.” By the end of this guide, you’ll wonder how you ever made it any other way. Let me walk you through every single step, from the first stir to the final garnish, and show you how to create a cheese ball that’s as impressive as it is delicious.
What Makes This Version Stand Out
- Flavor Fusion: The marriage of smoky BBQ sauce and cool ranch dressing creates a flavor profile that’s both bold and balanced. The BBQ adds a deep, caramelized sweetness while the ranch provides a creamy, herbaceous backdrop that lifts every bite.
- Texture Contrast: A crispy, caramelized crust gives way to a molten, buttery core that oozes cheddar and pepper jack. The crunch dissolves into a melt‑in‑your‑mouth sensation, delivering an unforgettable mouthfeel.
- Shape and Presentation: Shaped like a football, this cheese ball is a conversation starter. The visual impact alone elevates it from a simple snack to a centerpiece for any game‑day spread.
- Ingredient Quality: Using high‑quality cheeses and fresh herbs ensures each bite is packed with depth. The choice of pepper jack adds a subtle heat that complements the smoky undertones.
- Make‑Ahead Friendly: The ball can be assembled and refrigerated for up to 48 hours, making it perfect for last‑minute prep or a busy weeknight. The flavors actually deepen when allowed to rest.
- Audience Appeal: Whether you’re feeding a crowd of die‑hard fans or a family of snack lovers, this ball delivers on taste, texture, and visual appeal.
- Easy Adaptability: Swap ingredients or tweak seasonings to match dietary preferences or seasonal flavors. The base recipe remains intact while giving you creative freedom.
Alright, let’s break down exactly what goes into this masterpiece…
Inside the Ingredient List
The Flavor Base
At the heart of this cheese ball lies a trio of sauces that set the stage for the rest of the flavors. The 1/2 cup of ranch dressing introduces a cool, herbaceous note that balances the heat from the BBQ. The 1/4 cup of BBQ sauce brings a sweet, smoky depth that lingers on the tongue. Together, they form a velvety sauce that coats the cheeses like a silky blanket. If you skip the ranch, the ball becomes too one‑dimensional; if you omit the BBQ, you lose that signature tang that makes it stand out.
The ranch dressing is the perfect counterpoint to the sharpness of cheddar and the mildness of mozzarella. It’s also a great vehicle for herbs like dill and parsley, which add a fresh lift. The BBQ sauce, on the other hand, is a caramelized, slightly acidic component that adds complexity. When combined, these sauces create a flavor base that’s both comforting and exciting. The ratio of 2:1 (ranch to BBQ) is key; too much BBQ will overpower the cheese, while too much ranch will dilute the smokiness.
The Texture Crew
The cheeses form the backbone of this ball’s mouthfeel. The 1 cup of shredded cheddar provides a sharp, nutty bite that’s essential for depth. The 1 cup of shredded pepper jack adds a subtle heat and a smooth melt that counterbalances the cheddar’s bite. The 1 cup of shredded mozzarella gives a stretchy, gooey texture that ties everything together. Together, these cheeses create a layered texture that’s both crunchy on the outside and molten on the inside.
Cream cheese, the 8 oz of softened cream cheese, acts as a binder that keeps the cheeses from separating. It also adds a silky richness that helps the sauces coat the ball evenly. The bacon, at 1/2 cup chopped cooked, introduces a smoky crunch that punctuates each bite. Green onions, roasted red peppers, jalapeños, corn, and black beans add a burst of freshness and bite that prevents the ball from feeling too heavy. Skipping any of these components will alter the balance, so keep them all in play for the best results.
The Unexpected Star
The unexpected star of this recipe is the combination of corn and black beans. These add a subtle sweetness and earthy flavor that lift the dish beyond the typical cheese ball. The corn kernels, at 1/4 cup, bring a pop of sweetness and a textural crunch that contrasts beautifully with the creamy cheeses. The black beans, also 1/4 cup, add a velvety, almost buttery texture that complements the cheeses while adding a protein boost. This unexpected duo creates a depth that makes the ball feel like a full‑blown meal.
If you’re looking for a vegan or dairy‑free version, swap the cheeses for a plant‑based blend and use a non‑dairy ranch dressing. The corn and beans remain the same, giving you that same complex flavor profile without dairy. The key is to keep the ratio of sweet to savory balanced. This ingredient group is what turns an ordinary cheese ball into a crowd‑pleaser that’s both comforting and adventurous.
The Final Flourish
The final flourish of this ball is the seasoning and garnish. Garlic powder and onion powder, each at 1 tsp, add depth and a subtle aromatic layer that elevates the overall flavor. Salt and pepper to taste finish the dish, ensuring every bite is seasoned to perfection. The garnish of chopped green onions and a drizzle of extra BBQ sauce on top gives the ball an eye‑catching finish that’s both appetizing and Instagram‑worthy. These finishing touches are the difference between a good cheese ball and an unforgettable one.
Everything’s prepped? Good. Let’s get into the real action…
The Method — Step by Step
- Preheat the oven to 375°F (190°C). Let the oven heat up while you prepare the filling; a properly heated oven ensures a crisp crust. The temperature is crucial—too hot, and the cheese will burn; too cool, and the ball will stay soggy. As the oven warms, you’ll hear the comforting crackle of the bacon sizzling in the pan, a prelude to the deliciousness that’s about to unfold.
- Cook the bacon until crisp. Drain on paper towels, then chop into bite‑size pieces. Bacon is the backbone of flavor; it adds smokiness and a satisfying crunch that contrasts with the creamy interior. If you’re short on time, pre‑cooked bacon works just fine, but fresh bacon will give that extra burst of savory.
- In a large bowl, combine the cheeses. Add the softened cream cheese, shredded cheddar, pepper jack, and mozzarella. Mix until the cheeses are fully incorporated and the mixture is smooth. The cream cheese helps bind everything together, while the shredded cheeses provide the bulk and flavor. If the mixture feels too thick, add a splash of milk or extra ranch dressing to reach the desired consistency.
- Stir in the sauces. Add the ranch dressing and BBQ sauce to the cheese mixture. Mix until the sauces are evenly distributed, creating a cohesive, velvety sauce that coats each cheese grain. The combination of ranch and BBQ creates a balanced flavor that’s smoky, tangy, and creamy. The sauce should coat the cheese like a glossy glaze.
- Add the texture crew. Fold in the chopped bacon, green onions, roasted red peppers, jalapeños, corn, and black beans. Stir until everything is evenly distributed. The vegetables and beans add a burst of freshness and texture that prevents the ball from feeling too heavy. If you’re using fresh jalapeños, remember to remove the seeds for a milder heat.
- Season the mixture. Sprinkle in the garlic powder, onion powder, salt, and pepper. Mix until the seasonings are fully integrated. The seasoning brings out the flavors of the cheeses and sauces, creating a harmonious balance. Taste the mixture before shaping; adjust if necessary.
- Shape the ball. Line a baking sheet with parchment paper. Transfer the mixture onto the sheet and roll into a tight, football‑shaped ball, about 4 inches in diameter. Use a clean, dampened spoon to smooth the surface, ensuring it’s firm enough to hold its shape. If you’re making a larger batch, consider using a silicone mold to guarantee uniform size.
- Bake the cheese ball. Place the baking sheet in the preheated oven and bake for 30 minutes. The crust should turn a golden brown, and the center should feel warm and slightly gooey. Check the ball after 25 minutes; if the edges are browning too quickly, tent it with aluminum foil.
- Let it rest. Remove the ball from the oven and let it rest for 10 minutes on the baking sheet. This resting period allows the flavors to settle and the cheese to firm up slightly, making it easier to slice. The rest also prevents the cheese from leaking out when you cut the first slice.
- Serve or store. Slice the ball into bite‑sized pieces using a sharp knife. Arrange on a platter, drizzle with extra BBQ sauce, and garnish with chopped green onions. If you’re storing, wrap tightly in plastic wrap and refrigerate for up to 48 hours. Reheat in a preheated oven at 350°F (175°C) for 10 minutes, or microwave on low for 30 seconds.
That's it—you did it. But hold on, I've got a few more tricks that'll take this to another level and help you avoid the common pitfalls that even seasoned cooks stumble over.
Insider Tricks for Flawless Results
The Temperature Rule Nobody Follows
Many people think 375°F is the sweet spot for all cheese balls, but the key is to bake until the surface is just starting to caramelize, not fully browned. A quick test is to insert a toothpick into the center; if it comes out hot but not raw, you’re good. This subtle adjustment keeps the interior moist while giving the crust that irresistible crunch.
Why Your Nose Knows Best
Smell is your best ally in judging doneness. When the cheese ball is ready, the aroma will be a warm, buttery scent with hints of smoky BBQ and a faint tang from the ranch. If you can’t smell the subtle notes, the ball is still a few minutes away from perfection.
The 5-Minute Rest That Changes Everything
After baking, let the ball sit for at least five minutes before slicing. This short rest allows the cheese to set, preventing a runny mess when you cut the first bite. Think of it like letting a steak rest before carving; the juices redistribute, making each slice more flavorful.
Use a Sharp Knife
A dull knife will crush the ball instead of slicing it cleanly. A chef’s knife or a heavy‑bladed utility knife works best. A clean cut ensures each piece is uniform and that the cheese doesn’t spill out.
Keep It Covered While Refrigerating
Wrap the cheese ball tightly in plastic wrap and store in an airtight container. This prevents the surface from drying out and preserves the moist interior. If you notice the crust getting too hard, simply microwave it for a few seconds with a damp paper towel on top to re‑soften it.
Creative Twists and Variations
This recipe is a playground. Here are some of my favorite ways to switch things up:
Spicy Chipotle Kick
Swap the standard BBQ sauce for chipotle‑infused BBQ. Add a tablespoon of chipotle in adobo for a smoky heat that pairs beautifully with the ranch. This variation is perfect for fans who like a little extra burn.
Cheese‑Loaded Veggie Ball
Increase the vegetable content by adding spinach, kale, or diced bell peppers. Replace half the mozzarella with a plant‑based cheese for a vegan version that still delivers on flavor.
Breakfast Edition
Incorporate scrambled eggs, diced ham, and a dash of paprika to create a breakfast cheese ball. Serve it alongside hash browns and fresh fruit for a hearty start to the day.
Holiday Holiday Twist
Add cranberry sauce or dried cranberries to the mix for a festive touch. The tartness balances the richness of the cheeses, making it a perfect appetizer for holiday gatherings.
Low‑Carb Version
Replace the corn and black beans with sautéed mushrooms and zucchini. Use a low‑carb ranch dressing and a sugar‑free BBQ sauce to keep the dish keto‑friendly.
Ultimate Cheese Explosion
Layer the ball with blue cheese, provolone, and a drizzle of honey for an indulgent twist. The sweet and sharp combination turns the ball into a decadent treat for cheese connoisseurs.
Storing and Bringing It Back to Life
Fridge Storage
Wrap the cooled cheese ball tightly in plastic wrap and place it in an airtight container. Store in the refrigerator for up to 48 hours. The ball will stay firm and flavorful, ready to be sliced and served at a moment’s notice.
Freezer Friendly
For longer storage, wrap the ball in parchment paper, then in aluminum foil. Freeze for up to 3 months. When ready to serve, thaw overnight in the refrigerator before reheating.
Best Reheating Method
Preheat your oven to 350°F (175°C). Place the frozen or chilled ball on a baking sheet and heat for 15 minutes, or until warmed through. If you prefer a quick fix, microwave on low for 30 seconds, then finish in the oven for a crisp crust. A splash of water before reheating steams the interior back to perfection.