I was standing in my kitchen, half‑asleep, staring at a half‑baked batch of plain macarons that had turned out as flat as a pancake. The smell of cocoa was wafting from the pot where I’d been trying to melt dark chocolate, and I thought, “If only I could turn this disaster into a cozy winter miracle.” That moment sparked a dare from my roommate: “I bet you can’t make a macaron that tastes like a mug of hot chocolate and still looks like a work of art.” I accepted, and the result is a confection that makes the whole house feel like a cabin by the fire, with the kind of decadence that makes you want to hug the baker.
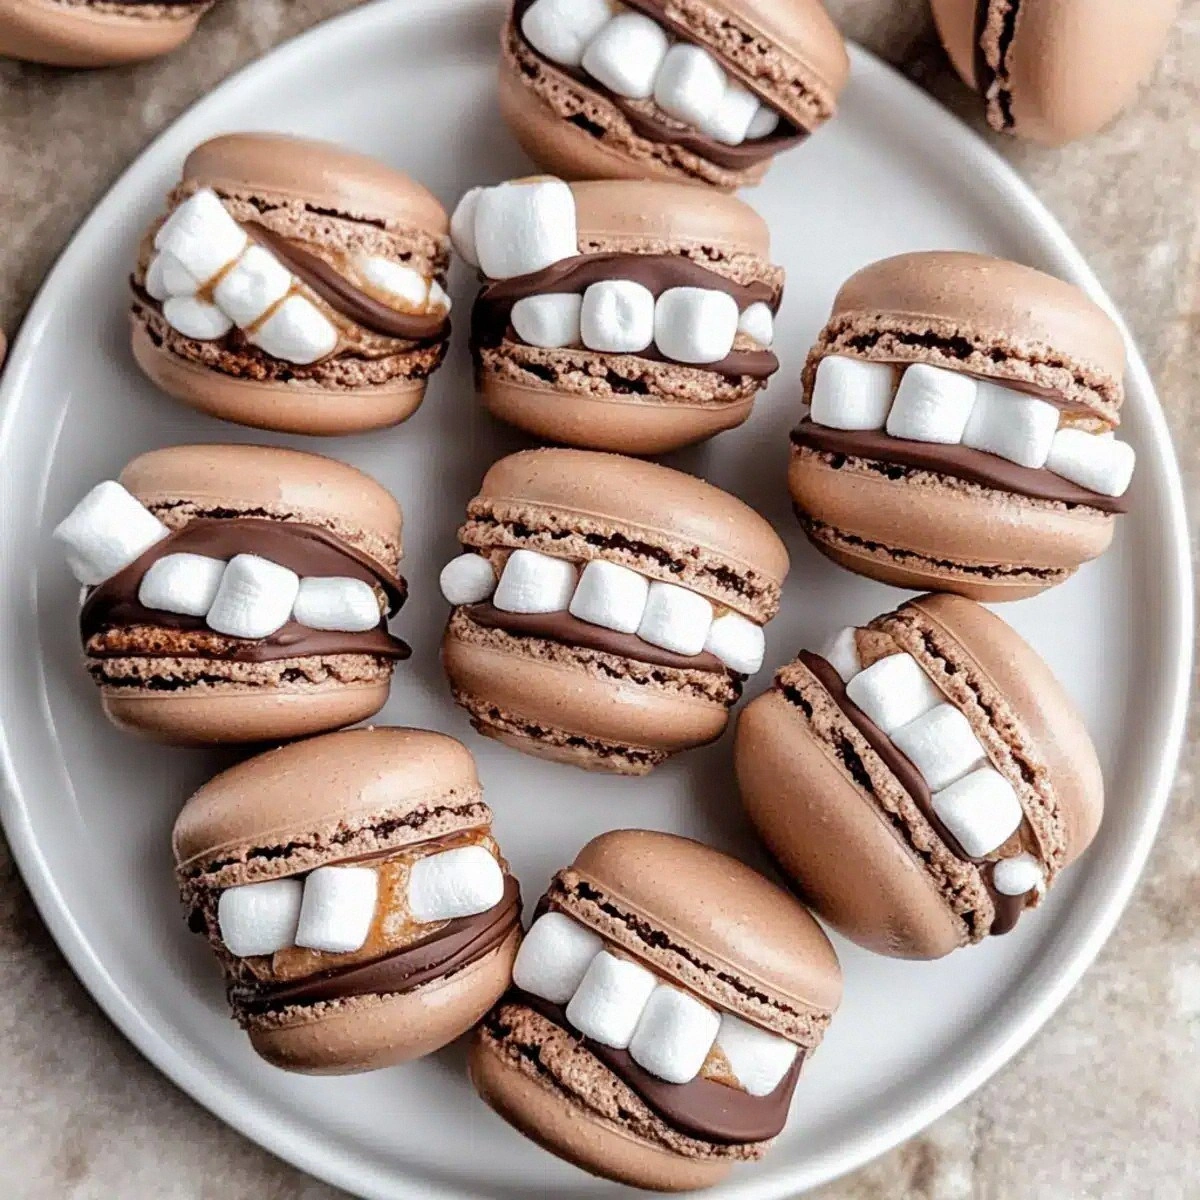
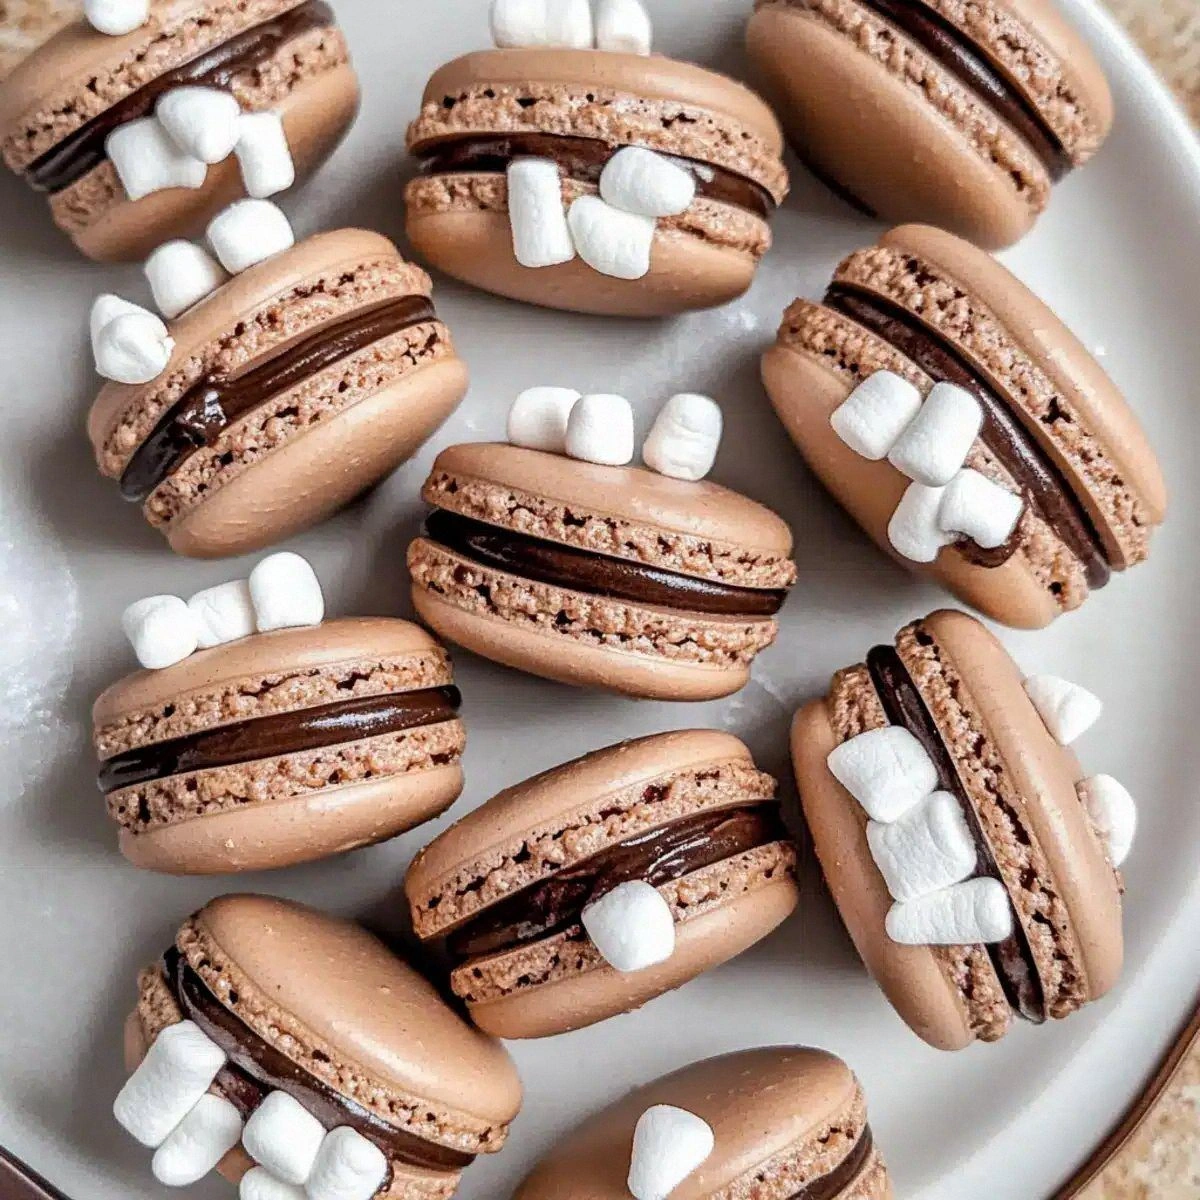
Picture this: a glossy, chocolate‑kissed top that cracks just enough to reveal a silky, marshmallow‑studded ganache underneath, the way a fresh snowfall settles on a pine branch. When you bite into it, the first thing you notice is the crisp snap of the shell, followed by a melt‑in‑your‑mouth wave of dark chocolate, cream, and a whisper of toasted marshmallow. The aroma is a head‑on collision of cocoa, sweet cream, and that nostalgic scent of hot chocolate that makes you think of woolen scarves and crackling fireplaces. Every sense is engaged, from the faint crunch of the almond‑flour‑infused shell to the warm, comforting hug you get from the filling.
What makes this version truly stand out is a secret weapon: a splash of heavy cream folded into the ganache, plus a handful of mini marshmallows that melt just enough to give the filling a fluffy, cloud‑like texture without turning it into a puddle. Most recipes get the balance wrong, ending up either too dry or too soggy, but I’ve cracked the code by tempering the chocolate and using a precise macaronage technique that locks in moisture. I’ll be honest — I ate half the batch before anyone else got a chance to try, and that’s a confession I’m willing to make because the flavor is that good.
Okay, ready for the game‑changer? The technique that elevates this recipe is a simple “double‑whisk” method that creates an ultra‑smooth batter, paired with a brief rest period that allows the shells to form a perfect skin before baking. This ensures they rise just enough to get that iconic “feet” while staying tender inside. Let me walk you through every single step — by the end, you’ll wonder how you ever made macarons any other way.
What Makes This Version Stand Out
- Taste: The deep, bittersweet cocoa from dark chocolate is balanced by the sweet, buttery almond flour, creating a flavor profile that feels like a hug in a bite.
- Texture: A crisp, airy shell gives way to a luxuriously smooth ganache studded with tiny marshmallow pearls that melt on the tongue.
- Simplicity: Despite the impressive result, the ingredient list is short, and the steps are straightforward once you master the macaronage.
- Uniqueness: Adding mini marshmallows to the filling is a playful twist that most traditional recipes overlook.
- Crowd Reaction: Guests invariably gasp, then dive back for seconds — I dare you to taste this and not go back for more.
- Ingredient Quality: Using high‑quality dark chocolate (at least 70% cacao) makes the flavor sing, while fresh almond flour prevents a gritty mouthfeel.
- Cooking Method: The low‑heat, slow‑bake technique yields perfectly risen shells without cracks or over‑dryness.
- Make‑Ahead Potential: These macarons keep beautifully for up to a week, making them ideal for holiday gatherings or a pre‑made dessert tray.
Inside the Ingredient List
The Flavor Base
Dark chocolate is the heart of this macaron, delivering that rich, slightly bitter backbone that mimics a classic mug of hot chocolate. I recommend a chocolate with at least 70% cacao; lower percentages can make the filling taste waxy. If you substitute with milk chocolate, you’ll lose that depth and end up with a candy‑like sweetness that overwhelms the almond notes.
The Texture Crew
Almond flour and cocoa powder form the dry mixture that gives the shells their delicate crunch. Almond flour should be finely ground and sifted multiple times to avoid any gritty texture. Coconut flour is a tempting swap, but it absorbs more liquid and can make the shells too dense.
The Unexpected Star
Mini marshmallows are the surprise element that turns a regular ganache into a fluffy, melt‑in‑your‑mouth surprise. They soften during the gentle heating of the ganache, creating pockets of airy sweetness. If you’re allergic to marshmallows, try a handful of toasted coconut flakes for a similar textural contrast.
The Final Flourish
Egg whites and cream of tartar provide the structure that makes macarons rise. Fresh, room‑temperature egg whites whip up to a glossy meringue; older whites can lead to a flat, uneven batch. A pinch of cream of tartar stabilizes the meringue, preventing it from weeping later on.
Everything's prepped? Good. Let's get into the real action...
The Method — Step by Step
Start by sifting together the almond flour, cocoa powder, and powdered sugar into a large bowl. Sifting at least three times eliminates lumps and ensures a smooth batter; you’ll notice the mixture becoming feather‑light, almost like powdered snow. This step is crucial because any graininess will show up in the final shell as a gritty texture. Once sifted, set the bowl aside while you prepare the meringue.
Separate three large egg whites into a clean, dry mixing bowl, making sure no yolk or shell fragments get in. Add the cream of tartar and begin whipping on medium speed until the mixture becomes frothy. Increase to high speed and gradually sprinkle in the granulated sugar, a tablespoon at a time, allowing each addition to dissolve before adding the next. The meringue should reach stiff peaks, forming glossy peaks that stand up straight when the whisk is lifted.
Kitchen Hack: If you’re nervous about over‑whipping, pause the mixer when the meringue looks glossy, then give it a quick whisk by hand to test the texture.Now comes the macaronage: gently fold the dry sifted mixture into the meringue using a rubber spatula. The motion is a slow, deliberate fold‑over‑fold, turning the bowl until the batter flows like lava and forms a thick ribbon when lifted. You’ll know it’s ready when the batter can be lifted and slowly drips back into the bowl without breaking the surface tension. This step is the most finicky, but trust me, it’s pure magic when you get it right.
Transfer the batter into a piping bag fitted with a 1‑inch round tip. Pipe 1‑inch circles onto a parchment‑lined baking sheet, leaving about an inch of space between each. Once all circles are piped, tap the tray firmly on the counter three times to release any air bubbles, then let the shells rest at room temperature for 30‑45 minutes. The surface should form a slight skin that doesn’t stick to your fingertip when touched.
While the shells are resting, preheat your oven to 300°F (150°C). This low temperature is essential for a gentle rise that creates the classic “feet” without cracking the tops. If you’re using a convection oven, reduce the temperature by 15°F to prevent over‑browning.
Bake the shells for 12‑15 minutes, rotating the tray halfway through for even color. The edges should start to pull away from the parchment, and the tops will have a matte finish. If you peek too early, the shells can collapse; trust the timer and let the heat do its work. When they’re done, the shells will feel firm to the touch but still have a slight give when pressed gently.
Watch Out: Opening the oven door too early can cause the shells to crack; resist the urge to check before the timer goes off.While the shells cool, melt the dark chocolate in a double boiler over low heat, stirring until completely smooth. Remove from heat and whisk in the heavy cream until the mixture becomes a glossy ganache. Add the mini marshmallows and let them melt gently, stirring until the ganache is uniform and glossy. This is the moment of truth: the ganache should coat the back of a spoon like liquid velvet.
Once the shells are completely cool (touch them; they should feel like a solid marble), pipe a generous dollop of the ganache onto the flat side of one shell, then sandwich it with its matching pair. Press lightly to spread the filling to the edges, but avoid squeezing out too much. The shells should cling together, creating a smooth, glossy top that hints at the marshmallow speckles inside.
Kitchen Hack: Chill the assembled macarons for 10 minutes before serving; this sets the ganache and makes the shells easier to handle.Finally, arrange the finished macarons on a platter and let them sit at room temperature for at least 30 minutes before serving. This resting period allows the flavors to meld, giving you that perfect balance of crunchy shell and melt‑in‑your‑mouth filling. Picture yourself pulling this out of the oven, the whole kitchen smelling incredible, and your friends reaching for seconds before you even have a chance to taste one.
That's it — you did it. But hold on, I've got a few more tricks that'll take this to another level...
Insider Tricks for Flawless Results
The Temperature Rule Nobody Follows
Macarons are temperature‑sensitive; even a few degrees can affect the rise. I always use an oven thermometer and set the heat a couple of degrees lower than the dial indicates. This prevents the tops from over‑browning while still allowing the feet to develop. A friend once cranked the oven to 350°F and ended up with cracked shells — a lesson learned the hard way.
Why Your Nose Knows Best
During the resting stage, trust your sense of smell. When the shells develop a faint, toasted almond aroma, they’re ready to bake. If you’re unsure, give a gentle sniff; the scent should be subtle, not overpowering. This sensory checkpoint is more reliable than a timer, especially in humid kitchens.
The 5‑Minute Rest That Changes Everything
After piping, let the shells sit for exactly five minutes longer than you think you need. This extra time lets the outer layer form a skin, preventing cracks in the oven. I once cut this short and ended up with a batch that stuck to the parchment like a sticky note.
The Double‑Whisk Technique
If you’re prone to over‑mixing, try the “double‑whisk” method: whisk the dry ingredients separately, then gently fold them into the meringue using a second whisk to lift and turn. This gives you better control over the batter’s consistency. I’ve found it reduces the risk of a runny batter that spreads too thin.
Cooling on a Wire Rack
Once out of the oven, transfer the shells to a wire rack instead of leaving them on the tray. This allows air to circulate, preventing steam from making the bottoms soggy. The result is a uniformly crisp base that pairs perfectly with the silky filling.
Creative Twists and Variations
This recipe is a playground. Here are some of my favorite ways to switch things up:
Peppermint Bliss
Add a teaspoon of crushed peppermint candy to the ganache for a festive minty kick. The cool peppermint balances the rich chocolate, making it perfect for holiday parties.
Spicy Chili Chocolate
Stir in a pinch of cayenne pepper or a few drops of chili oil into the ganache. The subtle heat adds depth and surprises the palate, ideal for adventurous eaters.
White Chocolate Raspberry
Swap the dark chocolate for white chocolate and fold in a spoonful of raspberry puree. The bright fruit notes contrast beautifully with the almond shell.
Coffee Infusion
Dissolve a tablespoon of instant espresso powder in the heavy cream before mixing with the chocolate. This creates a mocha‑marvel that’s perfect for brunch.
Nutty Crunch
Fold toasted chopped hazelnuts or pistachios into the ganache for added texture. The nutty crunch adds another layer of flavor that pairs well with the chocolate.
Storing and Bringing It Back to Life
Fridge Storage
Place the assembled macarons in an airtight container and store them in the refrigerator for up to 5 days. The cool environment keeps the ganache firm and the shells crisp. Before serving, let them sit at room temperature for 15‑20 minutes so the flavors fully awaken.
Freezer Friendly
Unassembled shells freeze beautifully for up to 3 months. Layer them between parchment sheets in a zip‑top bag to prevent sticking. When ready to use, thaw the shells in the fridge overnight, then assemble with fresh ganache.
Best Reheating Method
If the ganache has hardened, gently warm the assembled macarons in a 300°F oven for 3‑4 minutes. Add a tiny splash of water to the tray before reheating; the steam revives the ganache, bringing it back to that silky texture you love.