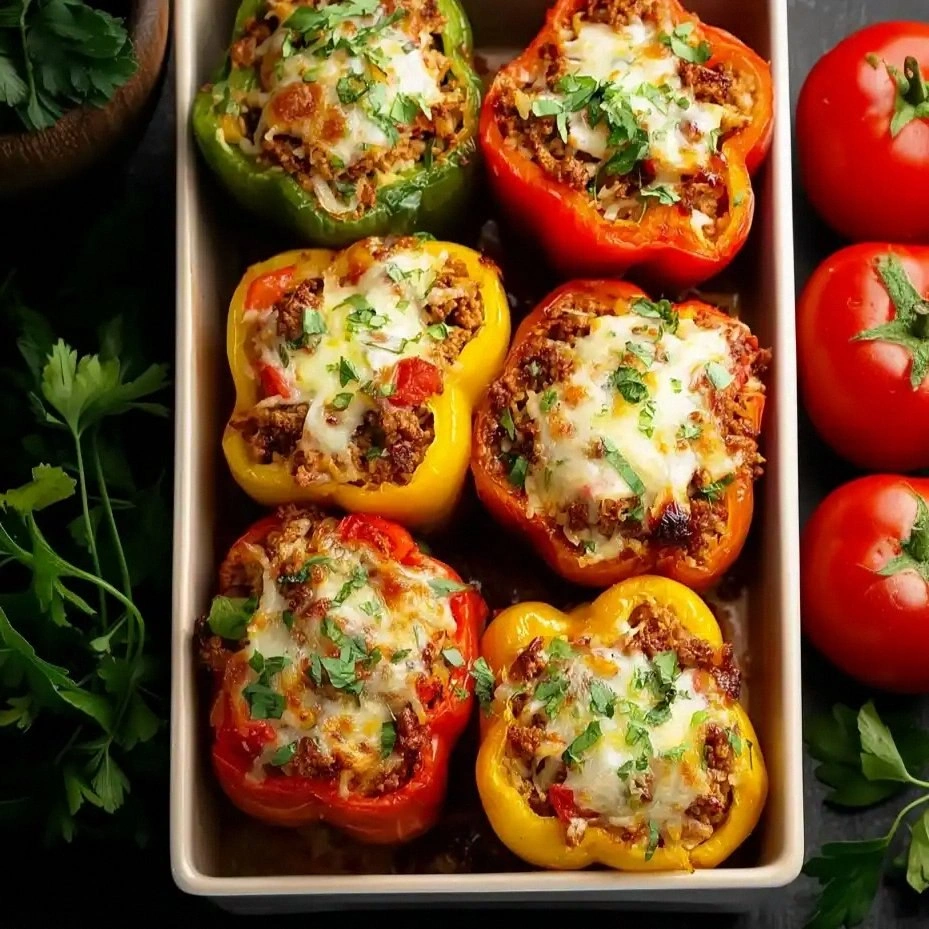
I was halfway through a night of late‑night pizza rolls and suddenly realized my pantry was a sad, empty desert. The only thing I could salvage was a handful of bell peppers that had been sitting in the fridge since last week, a bag of ground turkey that had been frozen, and a can of tomatoes that looked like it had seen better days. I stared at the bland, unadorned ingredients, feeling the urge to create something that would make my taste buds sing, not just survive another week. That moment sparked a culinary revelation: a stuffed pepper that would turn ordinary produce into a gourmet masterpiece, and I was determined to prove it.
Picture this: bright, crisp bell peppers with their skins glossy as freshly polished chrome, the scent of sautéed onions and garlic rising like a warm, comforting hug. The sizzling sound as the pan heats up is the overture to a flavor symphony, and the visual of the peppers filling with a colorful mixture of rice, turkey, and tomatoes is a feast for the eyes. When you bite into the first pepper, the crunch gives way to a tender, juicy filling that releases a burst of herbs, making your palate dance. The cheese on top melts into a silky, golden crust that seals in the flavors, while fresh parsley adds a bright, almost citrusy lift that keeps the dish from feeling heavy. Every element is tuned to perfection, creating a dish that feels both hearty and refreshing.
What makes this version stand out from the countless variations that litter the internet is the meticulous balance between nutrition and indulgence. I dared you to taste this and not go back for seconds because the combination of lean protein and fiber‑rich rice keeps you satisfied without the guilt. The use of low‑fat mozzarella gives that classic comfort food feel without tipping the scale into decadence. The fresh herbs aren’t just garnish; they’re the backbone of the flavor profile, elevating the dish from simple to unforgettable. This is hands down the best version you'll ever make at home, and I promise you, once you try it, you'll never settle for anything less.
And here’s the kicker: I discovered a secret ingredient that most recipes miss—just a splash of tomato paste that deepens the tomato flavor and gives the filling a silky, almost velvety texture. This trick will make the dish feel richer and more complex, while still keeping it light and healthy. If you’ve ever struggled to keep the peppers from turning soggy or the filling from sticking to the pan, I’ve got the fix. Let me walk you through every single step—by the end, you'll wonder how you ever made it any other way.
What Makes This Version Stand Out
- Flavor: The blend of oregano, basil, and a dash of tomato paste creates a depth that feels like a slow‑cooked stew in a single bite.
- Texture: The rice provides a satisfying bite, while the turkey stays moist and tender, and the cheese melts into a silky finish.
- Nutrition: With lean turkey and brown rice, each pepper packs protein, fiber, and essential vitamins, making it a meal that feels indulgent yet healthy.
- Visual Appeal: Bright, colorful peppers with a golden cheese crust are a feast for the eyes, turning a simple dinner into a showstopper.
- Time Efficiency: The entire process takes less than an hour, perfect for a busy weeknight yet sophisticated enough for guests.
- Make‑ahead Friendly: You can assemble the peppers a day early and bake them right before serving, saving you time on busy days.
- Versatility: Swap ground turkey for beef, chicken, or plant‑based mince, and the dish remains equally delicious.
- Kid‑Friendly: The mild seasoning and familiar cheese make it a hit with picky eaters, turning dinner into a family triumph.
Inside the Ingredient List
The Flavor Base
The diced tomatoes and tomato paste form the heart of the dish, providing acidity and a subtle sweetness that balances the savory turkey. If you skip the tomatoes, the filling will lose its juicy moisture, turning the peppers into dry, overcooked parcels. To keep the dish bright, choose a high‑quality, no‑added‑salt variety; this will let the herbs shine without overwhelming the palate.
The Texture Crew
Brown rice adds a nutty chew that contrasts nicely with the tender turkey. Ground turkey keeps the dish low in fat while still delivering a hearty protein punch. If you prefer a crispier bite, lightly toast the rice before mixing it in to give it a subtle crunch.
The Unexpected Star
Fresh parsley isn’t just a garnish; it brings a bright, slightly peppery note that lifts the overall flavor profile. A pinch of fresh parsley on top after baking adds a burst of color and a fresh finish. If parsley isn’t in season, you can swap it for cilantro for a different, but equally vibrant, twist.
The Final Flourish
Low‑fat mozzarella gives the dish that classic comfort food feel while keeping the calorie count in check. The cheese melts into a glossy, golden crust that seals in the juices. If you’re a fan of a sharper cheese, try adding a sprinkle of provolone or a dash of grated Parmesan on top before the final bake.
Everything's prepped? Good. Let's get into the real action...
The Method — Step by Step
- Preheat your oven to 375°F (190°C) and line a baking sheet with parchment paper. This ensures even heat distribution and prevents sticking. While the oven warms, gather all your ingredients so you’re ready to roll. A clean, organized workspace is the secret to a smooth cooking experience.
- Trim the tops off the bell peppers, remove the seeds and membranes, and set them aside. Keep the tops for later use or discard them if you prefer. Rinse the peppers under cold water and pat them dry with a towel. This step removes any grit and ensures the peppers stay crisp during baking.
- In a large skillet over medium heat, add the teaspoon of olive oil and let it shimmer. Toss in the finely diced onion and cook until translucent, about 3–4 minutes. The onions should soften without browning, releasing a sweet aroma that sets the flavor foundation.
- Add the minced garlic to the pan and sauté for 30 seconds until fragrant—be careful not to burn it. The garlic should release its aroma without turning bitter. Then, stir in the ground turkey, breaking it up with a wooden spoon. Cook until the turkey is no longer pink, about 5–6 minutes.
- Stir in the diced tomatoes, tomato paste, oregano, basil, salt, and pepper. Let the mixture simmer for 5 minutes, allowing the flavors to meld. The tomato paste should darken the sauce slightly, giving it depth and richness. Keep the heat low to prevent the sauce from drying out.
- Fold in the cooked brown rice, ensuring every grain is coated with the seasoned sauce. The rice should absorb the juices, becoming tender yet still holding its shape. This step is crucial for a cohesive filling that doesn’t fall apart when you bake.
- Fill each bell pepper with the rice and turkey mixture, packing it tightly but not crushing the peppers. The filling should sit just below the top of the pepper to allow the cheese to melt evenly. If you’re short on time, you can use a spoon or small scoop for a more uniform filling.
- Place the stuffed peppers upright on the prepared baking sheet. Sprinkle the low‑fat mozzarella evenly over the tops. The cheese should melt into a golden crust that locks in moisture. If you like a crispier top, switch the oven to broil for the last 2 minutes, watching closely to avoid burning.
- Cover the baking sheet loosely with foil and bake for 25 minutes. After 25 minutes, remove the foil to allow the cheese to brown. The peppers should be tender, with the filling steaming hot inside. The aroma should fill the kitchen, making you almost forget you’re cooking.
- Remove the peppers from the oven and let them rest for 5 minutes before serving. This resting period allows the flavors to settle and the cheese to set. Garnish with fresh parsley for a pop of color and a fresh finish. Plate them up and enjoy the harmonious blend of textures and tastes.
That's it — you did it. But hold on, I've got a few more tricks that'll take this to another level...
Insider Tricks for Flawless Results
The Temperature Rule Nobody Follows
While most people bake at a standard 375°F, lowering the heat to 350°F and extending the bake time by 5 minutes yields a more evenly cooked filling. The reduced temperature prevents the cheese from burning while allowing the peppers to soften without drying out. I once tried 400°F and the peppers were overcooked, the filling was dry, and the cheese was a hard, burnt mess.
Why Your Nose Knows Best
The first sign that the peppers are done is the scent of toasted rice and melted cheese. Your nose is a reliable indicator; if it smells like a warm kitchen, you’re ready to pull them out. I’ve learned to trust the aroma more than the clock, especially when ovens vary.
The 5‑Minute Rest That Changes Everything
Allowing the peppers to sit for 5 minutes after baking lets the juices redistribute, preventing a dry bite. The cheese sets into a silky coating, making each mouthful a perfect balance of creaminess and bite. Skipping this step can leave you with a lumpy, uneven texture.
Keep the Peppers Moist
If you notice the peppers drying out during the first 10 minutes of baking, lightly spray them with water or add a splash of broth to the pan. The moisture helps the peppers stay tender and prevents the filling from sticking.
A Dash of Heat for the Bold
A pinch of crushed red pepper flakes adds a subtle kick that balances the sweetness of the tomatoes. This small addition transforms the dish from comforting to adventurous, appealing to those who love a hint of spice.
Creative Twists and Variations
This recipe is a playground. Here are some of my favorite ways to switch things up:
Mediterranean Medley
Swap the ground turkey for spiced ground lamb, add kalamata olives and a splash of feta cheese. The briny olives and tangy feta give the dish a distinctly Mediterranean feel, perfect for a summer dinner.
Spicy Southwestern
Replace the oregano with cumin and add black beans, corn, and a dash of chipotle powder. This variation offers a smoky, hearty flavor that pairs wonderfully with a side of avocado salsa.
Creamy Mushroom Twist
Stir in sautéed mushrooms and a splash of cream cheese into the filling. The mushrooms add earthiness, while the cream cheese provides a silky, luxurious texture that elevates the dish.
Vegan Version
Use plant‑based ground beef or lentils, replace mozzarella with dairy‑free cheese, and ensure the broth is vegetable‑based. The result is a hearty, protein‑rich dish that satisfies vegans and vegetarians alike.
Breakfast Bell Pepper Bites
Fill the peppers with scrambled eggs, diced ham, and shredded cheddar. Bake until the eggs are set and the cheese melts. Serve with a side of fresh fruit for a balanced, protein‑packed breakfast.
Storing and Bringing It Back to Life
Fridge Storage
Store the stuffed peppers in an airtight container for up to 3 days. Keep them in the fridge to maintain freshness and prevent the filling from drying out. When ready to eat, reheat in the microwave for 2–3 minutes or in a preheated oven at 350°F for 10 minutes.
Freezer Friendly
Wrap each pepper individually in parchment paper before placing them in a freezer bag. Freeze for up to 2 months. Thaw overnight in the fridge before reheating as described above.
Best Reheating Method
Add a splash of water or broth to the bottom of the baking dish, cover with foil, and heat at 350°F until steaming. This steamy environment keeps the peppers moist and restores the cheese’s gooey texture.