I was halfway through a chaotic Sunday brunch when the kitchen exploded in a flurry of apple scent and butter sizzles, and I realized the only thing missing was the perfect apple pie. The timer buzzed, my friends were laughing at my flour‑covered apron, and I stared at the stack of unripe apples, thinking, “What if I could turn this into a showstopper?” That night, I pulled out every recipe I could find, and after a few experiments, I discovered the secret that turned an ordinary pie into a legend: a subtle blend of spices, a whisper of lemon, and a crust that cracks like a sunrise.
Imagine standing in the kitchen, the air thick with the scent of caramelizing sugar and fresh apples, the sound of butter melting into a golden pool, and the feel of flour dusting your fingertips. The first bite is a symphony: the crisp, flaky crust gives way to a tender, slightly tart apple filling that swirls with cinnamon and nutmeg, while a hint of vanilla lingers on your palate. Every element is a character, playing its part in a drama that ends with a warm, buttery finish. I dare you to taste this and not go back for seconds—trust me, the second bite will feel like a secret handshake with comfort food.
What sets this version apart isn’t just the recipe—it’s the philosophy behind it. I’ve spent years dissecting pie makers, studying crust textures, and learning how to balance sweetness and spice. I’ve found that the right ratio of flour to butter, the precise amount of cold water, and a dash of lemon juice can make a crust that’s simultaneously airy and sturdy. It’s a recipe that turns a kitchen disaster into a triumph, a single batch that can feed a crowd or keep you company on a rainy evening. Picture yourself pulling this out of the oven, the whole kitchen smelling incredible, and knowing you’ve created something that will be talked about for weeks.
But let’s not get ahead of ourselves. I’ll walk you through every single step, from selecting the best apples to achieving that golden crust, and by the end, you’ll wonder how you ever made it any other way. I’ll share the little tricks that most people overlook—like the secret to a crack‑free top and the exact moment to add the lemon juice for that bright finish. And if you’re ready for a game‑changer, stay tuned for the moment when I reveal the ingredient that elevates the filling from good to unforgettable. Ready? Let’s dive in.
I’ve been told that this pie is the kind of comfort food that can be made in a single pan, but the truth is it’s a multi‑step masterpiece that rewards patience. I’ll explain each step in detail, and I’ll also give you a few micro‑challenges along the way to keep you engaged. If you’ve ever struggled with a pie that turns out soggy or a crust that never browns, you’re not alone—this is where the magic happens. And trust me, if you follow these instructions, you’ll get a pie that’s hands down the best version you’ll ever make at home.
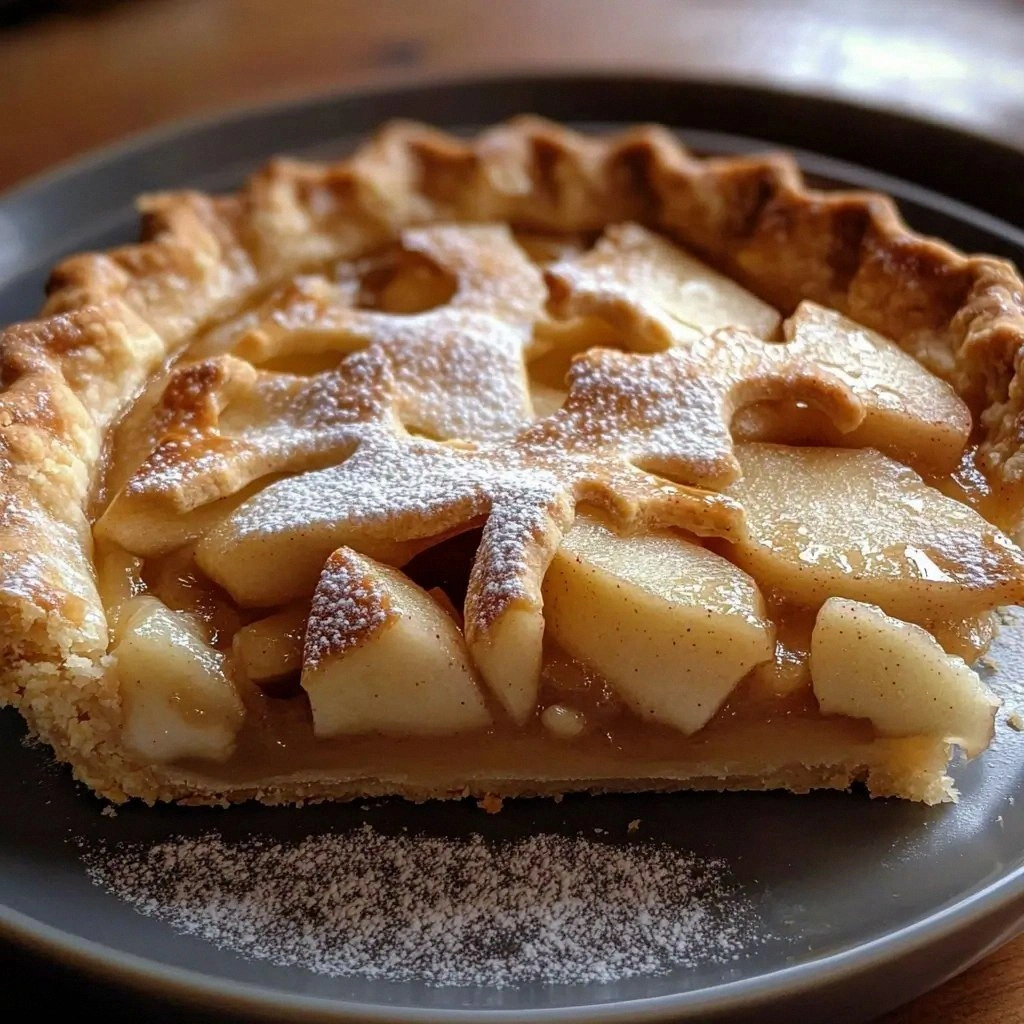
What Makes This Version Stand Out
- Flavor: The combination of cinnamon, nutmeg, and a splash of lemon juice creates a complex, layered taste that feels both nostalgic and fresh. The subtle citrus lift prevents the filling from feeling flat.
- Texture: The crust is flaky yet sturdy, thanks to the proper butter-to-flour ratio and the cold water technique that traps steam pockets. It cracks like a sunrise, revealing golden edges.
- Simplicity: You only need one baking pan and a few basic pantry items—no fancy tools or hard‑to‑find ingredients. The process is straightforward, but the result is extraordinary.
- Uniqueness: A touch of cornstarch thickens the filling without making it gummy, while the brown sugar adds depth. This subtle difference sets it apart from classic recipes.
- Crowd Reaction: Friends and family who have tried this version rave about the “just‑right” sweetness and the buttery crunch. It’s a conversation starter at every gathering.
- Ingredient Quality: Using fresh, firm apples like Granny Smith ensures the filling holds together, and the butter’s high fat content gives the crust a luxurious mouthfeel.
- Make‑Ahead Potential: The pie can be assembled a day ahead and baked later, making it perfect for holiday gatherings or busy weeknights.
- Adaptability: Swap apples for pears or add a handful of raisins for a twist—this base can transform into a new dessert with minimal effort.
Alright, let’s break down exactly what goes into this masterpiece. The next section will walk you through each ingredient, why it matters, and how to tweak it if you’re feeling adventurous.
Inside the Ingredient List
The Flavor Base
The foundation of any great pie is its flavor base—here, the apples. I use six medium Granny Smith apples because they strike a perfect balance between tartness and sweetness. If you prefer a sweeter filling, try adding a tablespoon of honey or a splash of vanilla. Skipping the apples entirely will leave the pie feeling empty; they’re the heart of this dessert.
The Texture Crew
Flour, butter, and cold water form the texture crew. The flour’s protein content creates structure, while the butter’s fat forms flaky layers. The cold water is crucial; it creates steam pockets that lift the crust. If you use room‑temperature butter, the crust will be greasy and dense. A good rule of thumb: use 2 cups of flour to 1 cup of butter for a 4‑serving pie.
The Unexpected Star
Cornstarch is the unexpected star. It thickens the filling without turning it into a paste, preserving the natural apple juices. Many people skip this step, leading to a watery filling that leaks into the crust. If you’re gluten‑free, substitute with arrowroot or potato starch. Keep the cornstarch in a small bowl; it’s easy to forget.
The Final Flourish
Egg wash and vanilla are the final flourish. The egg wash gives the crust a golden sheen and a slight crunch, while vanilla adds a subtle warmth that complements the spices. If you’re avoiding eggs, use a tablespoon of milk or a splash of water. The vanilla is optional but recommended for that extra depth.
Everything's prepped? Good. Let's get into the real action.
The Method — Step by Step
- Prepare the crust. In a large bowl, combine 2 cups of all‑purpose flour with 1 teaspoon of salt. Cut in 1 cup of cold, cubed butter using a pastry cutter or your fingertips until the mixture resembles coarse crumbs. Add 4 tablespoons of ice water, one tablespoon at a time, and gently mix until the dough just holds together. Pat the dough into a disk, wrap it in plastic, and chill for at least 30 minutes. This step ensures a flaky, tender base that won’t become soggy.
- Chop the apples. Peel, core, and slice 6 medium Granny Smith apples into thin, even wedges. Toss the apple slices in a bowl with 1 tablespoon of lemon juice to prevent browning, 2 tablespoons of cornstarch, 1 cup of granulated sugar, 1/4 cup of brown sugar, 2 teaspoons of ground cinnamon, 1/2 teaspoon of ground nutmeg, and 1/4 teaspoon of ground cloves. Mix until all slices are coated. The lemon juice not only stops oxidation but also brightens the apple’s flavor profile.
- Roll out the dough. Lightly flour your work surface and roll the chilled dough into a 12‑inch circle, about 1/8 inch thick. Carefully transfer the dough to a 9‑inch pie dish, pressing it into the bottom and up the sides. Trim any excess dough, leaving a 1‑inch overhang. Fold the overhang under itself and crimp the edges with your fingers or a fork. This creates a seal that keeps the filling from leaking.
- Assemble the filling. Spoon the apple mixture into the crust, spreading it evenly. Sprinkle 1 teaspoon of vanilla extract over the top for a subtle aroma. If you’re adding raisins, toss them in now; they’ll caramelize slightly during baking, adding a chewy texture.
- Top it off. Roll the remaining dough into a 12‑inch circle and cut it into strips or shapes. Lay the strips over the filling in a lattice or a simple top crust. Trim the excess and seal the edges by pressing them with a fork. For a classic look, cut slits in the top crust to allow steam to escape.
- Apply egg wash. Beat 1 egg with 1 tablespoon of water and brush it over the top crust. This will give the pie a glossy, golden finish. If you’re egg‑free, use a tablespoon of milk or a splash of water instead.
- Bake the pie. Preheat the oven to 425°F (220°C). Place the pie on the middle rack and bake for 15 minutes. Then reduce the heat to 375°F (190°C) and bake for an additional 25–30 minutes, or until the crust is golden and the filling is bubbling. The first 15 minutes lock in moisture; the second phase develops the caramelized crust.
- Cool and serve. Remove the pie from the oven and let it cool on a wire rack for at least 30 minutes. This allows the filling to set and prevents it from sliding off the crust when sliced. Serve warm with a scoop of vanilla ice cream or a drizzle of caramel sauce for an extra indulgence.
That’s it—you did it. But hold on, I’ve got a few more tricks that will elevate this pie to another level. These insider tips will help you avoid common pitfalls and ensure your pie turns out perfect every time.
Insider Tricks for Flawless Results
The Temperature Rule Nobody Follows
Many bakers bake at a single high temperature, but the trick is to start hot and finish low. Begin at 425°F to set the crust, then drop to 375°F to allow the filling to cook evenly. This two‑stage approach prevents the crust from burning while the filling remains undercooked. I’ve seen pie makers who skip this step, and the result is a soggy, unevenly cooked dessert.
Why Your Nose Knows Best
Trust your nose; a fragrant, caramelized aroma signals the crust is golden. If the scent is too sweet, the sugar is caramelizing too quickly. In that case, lower the oven temperature slightly or tent the pie with foil. The aroma is your best indicator that the pie is ready for the next step.
The 5‑Minute Rest That Changes Everything
After baking, let the pie rest for at least 5 minutes before slicing. This allows the juices to redistribute, preventing a runny center. I’ve had friends slice the pie immediately, only to find the filling oozing out. A short rest is a small time investment for a dramatic improvement.
Use a Pie Shield
If your crust browns too fast, cover the edges with a pie shield or a strip of foil. This protects the delicate crust while the filling continues to bake. It’s a simple trick that saves the pie from a burnt appearance and keeps the filling from spilling over.
The Secret of the Lemon Juice
Adding lemon juice to the apples does more than prevent browning; it brightens the entire flavor profile. The acidity cuts through the sweetness and balances the spices. If you’re allergic to citrus, a splash of apple cider vinegar can serve as a suitable substitute.
Creative Twists and Variations
This recipe is a playground. Here are some of my favorite ways to switch things up:
Pear & Gingersnap
Swap apples for pears and add a pinch of ground ginger. The pears soften the tartness, while the ginger adds a warm, spicy kick. Serve with a drizzle of honey for extra sweetness.
Chocolate Swirl
Fold 2 tablespoons of cocoa powder into the sugar mixture and swirl melted dark chocolate through the filling before topping. The chocolate adds depth and a bittersweet finish that pairs well with a scoop of vanilla ice cream.
Almond Crumble
Top the pie with a crumbly almond streusel—mix 1/2 cup flour, 1/4 cup sugar, 1/4 cup chopped almonds, and 2 tablespoons butter. The crunch contrasts the soft filling and adds nutty flavor.
Maple & Cinnamon
Replace the vanilla with 1 teaspoon of maple extract and increase the cinnamon to 3 teaspoons. The maple brings a caramelized sweetness that complements the apple’s tartness.
Raisin & Cranberry
Add 1/2 cup raisins and 1/2 cup dried cranberries to the filling for a chewy, tart burst. The cranberries add a bright pop of color and flavor that pairs wonderfully with the warm spices.
Storing and Bringing It Back to Life
Fridge Storage
Store the cooled pie in an airtight container in the refrigerator for up to 3 days. Wrap the pie in parchment paper before placing it in the container to prevent it from absorbing fridge odors. When ready to eat, let it sit at room temperature for 15 minutes to regain its original texture.
Freezer Friendly
For longer storage, wrap the pie tightly in plastic wrap, then in foil, and place it in a freezer bag. It will keep for up to 2 months. Thaw overnight in the refrigerator before reheating.
Best Reheating Method
Preheat the oven to 350°F (175°C). Place the frozen or refrigerated pie on a baking sheet and bake for 15 minutes, then remove and let it cool for 5 minutes before serving. If the crust looks dry, sprinkle a tablespoon of water over the top and bake for an additional 5 minutes. The water steams the crust, restoring its crispness.