I remember the night I first stumbled into the kitchen with a bag of stale graham crackers, a half‑empty fridge, and a craving that felt like a tiny rebellion. The air smelled of burnt sugar from the last time I tried a cheesecake and the faint citrus of fresh raspberries that were just about to be harvested. I laughed at the irony of a dessert that could feel like a dessert, and decided to turn that mishap into a masterpiece. I was determined to make a pink velvet cheesecake that would not only satisfy the sweet tooth but also become the talk of the table.
Picture this: the first bite melts on your tongue, the creamy filling tingles with a hint of vanilla, and the bright burst of raspberry takes you on a quick trip to a sun‑kissed berry patch. The crust is a golden, buttery crunch that holds the silky center without crumbling. The kitchen is filled with the aroma of toasted crumbs and the faint scent of citrus that lingers in the air, making every inhale a promise of flavor. I could almost hear the gentle sighs of my friends as they taste the first spoonful and instantly know this is something special.
What sets this version apart from the countless other cheesecake recipes floating around the internet is the meticulous layering of textures and the intentional use of natural raspberry puree to deepen the flavor profile. I dared to add a splash of red food coloring to give it that luscious, Instagram‑ready hue without sacrificing authenticity. The result is a dessert that feels like a velvet ribbon of pink, each bite a symphony of sweet, tart, and creamy notes that dance together. I’m not just sharing a recipe; I’m offering an experience that will have your guests asking for seconds.
If you’ve ever been disappointed by a cheesecake that turns out too dense or too runny, this recipe is your salvation. By the end of this guide, you’ll see how each step, each ingredient, and each technique is designed to bring out the best in this dessert. Let me walk you through every single step — by the end, you'll wonder how you ever made it any other way.
What Makes This Version Stand Out
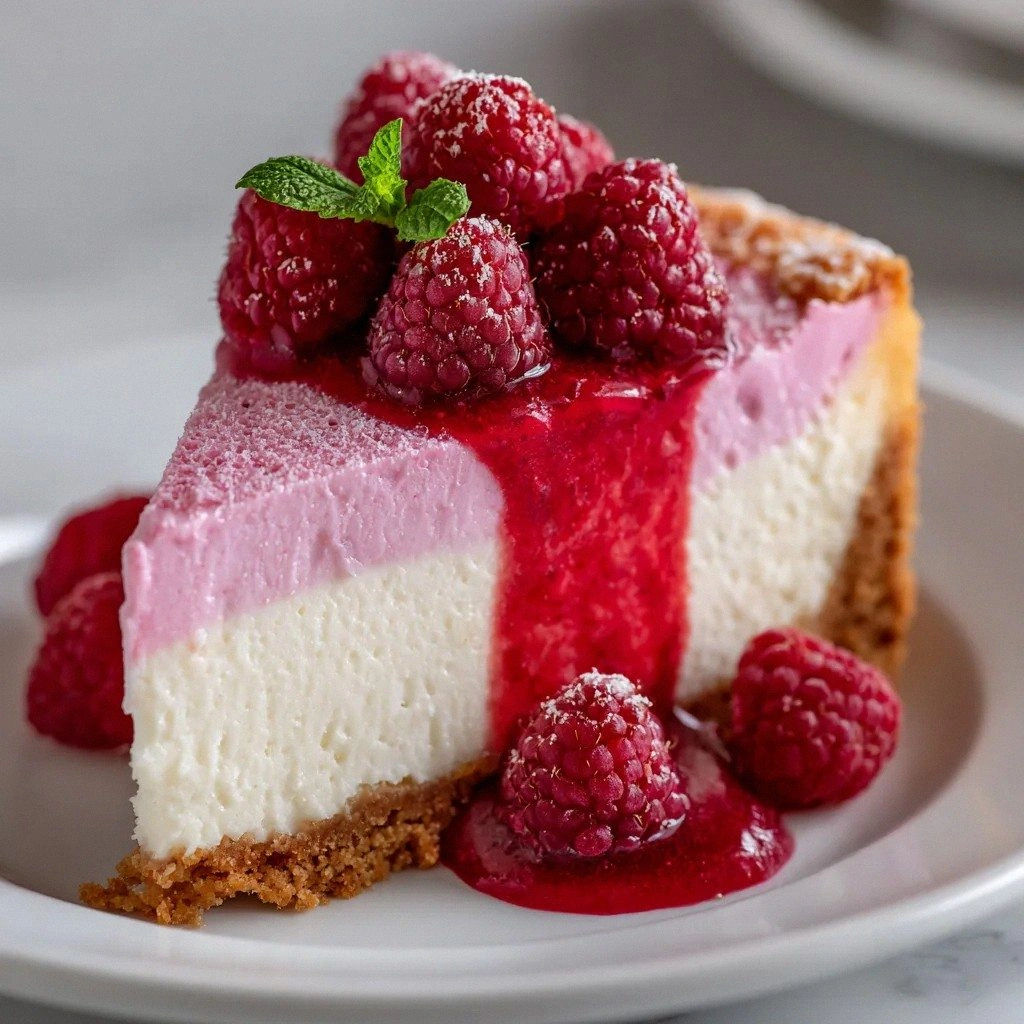
- Texture: The crust is crisp yet buttery, providing a satisfying crunch that contrasts with the silky filling. The use of fresh raspberries and a touch of puree adds a subtle bite that keeps the palate engaged.
- Flavor: The combination of vanilla extract and raspberry puree creates a layered taste that is both sweet and tart, unlike the flat flavor profile of many store‑bought cheesecakes.
- Color: A few drops of red food coloring elevate the visual appeal, turning the cheesecake into a showstopper that feels celebratory.
- Ease: The recipe uses pantry staples and a straightforward method, making it approachable for both novices and seasoned bakers.
- Make‑ahead: It can be assembled and refrigerated for up to 24 hours, allowing you to focus on other preparations while the cheesecake sets perfectly.
- Crowd‑pleaser: Friends rave about the balance of flavors, and the pink hue is a conversation starter at any gathering.
- Ingredient Quality: By selecting high‑quality cream cheese and fresh raspberries, the final product feels luxurious and indulgent.
- Technique: The method of gently folding the batter with a rubber spatula preserves the airy structure, preventing a heavy, dense finish.
Alright, let's break down exactly what goes into this masterpiece...
Inside the Ingredient List
The Flavor Base
Graham cracker crumbs form the backbone of the crust, delivering a sweet, slightly nutty flavor that complements the richness of the filling. If you skip them, your cheesecake will lack that essential crunch and will feel like a flat, soggy slab. For a gluten‑free option, use almond flour or oat crackers; the texture will shift slightly but still provide a satisfying bite.
The Texture Crew
Unsalted butter binds the crumbs together, giving the base a buttery depth without the briny aftertaste of salted butter. Cream cheese is the star—softened to room temperature, it becomes silky and smooth, ensuring a velvety mouthfeel. Sour cream adds a tang that cuts through the sweetness, creating a balanced profile that lingers on the tongue.
The Unexpected Star
Fresh raspberries are not just a garnish; they infuse the filling with a natural tartness that brightens the overall flavor. Raspberry puree concentrates the berry essence, delivering a punch of flavor without the bulk of whole fruit. If you don’t have fresh berries, frozen raspberries thawed and pureed will work just fine, though the texture may be slightly softer.
The Final Flourish
Granulated sugar sweetens the batter, balancing the tartness of the raspberries and the richness of the cream cheese. Vanilla extract adds warmth and depth, acting as a flavor bridge that ties everything together. A few drops of red food coloring give the cheesecake its signature pink hue, making it visually stunning without altering the taste.
Everything's prepped? Good. Let's get into the real action...
The Method — Step by Step
- Preheat your oven to 325°F (165°C) and line the bottom of a 9‑inch springform pan with parchment paper. This prevents sticking and gives the crust a clean edge. The oven should be fully preheated before you begin, ensuring an even bake from the start.
- In a large bowl, combine the graham cracker crumbs with the melted unsalted butter. Use a fork to mix until the crumbs are evenly coated, forming a moist, crumbly mixture. The butter should be just melted—if it's too hot, the crumbs might clump.
- Press the crumb mixture into the bottom of the prepared pan, using the back of a spoon or the bottom of a glass to compact it firmly. A tight crust is essential for a stable cheesecake that holds its shape during baking and cooling.
- In a separate bowl, beat the cream cheese until smooth and fluffy. This step is crucial; any lumps will translate into a gritty texture in the final product. Add the granulated sugar and continue beating until the mixture is pale and airy.
- Add the vanilla extract and mix until incorporated. Then, fold in the fresh raspberries and raspberry puree gently with a rubber spatula. The goal is to distribute the berries without breaking them, preserving small pockets of fruit for texture.
- Incorporate the eggs one at a time, beating gently after each addition. The batter should remain silky and glossy. If it starts to look curdled, stop and whisk vigorously for a few seconds.
- Fold in the sour cream and a few drops of red food coloring until the batter is uniformly pink. The color should be vibrant but not overpowering. The sour cream also helps keep the cheesecake tender and moist.
- Pour the batter over the crust and tap the pan gently on the counter to release any air bubbles. Place the pan on a baking sheet and bake for 30–35 minutes, or until the edges are set and the center has a slight wobble. The cheesecake should still feel a little soft in the middle—this ensures a creamy finish.
- Remove from the oven and allow the cheesecake to cool in the pan for 15 minutes before transferring to a wire rack. This cooling period lets the cheesecake set further and prevents cracks.
- Refrigerate for at least 4 hours, preferably overnight, to allow the flavors to meld and the texture to firm up. The longer it rests, the more the raspberry flavor deepens.
- Before serving, run a knife around the edge of the springform pan to loosen the cheesecake, then carefully remove the ring. Slice with a sharp knife, wiping it clean between cuts for a neat presentation.
That's it — you did it. But hold on, I've got a few more tricks that'll take this to another level...
Insider Tricks for Flawless Results
The Temperature Rule Nobody Follows
Keep the batter at room temperature before baking; a cold batter can cause the cheesecake to crack. If your kitchen is chilly, let the batter sit out for 15 minutes. The batter should feel like a soft sponge, not a hard dough.
Why Your Nose Knows Best
The aroma of vanilla and toasted crumbs is a sign that the flavors are developing correctly. If the scent feels flat, it might be time to adjust the vanilla or add a splash more sugar.
The 5‑Minute Rest That Changes Everything
After baking, let the cheesecake sit in the oven with the door closed for 5 minutes before removing it. This gradual cooling prevents a sudden temperature drop that can cause cracks.
The Gentle Fold
When adding eggs, fold them in with a gentle motion instead of beating. This preserves air pockets, giving the cheesecake a light, airy texture.
The Final Chill
Refrigerate the cheesecake for at least 6 hours; the longer it chills, the more the flavors integrate, resulting in a richer taste. If you’re short on time, a 3‑hour chill will still yield a decent result.
Creative Twists and Variations
This recipe is a playground. Here are some of my favorite ways to switch things up:
Chocolate Velvet
Add 1/2 cup of melted dark chocolate to the batter and reduce the raspberry puree by half. The chocolate’s bitterness balances the sweetness, creating a decadent dessert that still has a subtle berry undertone.
Lemon Zest Surprise
Incorporate the zest of one lemon into the crust and add a tablespoon of lemon juice to the batter. The citrus sharpness cuts through the richness, giving the cheesecake a refreshing lift.
Almond Crunch
Replace graham cracker crumbs with almond flour and sprinkle chopped toasted almonds on top before baking. The nutty flavor adds depth and a delightful crunch.
Coconut Cream Twist
Swap half the cream cheese for coconut cream and add shredded coconut to the crust. The tropical flavor pairs beautifully with the raspberry, creating a beach‑inspired dessert.
Salted Caramel Drizzle
Prepare a simple salted caramel sauce and drizzle it over the cooled cheesecake. The salty sweetness enhances the raspberry flavor and adds a glossy, indulgent finish.
Berry Medley
Combine raspberries with strawberries, blueberries, and blackberries in a 1:1 ratio. The medley creates a colorful, complex berry profile that appeals to all ages.
Storing and Bringing It Back to Life
Fridge Storage
Store the cheesecake in an airtight container in the refrigerator for up to 5 days. Keep it covered with plastic wrap to prevent it from absorbing other odors and to maintain moisture.
Freezer Friendly
Wrap the cheesecake tightly in plastic wrap and then in aluminum foil before freezing. It can be frozen for up to 3 months. Thaw overnight in the refrigerator before serving.
Best Reheating Method
To reheat, place the cheesecake on a baking sheet and warm it in a 250°F (120°C) oven for 10 minutes. Add a splash of water to the pan to create steam, which helps the cheesecake stay moist and creamy.