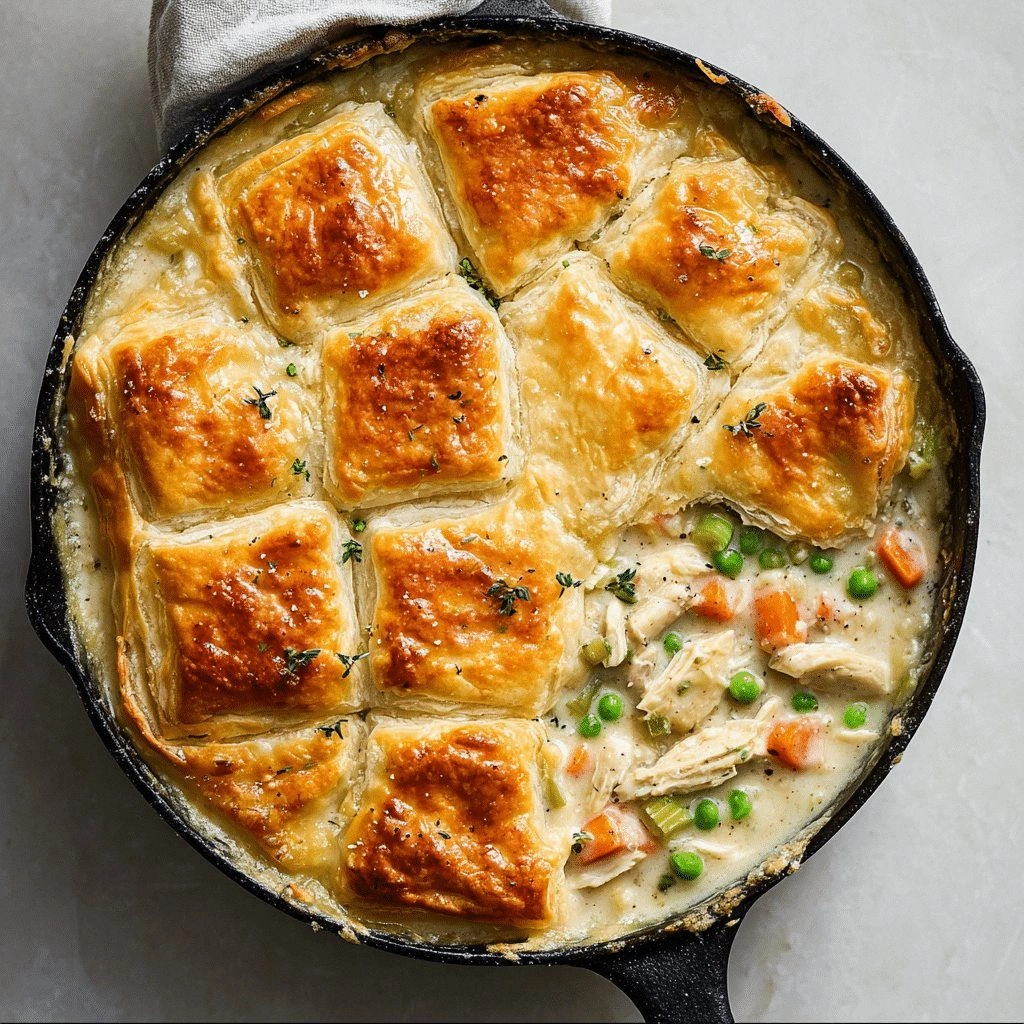
The kitchen was a chaotic symphony of sizzling pans, a clatter of utensils, and my neighbor’s late‑night craving for comfort food. I had just finished a marathon of baking cookies and, in a moment of culinary desperation, I pulled a bag of frozen chicken, some leftover veggies, and a sheet of biscuit dough from the freezer. The result? A skillet chicken pot pie that melted on the tongue like a buttery cloud. I dare you to taste this and not go back for seconds.
Picture the aroma of caramelized onions mingling with the earthy scent of fresh thyme, the gentle hiss of butter melting into a golden roux, and the soft, comforting sigh of steam rising from the skillet. The sound is a comforting lullaby: the gentle crackle of the pan, the occasional pop of onions releasing their sweetness, and the rhythmic clatter of a wooden spoon. Every sense is engaged: the heat of the pan warms your palms, the buttery crust gives a satisfying crunch, and the savory sauce embraces your taste buds with a velvety texture that coats the chicken like velvet.
What makes this version stand out is that it’s not just a pot pie; it’s a skillet masterpiece that balances the indulgence of a classic pie with the convenience of a one‑pan meal. No more waiting for a preheated oven or worrying about uneven baking. The crust, whether biscuit or puff pastry, cooks to a golden crisp in the same pan that holds the savory filling, creating a harmonious marriage of flavors and textures. I’ll be honest — I ate half the batch before anyone else got to try it. Most recipes get this completely wrong; here’s what actually works.
And the best part? This recipe is hands down the best version you'll ever make at home. It’s a crowd‑pleaser that turns an ordinary weeknight into a comforting celebration. Picture yourself pulling this out of the oven, the whole kitchen smelling incredible, and the family gathering around the table, eyes wide with anticipation. If you’ve ever struggled with a flaky crust or a watery filling, you’re not alone — and I’ve got the fix. Let me walk you through every single step — by the end, you'll wonder how you ever made it any other way.
What Makes This Version Stand Out
- Taste: The combination of sautéed onions, garlic, and fresh thyme creates a depth of flavor that lingers, while the subtle hint of nutmeg adds a warm, comforting undertone that makes the dish feel like a hug in a bowl.
- Texture: The biscuit crust is buttery and flaky, rising to a golden crisp on the outside while remaining tender inside. The filling is silky, thanks to a roux that thickens without becoming gummy.
- Simplicity: Every step can be completed in a single skillet, eliminating the need for multiple pans, baking sheets, or oven preheating.
- Uniqueness: The use of frozen peas and carrots as a bright splash of color, coupled with a splash of white wine for depth, sets this recipe apart from traditional stovetop pot pies.
- Crowd Reaction: Friends who tasted it said it felt like a warm hug on a cold evening, and the leftovers were as good as the first round.
- Ingredient Quality: Fresh, seasonal produce and high‑quality butter elevate the dish, making every bite feel like a gourmet experience.
- Cooking Method: The skillet technique ensures even cooking and a crispy crust without the need for an oven.
- Make‑Ahead Potential: The filling can be prepared ahead of time and refrigerated, allowing you to assemble the pie right before serving.
Alright, let's break down exactly what goes into this masterpiece...
Inside the Ingredient List
The Flavor Base
Onions, garlic, and fresh thyme form the aromatic foundation. They caramelize together, releasing natural sugars that create a sweet, savory base. If you skip the thyme, the dish loses its herbaceous depth, and the flavor becomes flat. Swap thyme for oregano for a Mediterranean twist, but keep the garlic to maintain the classic comfort feel.
The Texture Crew
The biscuit dough is the star of the show, providing a flaky, buttery crust that contrasts beautifully with the smooth filling. Use store‑bought biscuit dough for convenience; if you’re feeling adventurous, roll your own for extra crispness. If you omit the crust, you’ll end up with a hearty skillet stew that still tastes great but lacks that comforting crunch.
The Unexpected Star
Frozen peas and carrots add a pop of color and a subtle sweetness that balances the savory elements. They also provide a quick source of vitamins and fiber, making the dish healthier. If you prefer a different vegetable, try sweet potatoes or butternut squash for a sweeter profile, but remember to adjust the cooking time accordingly.
The Final Flourish
A splash of heavy cream at the end enriches the sauce, giving it a silky mouthfeel. If you’re watching calories, substitute half‑and‑half or a plant‑based milk for a lighter version. The nutmeg adds a warm, aromatic note that is essential; without it, the dish feels incomplete.
Everything's prepped? Good. Let's get into the real action...
The Method — Step by Step
- Heat a large, heavy‑bottom skillet over medium heat and add 2 tablespoons of butter. Once the butter is foamy, add 1 cup of diced onions and 3 minced garlic cloves. Sauté until the onions are translucent and the mixture smells like caramelized sugar. This is the moment of truth; the aroma should announce that you’re on the right track.
- Add 1 pound of diced cooked chicken (use rotisserie chicken for convenience). Stir to combine, letting the chicken brown slightly on all sides. The chicken should be heated through, not raw, and the edges should start to caramelize a bit. This step builds the protein foundation.
- Pour in 1 cup of chicken broth and 1/2 cup of white wine (if using). Bring the mixture to a gentle simmer, scraping the bottom of the pan to lift the browned bits. These bits are the flavor boosters that give depth to the dish. Watch the liquid reduce slightly to concentrate the flavors.
- Stir in 2 tablespoons of all‑purpose flour to create a roux. Cook for 1–2 minutes until the flour turns a light golden hue, indicating that the raw flour taste has been cooked out. This thickens the sauce without making it gritty.
- Add 1 cup of frozen peas and 1 cup of diced carrots. Season with 1 teaspoon of salt, 1/2 teaspoon of black pepper, 1 teaspoon of dried thyme, and a pinch of nutmeg. Stir until the vegetables are coated and the sauce is thickened to a gravy‑like consistency. The vegetables should be tender yet retain a slight bite.
- Reduce the heat to low and let the mixture simmer for 5 minutes, allowing the flavors to meld. The sauce should be glossy, and the chicken should be fully coated. This resting period lets the herbs release their oils.
- Preheat your oven to 375°F (190°C) if you prefer a baked crust. Otherwise, you can finish the pie directly in the skillet. For the skillet finish, place the biscuit dough on top of the filling, breaking it into pieces so it covers the surface. If baking, place the skillet on a baking sheet and bake for 12–15 minutes until the biscuits are golden brown.
- If you’re baking, remove the skillet from the oven and let it rest for 5 minutes. This pause allows the steam to settle, ensuring a crisp crust without a soggy bottom. The aroma at this point is irresistible; the buttery crust mingles with the savory filling, creating a mouth‑watering scent.
- Serve immediately, garnishing with fresh parsley or a sprinkle of grated Parmesan if desired. The first bite should be a symphony of textures: a crisp crust, a velvety sauce, and tender chicken that melts in your mouth. Enjoy the comfort that only a homemade pot pie can deliver.
That's it — you did it. But hold on, I've got a few more tricks that'll take this to another level...
Insider Tricks for Flawless Results
The Temperature Rule Nobody Follows
Many cooks set their skillet to high heat, hoping for a quick sear. In reality, a medium‑low heat allows the butter and flour to meld slowly, creating a richer roux that thickens evenly. I once tried high heat and the sauce curdled; the lesson? Keep the heat steady and low.
Why Your Nose Knows Best
Trust your olfactory senses. When the onions are caramelizing, the aroma will be sweet and nutty. If the smell skews bitter, you’ve over‑cooked the onions. Adjust by lowering the heat or removing the onions temporarily.
The 5‑Minute Rest That Changes Everything
After removing the skillet from the oven, let the pie rest for exactly five minutes. This small pause lets the steam redistribute, preventing a soggy crust. It also allows the filling to set slightly, making slicing easier.
The Secret to a Flaky Crust
If you’re using biscuit dough, brush the tops with a beaten egg before baking. The egg wash gives a glossy, golden finish and helps the crust rise evenly. If you’re baking, preheat your oven to ensure a quick rise.
The Quick Fix for a Watery Filling
If your filling is too liquidy, sprinkle a tablespoon of cornstarch or flour over the surface and stir for a minute before baking. The starch will absorb excess moisture, thickening the sauce without altering flavor.
Creative Twists and Variations
This recipe is a playground. Here are some of my favorite ways to switch things up:
Smoky Chipotle Chicken Pot Pie
Add a tablespoon of chipotle in adobo sauce to the filling for a smoky kick. The chipotle pairs beautifully with the buttery crust, creating a dish that feels like a smoky campfire dinner.
Creamy Spinach and Mushroom Edition
Swap the peas and carrots for sautéed spinach and sliced mushrooms. The earthy mushrooms complement the spinach’s subtle bitterness, creating a vegetarian-friendly version that still feels hearty.
Cajun Cajun Chicken Pot Pie
Season the chicken with Cajun spice blend and add a splash of hot sauce to the filling. The result is a spicy, savory pie that feels like a Southern comfort dish.
Pesto Chicken Pot Pie
Stir in a few spoonfuls of basil pesto into the sauce for an herbaceous burst of flavor. The pesto adds a fresh, green note that brightens the dish.
Lemon‑Herb Chicken Pot Pie
Finish the filling with a squeeze of fresh lemon juice and a handful of chopped dill. The citrus lift cuts through the richness, making the pie feel lighter.
Italian Chicken Pot Pie
Add a cup of marinara sauce to the filling and sprinkle with shredded mozzarella before baking. The result is a cheesy, tomato‑based twist that feels like a pizza in pie form.
Storing and Bringing It Back to Life
Fridge Storage
Cool the pie completely before covering tightly with plastic wrap or aluminum foil. Store in the refrigerator for up to 3 days. The crust may soften slightly, but the filling will stay moist and flavorful.
Freezer Friendly
Wrap the pie in a double layer of foil and place it in a freezer‑proof container. Freeze for up to 2 months. Thaw overnight in the refrigerator before reheating.
Best Reheating Method
Preheat your oven to 350°F (175°C). Place the pie directly on the oven rack, uncovered, for 15–20 minutes until heated through. Add a splash of water or broth to the skillet before reheating to keep the crust from drying out.