I still remember the disaster that birthed these Chocolate Ricotta Fudgy Truffles like it was yesterday. Picture this: midnight, pajamas covered in cocoa powder, and a failed attempt at fancy French truffles that looked more like sad chocolate pebbles than anything you'd serve to company. I was ready to chuck the whole mess in the trash when my Italian neighbor knocked on my door, took one whiff, and said "ma che, you just need ricotta!" What happened next was nothing short of culinary alchemy. The creamy ricotta transformed those sad little lumps into the most impossibly smooth, intensely chocolatey bites that melted on your tongue like a dream. That first taste? Pure revelation. The chocolate hit you first, deep and dark, then the ricotta worked its magic, creating this cloud-like texture that made regular truffles feel like eating chalk.
Here's the thing — most truffle recipes are basically chocolate and cream, right? But they end up either too sweet, too hard, or they just sit there in your mouth like a chocolate brick. Not these babies. The ricotta changes everything. It keeps them impossibly tender, almost mousse-like in the center, while still giving you that satisfying snap when you bite through the chocolate coating. And the flavor? It's like someone took the best chocolate cheesecake you've ever had and condensed it into a bite-sized sphere of joy. I dare you to taste these and not go back for seconds. Actually, I dare you to stop at a dozen.
What really makes this version special is how it bridges that gap between impressive and approachable. You don't need fancy equipment or culinary school techniques. You need a bowl, a spoon, and the patience to let chocolate work its magic. The ricotta does all the heavy lifting, creating this luscious texture that makes people think you spent hours tempering chocolate and checking temperatures. Meanwhile, you were probably dancing around the kitchen in your socks, sampling the mixture "just to make sure it's okay."
Let me walk you through every single step — by the end, you'll wonder how you ever made it any other way.
What Makes This Version Stand Out
Ridiculously Fudgy: These aren't your typical dense, heavy truffles. The ricotta creates this melt-in-your-mouth texture that's almost like chocolate mousse wearing a truffle costume. They dissolve on your tongue in the most magical way, leaving behind this intense chocolate flavor that lingers like a beautiful memory.
Lightning Fast: From pantry to plate in under an hour, with most of that being chill time. While other truffle recipes have you babysitting tempering chocolate and checking temperatures with candy thermometers, this one lets the ricotta do all the texture work. You literally stir, chill, roll, and you're done.
Foolproof Texture: The ricotta acts like insurance against dry, crumbly truffles. Even if you slightly overcook your chocolate or your kitchen is too warm, these still turn out perfectly smooth and creamy. It's like having a pastry chef's expertise built right into the recipe.
Make-Ahead Champion: These actually taste better after a day in the fridge, making them perfect for dinner parties or holiday gifts. They'll keep for two weeks, getting even more intensely chocolatey as they age. Most recipes get worse over time — these get better.
Flavor Depth: The slight tang from the ricotta balances the chocolate's sweetness, creating this sophisticated flavor profile that tastes like something from a high-end chocolatier. It's the same principle behind adding coffee to chocolate cake — the ricotta just makes everything taste more complex and intentional.
Crowd-Pleasing Power: I've never met anyone who could eat just one. They're sophisticated enough for food snobs but approachable enough for kids. The almonds add this perfect crunch that makes people go "ooh, what's that?" right before they pop another one in their mouth.
Customizable Canvas: Once you master the base recipe, you can flavor these a million different ways. Orange zest, espresso powder, a splash of bourbon — the ricotta base plays well with everything. I once made a batch with candied ginger that disappeared before they even made it to the serving plate.
Inside the Ingredient List
The Flavor Base
Whole-milk ricotta cheese is the secret weapon here, providing the truffles with a luscious texture while keeping them moist and tender. Don't even think about reaching for that low-fat stuff — you need the full-fat version to get that dreamy, cloud-like consistency. The ricotta's mild, slightly sweet flavor acts like a blank canvas, letting the chocolate shine while adding body and richness. When you mix it in, it creates this gorgeous, almost mousse-like texture that makes regular truffles feel like eating chocolate-flavored rocks. If you absolutely can't find fresh ricotta, you can use cream cheese as a last resort, but you'll lose that light, airy quality that makes these special.
The Chocolate Foundation
Dark chocolate is where the magic happens — for that rich, deep flavor, it's all about the quality! I'm talking about the good stuff, at least 60% cacao, preferably from a brand that lists cocoa butter as one of the first ingredients. Melting this beauty creates the fudginess we crave, but here's the key: don't go too dark. Anything above 80% makes these taste bitter and sophisticated in a way that scares people away from having seconds. The chocolate needs to play nicely with the ricotta's sweetness, creating this perfect balance that makes people close their eyes when they taste it. Chop it fine before melting — it makes the process smoother and prevents any weird grainy bits in your finished truffles.
The Texture Team
Chopped almonds bring the crunch party to these smooth operators, offering a delightful contrast to the truffles with their nutty flavor and bit of texture. Don't you dare use pre-chopped nuts from a jar — they've lost all their oils and taste like cardboard. Toast them yourself in a dry pan until they smell like heaven and make that satisfying crackling sound when you bite into one. The size matters here: you want them chopped small enough to roll into the truffles easily, but not so fine that they disappear completely. Think of them as little surprise bursts of crunch that keep each bite interesting rather than just providing background noise.
The Supporting Cast
A touch of honey helps round out the chocolate's bitterness and helps bind everything together. The liquid gold adds this subtle floral note that makes people ask "what's that amazing flavor?" without being able to put their finger on it. Vanilla extract might seem basic, but it amplifies the chocolate like a volume knob, making everything taste more intensely of itself. A pinch of sea salt is non-negotiable — it's like turning on a light switch for all the other flavors, making the chocolate taste more chocolatey and the ricotta taste creamier. Don't skip it, even if you're tempted. And finally, a tablespoon of butter adds shine and helps the truffles set up with that professional-looking snap when you bite into them.
The Method — Step by Step
- Start by setting up your chocolate melting station — this next part? Pure magic. Chop your dark chocolate into small, even pieces so it melts uniformly without any stubborn chunks. Set up a double boiler by placing a heatproof bowl over a pot of barely simmering water, making sure the bowl doesn't touch the water. This gentle heat prevents the chocolate from seizing up and turning grainy, which is basically the culinary equivalent of watching your dreams die. Stir occasionally with a rubber spatula, and watch as those glossy chunks transform into liquid velvet. The smell alone will have you dipping in a finger for a taste, but resist — we're going for truffle perfection here.
- While your chocolate is slowly melting into liquid gold, drain your ricotta in a fine-mesh sieve set over a bowl. Most recipes skip this step and then wonder why their truffles are weepy and sad. Give it a good 15 minutes to let all that excess moisture drip away — you want the ricotta thick and creamy, not watery. Press it gently with a spoon to help things along, but don't go crazy and mash it into oblivion. The goal is ricotta that's the consistency of thick Greek yogurt, ready to absorb all that chocolate goodness without making your truffles fall apart at the first sign of room temperature.
- Toast your almonds now while you're waiting — trust me, your nose knows when they're done. Dump them into a dry skillet over medium heat and shake the pan every 30 seconds so they brown evenly instead of burning in spots. That moment when your kitchen starts smelling like marzipan and the nuts make little popping sounds? That's when you know they're perfect. Dump them onto a plate immediately to stop the cooking, because carryover heat will take them from golden to bitter faster than you can say "oh no." Let them cool completely before chopping — hot nuts are soft nuts, and you want them crisp for maximum textural contrast.
- Now comes the moment of truth — combining your melted chocolate with the ricotta. Wait until your chocolate is smooth and just warm to the touch, not hot, or you'll end up with chocolate scrambled eggs (which sounds gross because it is). Scrape the drained ricotta into a large bowl and add the honey, vanilla, and salt, stirring until everything is smooth and well combined. Pour the melted chocolate over this mixture in thirds, folding gently with a spatula after each addition. The batter should start pulling away from the sides of the bowl and look like the most luxurious chocolate frosting you've ever seen.
- Fold in three-quarters of your chopped almonds, saving the rest for rolling later. This is where you get to play chocolatier — the mixture should be thick enough to hold its shape but still pliable enough to scoop and roll. If it seems too soft, pop it in the fridge for 10 minutes to firm up. Too stiff? Let it sit at room temperature for a few minutes until it's workable. You're looking for the consistency of play-dough that's been left out for an hour — soft, moldable, but not sticky.
- Time to roll! This is the fun part where you get to play with your food without anyone yelling at you. Set out a sheet pan lined with parchment paper and grab a small cookie scoop or melon baller if you have one — it keeps everything uniform and professional looking. Scoop out walnut-sized portions and roll them quickly between your palms. The heat from your hands will help smooth out any cracks or seams. Work in small batches, keeping the mixture in the fridge between sessions so it stays firm and manageable.
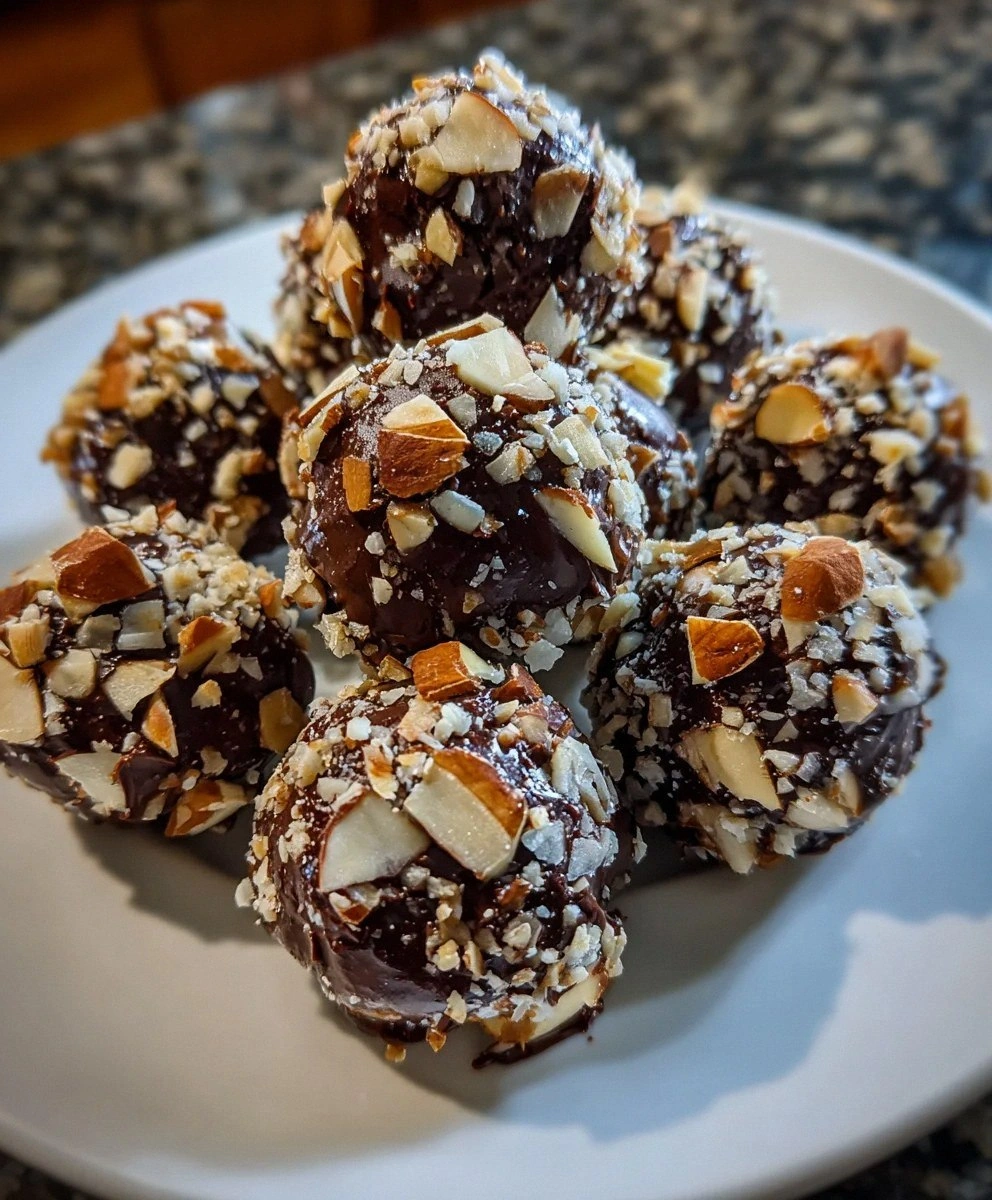
- Roll each truffle in your reserved chopped almonds, pressing gently so they adhere. Don't be shy here — you want a good coating that provides that satisfying crunch when you bite in. If the almonds aren't sticking, roll the truffles in your hands for a few seconds first — the warmth will make the surface slightly tacky. Place them back on the parchment-lined sheet as you go, and don't worry if they're not perfectly round — rustic is charming, and they'll taste incredible regardless of their Instagram-worthiness.
- The final chill is crucial — pop the whole sheet pan into the fridge for at least 30 minutes to let everything set up properly. This is when the flavors meld together and the texture transforms from good to absolutely transcendent. If you can wait longer, do it — overnight is even better. Just cover them loosely with plastic wrap so they don't absorb any weird fridge odors. That first bite after the chill? The chocolate shell gives way to this impossibly smooth, almost mousse-like center that'll make you close your eyes involuntarily.
- Bring them to room temperature for 10 minutes before serving — this is the step that separates good truffles from life-changing ones. Cold chocolate doesn't release its full flavor potential, so that brief warming period lets all the nuances shine through. The ricotta keeps them from getting too soft, so you don't have to worry about them turning into puddles. Arrange them on a platter, maybe dust with a little cocoa powder for that professional touch, and watch them disappear faster than you can say "who wants dessert?"
That's it — you did it. But hold on, I've got a few more tricks that'll take this to another level...
Insider Tricks for Flawless Results
The Temperature Rule Nobody Follows
Here's where most people mess up: they work with chocolate that's either too hot or too cold. Your melted chocolate should feel just warm to the touch — like a comfortable bath, not a hot tub. If it's steaming, let it cool down before mixing or you'll scramble the ricotta and end up with chocolate cottage cheese (gross). Same goes for your kitchen — if it's a sweltering summer day, crank up the AC or the truffles will soften faster than ice cream on hot pavement. I learned this the hard way during a July heatwave when my beautiful truffles turned into chocolate puddles before I could even photograph them.
Why Your Nose Knows Best
Trust your sense of smell at every stage — it's your built-in quality control. When toasting almonds, the moment your kitchen smells like marzipan, they're done. When melting chocolate, if you catch even a whiff of anything burnt, pull it off the heat immediately. And here's a pro tip: if your chocolate mixture starts to smell like fudge, it's probably getting too hot and you should cool it down fast. Your nose is more reliable than any timer, and it's saved me from countless kitchen disasters. A friend tried to rush the toasting step once — let's just say her smoke alarm became very familiar with her neighbors.
The 5-Minute Rest That Changes Everything
After you mix the chocolate and ricotta, let the mixture rest for exactly five minutes before rolling. This isn't just kitchen busywork — it's science. The chocolate needs time to cool slightly and set up, while the ricotta firms up just enough to make rolling easier. Skip this step and you'll be dealing with sticky, uncooperative truffle mix that sticks to everything except itself. I timed it once out of curiosity, and that five-minute rest is the difference between truffles that roll like a dream and ones that make you want to throw everything in the trash.
The Rolling Technique That Professionals Use
Here's the secret: roll between your palms for exactly three seconds, no more. Any longer and the heat from your hands starts melting the surface, creating sticky truffles that won't hold their coating. Work with cold hands if possible — run them under cold water first if your kitchen is warm. And don't try to make perfect spheres — slightly irregular truffles look artisanal and homemade in the best way. If you've ever struggled with rolling truffles that look like they came from a factory, you're not alone — and I've got the fix. Embrace the rustic charm!
The Storage Secret That Doubles Shelf Life
Most people just throw truffles in a container and hope for the best, but here's what actually works: add a small piece of bread to the storage container. The bread absorbs excess moisture that could make your truffles weep and get sticky, keeping them perfect for weeks instead of days. Change the bread piece every few days, and your truffles will stay as pristine as the day you made them. I discovered this accidentally when I stored some truffles with a piece of bread for lunch and found them in perfect condition a week later.
Creative Twists and Variations
This recipe is a playground. Here are some of my favorite ways to switch things up:
Orange Cardamom Dreams
Add a tablespoon of orange zest and a quarter teaspoon of ground cardamom to the ricotta mixture. The citrus brightens everything up while the cardamom adds this mysterious floral note that makes people ask "what's that amazing flavor?" Roll them in crushed pistachios instead of almonds for a Middle Eastern twist that'll transport your taste buds to a Moroccan spice market. These are perfect for dinner parties where you want to impress without looking like you're trying too hard.
Espresso Martini Truffles
Replace half the honey with coffee liqueur and add a teaspoon of instant espresso powder to the melted chocolate. The coffee enhances the chocolate's complexity while the liqueur keeps everything moist and adds a grown-up edge. Roll them in cocoa powder mixed with a tiny pinch of espresso powder for that mocha finish. Serve these after dinner with actual espresso, and watch your guests try to figure out why these taste like the best espresso martini they've ever had.
Salted Caramel Surprise
Before rolling, press a small piece of soft caramel into the center of each truffle, then seal it up completely. When people bite in, they get this gorgeous gooey caramel center that oozes out like liquid gold. Sprinkle the finished truffles with flaky sea salt instead of rolling in nuts. The sweet-salty combination is absolutely addictive — I'll be honest, I ate half the batch before anyone else got to try it when I first made these.
White Chocolate Raspberry
Use white chocolate instead of dark, and fold in freeze-dried raspberry powder or finely crushed freeze-dried raspberries. The tart berries cut through white chocolate's sweetness while adding these gorgeous pink flecks that make the truffles look like little jewels. Roll them in crushed freeze-dried raspberries mixed with coconut flakes for a tropical twist that tastes like summer in a truffle.
Spicy Mexican Chocolate
Add a quarter teaspoon of cinnamon and a tiny pinch of cayenne to the chocolate mixture. The warmth builds slowly, hitting you right at the end of each bite like a gentle hug from the inside. Roll them in a mixture of cocoa powder and cinnamon sugar, with a few chili flakes mixed in for visual appeal. These are dangerous — they look innocent but pack a pleasant heat that makes people reach for another one just to experience that sweet-spicy dance again.
Peanut Butter Cup Truffles
Replace one-third of the ricotta with smooth peanut butter for that nostalgic candy bar flavor. The peanut butter adds richness while the ricotta keeps things light and creamy. Roll them in crushed honey-roasted peanuts for extra crunch and sweetness. These taste like the grown-up version of your favorite childhood candy, sophisticated enough for adults but familiar enough to trigger all those happy memories.
Storing and Bringing It Back to Life
Fridge Storage
Store your finished truffles in an airtight container in the refrigerator for up to two weeks. Layer them between sheets of parchment paper to prevent them from sticking together, and keep them away from strong-smelling foods like onions or garlic — chocolate is basically a sponge for odors. The ideal temperature is around 35-38°F, so adjust your fridge if it runs warm. They actually improve in flavor after a day or two as the ricotta's subtle tang melds with the chocolate. Just remember to bring them to room temperature for 10 minutes before serving — cold chocolate doesn't release its full flavor potential, and you want every nuance to shine.
Freezer Friendly
These truffles freeze beautifully for up to three months, making them perfect for holiday prep or surprise chocolate emergencies. Freeze them in a single layer on a baking sheet first, then transfer to a freezer-safe container with parchment between layers. This prevents them from freezing into one solid chocolate brick. When you're ready to serve, thaw them overnight in the refrigerator, then let them sit at room temperature for 15 minutes before serving. They'll taste as fresh as the day you made them, with no textural changes. I've got a secret stash in my freezer right now for those days when only chocolate will do.
Best Reheating Method
Here's the thing — you don't actually reheat these truffles. Serving them ice-cold straight from the fridge is missing the point entirely. The magic happens when they're at cool room temperature, around 65-70°F. If you've stored them in the fridge, just let them sit out for 10-15 minutes before serving. If they've been frozen, the overnight fridge thaw plus room temp rest does the trick. Add a tiny splash of water to the container before bringing them to temperature — it creates just enough humidity to prevent the surface from drying out while they warm up slightly.