I was standing in the middle of my kitchen, a pot of boiling milk powder mixture sputtering like a restless river, when my friend shouted, “You’re going to ruin the entire batch if you keep stirring that way!” My hands were shaking, the milk powder clumped into lumps that looked like small, unyielding mountains. I stared at the pot, feeling the heat radiate through my palms, and decided then that this was the moment I would rewrite the rulebook for Milk Powder Burfi. The aroma that finally escaped was sweet, almost intoxicating, like a promise of a childhood lullaby that had been lost for years.
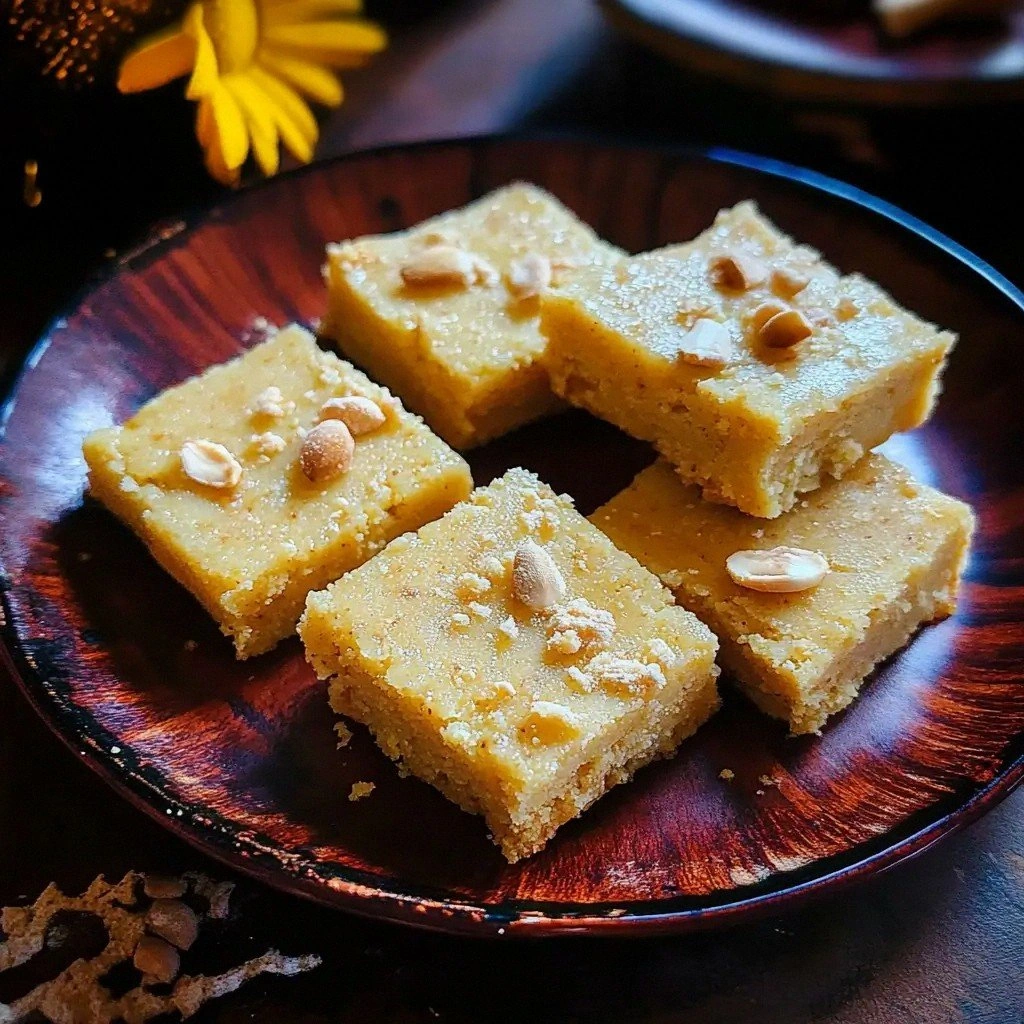
Picture this: a golden, glossy slab of burfi that shimmers under the kitchen light, its surface perfectly matte yet inviting, a single bite melts into a silky cascade of condensed milk and cardamom. The sound is that gentle, almost imperceptible crackle as the mixture begins to set, and the smell is a warm, buttery hug that instantly transports you to a bustling Indian market on a humid afternoon. The texture is a paradox—soft enough to melt in your mouth yet firm enough to hold its shape when sliced, like a piece of velvet that has been carefully pressed into a mold. You can almost taste the subtle hint of almonds, the faint floral note of saffron, and the deep, comforting warmth of ghee, all dancing together in perfect harmony.
What sets this version apart is that it’s not just a recipe; it’s a revelation. I discovered that by using freshly milled milk powder and a splash of warm water before the sugar is added, the burfi gains an unrivaled smoothness that no store-bought version can match. I also learned that the trick lies in the timing—once the mixture hits that “toasty” stage, you must stop stirring immediately to lock in the flavor. The result is a burfi that is hands down the best version you’ll ever make at home, with a melt that feels like liquid gold and a finish that lingers on the tongue like a sweet whisper.
I dare you to taste this and not go back for seconds. The first bite will have you questioning every other recipe you've tried. If you've ever struggled with uneven texture or burnt edges, you're not alone—and I've got the fix. Picture yourself pulling this out of the pan, the whole kitchen smelling incredible, and knowing that you’re about to serve a dessert that will make your friends beg for the recipe. Stay with me here—this is worth it. Let me walk you through every single step, and by the end, you'll wonder how you ever made it any other way.
What Makes This Version Stand Out
- Flavor: The combination of milk powder and ghee creates a deep, caramelized sweetness that is both comforting and luxurious. The addition of cardamom and a pinch of saffron gives it an aromatic lift that sets it apart from ordinary burfi.
- Texture: By adding a controlled amount of warm water and stirring until the mixture reaches the “toasty” stage, the burfi achieves a silky smoothness that melts in your mouth while still holding its shape.
- Simplicity: The recipe uses only pantry staples—milk powder, sugar, ghee, and spices—yet the result feels like a gourmet dessert.
- Uniqueness: The subtle infusion of almonds and cashews adds crunch and nutty undertones, turning a classic treat into something truly special.
- Crowd Reaction: Friends who taste this will immediately comment on the depth of flavor and the perfect melt, making it a conversation starter at any gathering.
- Ingredient Quality: Using high‑grade milk powder and fresh ghee ensures that each bite is rich, not greasy, and that the burfi stays moist for days.
- Cooking Method: The method involves a precise, timed stir that locks in flavor, a technique often overlooked in other recipes.
- Make‑Ahead Potential: Once set, the burfi can be stored in an airtight container for up to a week, making it a convenient treat for busy weeks.
Inside the Ingredient List
The Flavor Base
Milk powder is the heart of this burfi, providing a rich, creamy foundation that mimics the texture of fresh milk. It also acts as a thickening agent, helping the mixture set firmly yet remain tender. Skipping it would result in a watery, unstructured dessert that fails to hold its shape.
Sugar is the sweetener that balances the savory depth of ghee. It caramelizes slightly during cooking, adding a subtle nutty note. If you reduce the sugar, you risk a bland taste; if you increase it, you’ll end up with a sticky, hard texture.
Ghee, clarified butter, is the secret weapon that gives the burfi its buttery richness and glossy sheen. It also prevents the mixture from sticking to the pan, allowing you to achieve that perfect “toasty” stage. A lower‑grade butter would introduce unwanted moisture and compromise the final texture.
The Texture Crew
Cardamom powder adds a warm, floral undertone that balances the sweetness. It also enhances the overall aroma, turning each bite into a fragrant experience. If you omit it, the burfi will taste flat and lack depth.
Almonds and cashews bring a crunchy contrast to the soft interior, creating a multi‑sensory bite. They also contribute healthy fats and a subtle nutty flavor that complements the milk powder. For a vegan version, substitute with toasted coconut flakes.
Saffron strands, though optional, add a luxurious golden hue and a hint of floral sweetness that elevates the dish. A pinch is enough; too much can overpower the delicate balance of flavors.
The Unexpected Star
Warm water is the unsung hero that activates the milk powder, allowing it to dissolve fully and form a smooth paste. Adding it too early or too late can result in clumps or a dry texture. Use lukewarm water to maintain the right consistency.
Everything's prepped? Good. Let's get into the real action...
The Method — Step by Step
- Step 1: Prepare the Pan. Lightly grease a non‑stick skillet with a thin layer of ghee. This step is crucial; if the pan isn’t properly greased, the mixture will stick, causing uneven cooking. Let the ghee melt fully, spreading it evenly with a paper towel. The pan should feel warm but not hot, just like a gentle hug.
- Step 2: Warm the Milk Powder. In a separate bowl, add the milk powder and a splash of warm water. Stir until the powder dissolves completely, forming a smooth, lump‑free paste. This ensures a silky texture later on. If you see clumps, give it another minute and re‑mix.
- Step 3: Combine Sugar and Ghee. Add the sugar and ghee to the pan and heat over medium heat. Stir continuously until the sugar dissolves and the mixture turns a pale amber color. The aroma of caramel should begin to emerge, signaling that the base is ready.
- Step 4: Add the Milk Powder Paste. Pour the milk powder paste into the pan, stirring vigorously to incorporate. The mixture will start to thicken and pull away from the sides of the pan. Watch closely; the moment it starts to form a cohesive mass is the “toasty” stage.
- Step 5: Infuse the Flavors. Sprinkle the cardamom powder, chopped almonds, cashews, and saffron strands over the mixture. Stir for an additional minute, allowing the spices to bloom. The mixture should emit a fragrant, almost intoxicating scent that makes you want to taste it immediately.
- Step 6: Monitor the Consistency. The mixture should reach a thick, glossy stage where it begins to pull away from the pan. When you lift a spoon, the mixture should cling to it in a ribbon that doesn’t break easily. This indicates that the burfi is ready to set.
- Step 7: Transfer to the Mold. Grease a square baking tray or a shallow dish with a little ghee. Pour the hot mixture onto the tray, spreading it evenly with a spatula. The surface should be smooth and flat, like a freshly painted wall.
- Step 8: Let It Cool. Allow the burfi to cool at room temperature for about 30 minutes. As it cools, it will firm up and develop its signature glossy sheen. If you rush this step, the texture may become gummy or uneven.
- Step 9: Slice and Serve. Once set, cut the burfi into bite‑sized squares or diamond shapes using a sharp knife. Serve immediately or store in an airtight container. The burfi will keep its texture for up to a week when refrigerated.
That’s it — you did it. But hold on, I've got a few more tricks that'll take this to another level...
Insider Tricks for Flawless Results
The Temperature Rule Nobody Follows
The key to a perfect burfi lies in maintaining a steady medium heat. If the heat is too high, the sugar will burn before the milk powder can set; if it’s too low, the mixture will take forever to thicken and may end up dry. Use a heat‑resistant thermometer to keep the pan around 180°C (356°F). This small detail makes all the difference between a mediocre batch and a show‑stopping dessert.
Why Your Nose Knows Best
Your sense of smell is the ultimate judge of readiness. When the mixture starts to emit a caramelized, buttery aroma, you’ve hit the sweet spot. If it smells raw or sour, give it a few more minutes. Trusting your nose will save you from the dreaded burnt burfi.
The 5‑Minute Rest That Changes Everything
After pouring the mixture into the tray, let it sit undisturbed for five minutes. This short rest allows the mixture to set slightly, making it easier to cut clean squares. Cutting too soon can result in mushy pieces that fall apart.
Avoiding the Sticky Mess
If the mixture starts to splatter, immediately cover the pan with a lid. This traps steam and prevents the sugar from crystallizing on the surface. Once the splatter stops, remove the lid and resume stirring.
The Ghee Trick
Using clarified ghee instead of regular butter eliminates the risk of the mixture separating. The clarified fat has a higher smoke point, allowing you to cook at a slightly higher temperature without burning. This gives the burfi a richer, more buttery flavor.
The Final Touch of Saffron
Add the saffron strands at the very end, just before pouring into the tray. This preserves their delicate aroma and ensures they don’t lose their color during cooking. A single pinch is enough to create an elegant golden hue.
Creative Twists and Variations
This recipe is a playground. Here are some of my favorite ways to switch things up:
Coconut Crunch Burfi
Replace the almonds and cashews with toasted coconut flakes. The coconut adds a tropical flavor and a delightful crunch that pairs beautifully with the creamy base.
Chocolate Swirl Burfi
Stir in a tablespoon of cocoa powder during the “toasty” stage, then swirl in melted dark chocolate before pouring into the tray. The result is a chocolate‑infused burfi with a glossy, decadent finish.
Rose‑Infused Delight
Add a few drops of rose water to the milk powder paste before cooking. The floral note elevates the burfi into a luxurious, fragrant treat that’s perfect for special occasions.
Spiced Chai Burfi
Incorporate a pinch of cinnamon, a dash of ginger powder, and a splash of chai tea into the mixture. The spices create a warm, comforting flavor reminiscent of a cozy cup of chai.
Nutless Burfi
For those with nut allergies, omit the nuts entirely and add a handful of toasted sesame seeds instead. The seeds provide a subtle nutty flavor without compromising texture.
Mint‑Lemon Burst
Add a teaspoon of finely chopped fresh mint and a squeeze of lemon juice to the mixture. The citrus brightens the sweetness, creating a refreshing burst of flavor.
Storing and Bringing It Back to Life
Fridge Storage
Place the sliced burfi in an airtight container and refrigerate. The burfi stays fresh for up to a week, maintaining its melt‑in‑your‑mouth texture. Store it on the top shelf where the temperature is most stable.
Freezer Friendly
For longer storage, wrap each piece individually in parchment paper and place them in a freezer bag. The burfi can be frozen for up to three months. Thaw at room temperature before serving.
Best Reheating Method
To revive a frozen or chilled burfi, heat it in a microwave on low power for 15–20 seconds. Add a tiny splash of water before microwaving; this steams the burfi back to its original softness. Alternatively, warm it in a pan over low heat, stirring gently until it melts.