I’ll be honest — I ate half the batch before anyone else got a spoonful, and that’s because this Peanut Butter Banana Ice Cream is hands down the best version you’ll ever make at home. It started as a late‑night kitchen experiment when a friend dared me to turn two overripe bananas and a jar of peanut butter into something that could actually replace a bakery‑fresh sundae. The moment the bananas hit the freezer, the kitchen smelled like a tropical peanut butter lounge, and I could hear the faint hum of the freezer door sighing shut. The next morning, armed with a blender and an ice‑cream maker, I discovered a texture so creamy it slid across the tongue like satin, while the peanut butter swirled through like a smooth, nutty river.
If you’ve ever struggled with banana‑based ice cream turning into a grainy mess, you’re not alone — the culprit is usually the water content in the fruit. Most recipes get this completely wrong, either by over‑blending or by neglecting the crucial step of freezing the bananas solid before processing. My secret? A quick flash‑freeze followed by a high‑speed blend that breaks down the banana cells without releasing excess water. The result is a dense, velvety scoop that feels like a peanut‑butter‑kissed cloud, and it holds its shape even on a hot summer day.
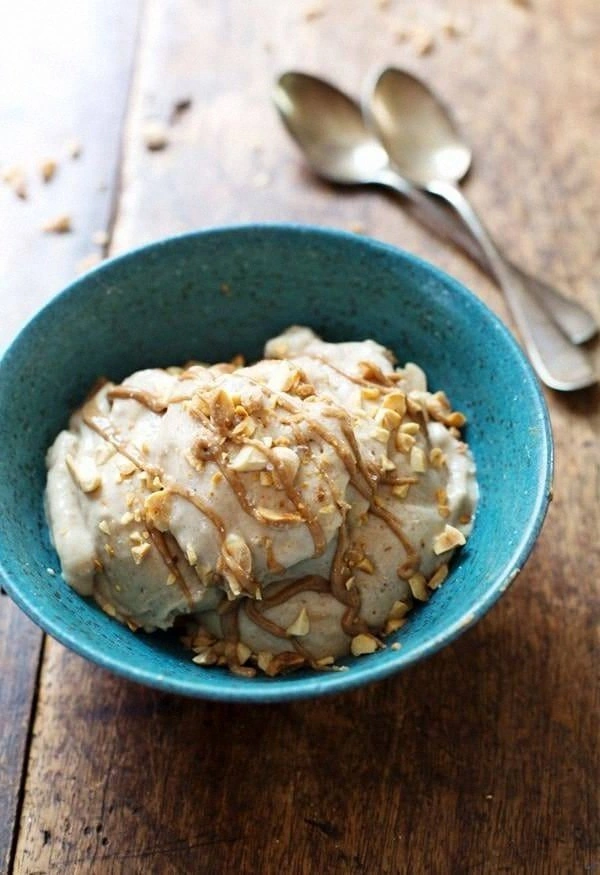
Picture yourself pulling this out of the ice‑cream maker, the whole kitchen smelling incredible, the creamy swirl catching the light as you scoop it into a bowl. The first bite hits you with a buttery peanut flavor that hugs the banana’s natural sweetness, followed by a buttery finish that lingers just long enough to make you want another spoonful. I dare you to taste this and not go back for seconds — it’s that good. And the best part? No egg yolks, no complicated custard, just a handful of pantry staples turned into pure indulgence.
Okay, ready for the game‑changer? I’m about to walk you through every single step — by the end, you’ll wonder how you ever made ice cream any other way. Stay with me here — this is worth it.
What Makes This Version Stand Out
- Flavor: The natural sweetness of ripe bananas pairs perfectly with the deep, roasted notes of creamy peanut butter, creating a flavor duet that sings on the palate.
- Texture: By flash‑freezing the bananas and using a high‑speed blender, the ice cream achieves a silk‑smooth mouthfeel that rivals any premium gelato.
- Simplicity: Only seven ingredients, no custard base, no gelatin, no special equipment beyond a basic ice‑cream maker or a freezer.
- Uniqueness: The addition of a touch of honey balances the peanut butter’s richness without overwhelming the banana’s fruity notes.
- Crowd Reaction: Even the most skeptical sweet‑tooth will be converted after the first spoonful; it’s a guaranteed crowd‑pleaser at potlucks and family gatherings.
- Ingredient Quality: Using a high‑quality, natural‑oil peanut butter makes the flavor brighter and the texture creamier.
- Method: The flash‑freeze technique locks in flavor and prevents ice crystals, while the churn adds that airy lift.
- Make‑Ahead Potential: This ice cream stores beautifully for up to two weeks, making it perfect for meal‑prep enthusiasts.
Inside the Ingredient List
The Flavor Base
Ripe bananas are the heart of this dessert. Their natural sugars provide the perfect sweetness without added refined sugar, and their creamy flesh becomes silk when frozen solid. If you skip the flash‑freeze, you’ll end up with a watery, icy mess that feels more like a slush than a dessert. When choosing bananas, look for ones with brown speckles; they’re the sweetest and most aromatic. A quick tip: give them a gentle press — if they give a little, they’re ready to freeze.
The Texture Crew
Heavy cream adds richness and a buttery mouthfeel that makes the ice cream feel luxurious. Whole milk contributes a subtle dairy note while keeping the mixture from becoming overly heavy. If you’re dairy‑free, swap the cream for coconut cream and the milk for almond milk, but expect a slight coconut aroma to sneak in. The ratio of cream to milk is crucial; too much cream can make the final product overly dense, while too much milk can lead to ice crystals.
The Unexpected Star
A half‑cup of creamy peanut butter is the secret weapon that turns this from “just banana ice cream” into a decadent treat. It adds a nutty depth and a hint of saltiness that balances the banana’s sweetness. Opt for a natural‑oil peanut butter without added sugars for the cleanest flavor. If you’re allergic or want a twist, almond butter works surprisingly well, offering a softer nut profile.
The Final Flourish
A quarter‑cup of honey (or maple syrup) provides a gentle floral sweetness that melds the flavors together. Vanilla extract adds a fragrant backdrop that makes the overall taste feel more rounded. A pinch of sea salt amplifies every nuance, turning the dessert from flat to fabulous. If you’re watching sugar, you can reduce the honey to two tablespoons, but the ice cream will be slightly less sweet.
Everything's prepped? Good. Let’s get into the real action…
The Method — Step by Step
Start by slicing the bananas into 1‑inch rounds and arranging them on a single layer of parchment paper on a baking sheet. Pop the tray into the freezer for at least two hours, or until the pieces are rock‑solid. This flash‑freeze step is the foundation of a silky texture; you’ll hear a faint crack as each slice hardens, a sound that promises a creamy outcome.
While the bananas are chilling, measure out your heavy cream, whole milk, honey, vanilla, and a pinch of sea salt. Place the milk and honey in a small saucepan, warming gently over low heat just until the honey dissolves — you’ll notice a fragrant, sweet aroma rising, indicating it’s ready. Do not let the mixture boil; a gentle simmer is all you need.
Transfer the frozen banana slices to a high‑speed blender. Add the warmed milk‑honey mixture and blend on high for about 30 seconds, stopping to scrape down the sides. The banana should break down into a thick, pale paste that looks like a smooth, creamy puree. If the blend looks too chunky, add a splash more milk and continue.
Now it’s time for the peanut butter. Drop the half‑cup of creamy peanut butter into the blender, followed by the vanilla extract and the pinch of salt. Blend again until the mixture becomes a uniform, glossy orange‑gold hue. The scent of roasted peanuts will flood the kitchen, a signal that you’re on the right track.
Finally, pour in the heavy cream. Blend one more time, this time on a medium setting, just until the cream is fully incorporated and you have a silky, thick batter. The mixture should coat the back of a spoon without running off — that’s the perfect consistency before churning.
Transfer the batter into your ice‑cream maker, following the manufacturer’s instructions for churn time (usually 20‑25 minutes). As the machine whirs, you’ll hear a faint, airy rustle, and the mixture will gradually thicken. This is the moment of truth. If you don’t have an ice‑cream maker, see the “Watch Out” box below for a manual method that still delivers great results.
If you’re using the manual method, pour the blended batter into a shallow metal pan and place it in the freezer. Every 30 minutes, pull it out and stir vigorously with a spatula, breaking up any forming ice crystals. After about three hours of this “stir‑and‑freeze” dance, the ice cream will be thick, creamy, and ready to serve.
Once churned or manually frozen, transfer the ice cream to an airtight container. For an extra‑smooth finish, smooth the top with a spatula and press a piece of parchment directly onto the surface before sealing the lid. Freeze for at least another hour to let the flavors meld fully.
That’s it — you did it. But hold on, I’ve got a few more tricks that'll take this to another level…
Insider Tricks for Flawless Results
The Temperature Rule Nobody Follows
Never churn a warm batter. If the mixture is above 70°F, the ice cream will form large crystals and feel gritty. Keep the blended base in the fridge for at least 15 minutes before pouring it into the machine. I once tried to speed things up by skipping this step, and the final product resembled a frosty sorbet — not the creamy dream I was aiming for.
Why Your Nose Knows Best
When the ice cream is nearing completion, trust your sense of smell. A faint buttery aroma signals that the fat has emulsified properly. If you smell a raw milk scent, the churn isn’t done yet. I once stopped early because I thought the timer was enough; the result was a runny, under‑churned batch that tasted more like a smoothie than ice cream.
The 5‑Minute Rest That Changes Everything
After churning, let the ice cream rest in the freezer for a solid five minutes before serving. This short pause allows the air bubbles to settle and the texture to firm up just enough for perfect scoops. Skipping this rest can lead to a too‑soft, melty mess that slides off the spoon. My kitchen crew always insists on this pause, and the smiles prove it’s worth it.
The Ice‑Cube Trick for Extra Creaminess
Add a single ice cube to the blender just before the final blend. The cold shock helps keep the mixture at a low temperature, reducing the chance of ice crystals forming later. It’s a tiny hack, but it makes a noticeable difference in the final mouthfeel. I discovered this when a friend complained that his ice cream turned grainy after a week in the freezer.
The Secret Salt Boost
A pinch of flaky sea salt added at the very end of blending amplifies the peanut butter’s depth. It’s like turning up the volume on a favorite song — the flavors become more pronounced without adding any new ingredients. Be careful not to over‑salt; a little goes a long way.
Creative Twists and Variations
This recipe is a playground. Here are some of my favorite ways to switch things up:
Chocolate Swirl
Melt ¼ cup dark chocolate and swirl it into the churned ice cream before the final freeze. The bittersweet chocolate adds a sophisticated contrast to the sweet banana‑peanut combo, perfect for coffee‑drinking friends.
Coconut Crunch
Replace half the heavy cream with coconut cream and toss in toasted coconut flakes during the last minute of churning. The tropical notes pair wonderfully with banana, and the crunch adds a delightful textural surprise.
Spicy Kick
Add a pinch of cayenne pepper or a drizzle of honey‑chili sauce after churning. The subtle heat elevates the peanut butter’s richness and makes the dessert feel unexpectedly bold.
Berry Burst
Fold in a handful of fresh raspberries or a swirl of strawberry jam just before the final freeze. The tart berries cut through the sweetness, creating a balanced flavor profile that’s perfect for summer picnics.
Nutty Medley
Stir in chopped toasted almonds, pecans, or hazelnuts after the ice cream has churned. The extra crunch adds a satisfying bite and makes the dessert feel more substantial for those who love a nutty finish.
Storing and Bringing It Back to Life
Fridge Storage
While ice cream is best kept frozen, you can store a small portion in the fridge for up to 24 hours if you need a softer texture for a quick serving. Transfer a scoop to a covered bowl, and it will stay creamy without turning into a melt.
Freezer Friendly
Keep the bulk of your ice cream in an airtight container in the freezer for up to two weeks. For the longest shelf life, place a piece of parchment paper directly on the surface before sealing; this prevents ice crystals from forming on top.
Best Reheating Method
When you’re ready to serve, let the container sit at room temperature for 5‑10 minutes, then give it a quick stir. If it’s a bit too firm, add a tiny splash of whole milk or water and fold it in — the liquid creates steam that revives the creamy texture without diluting the flavor.