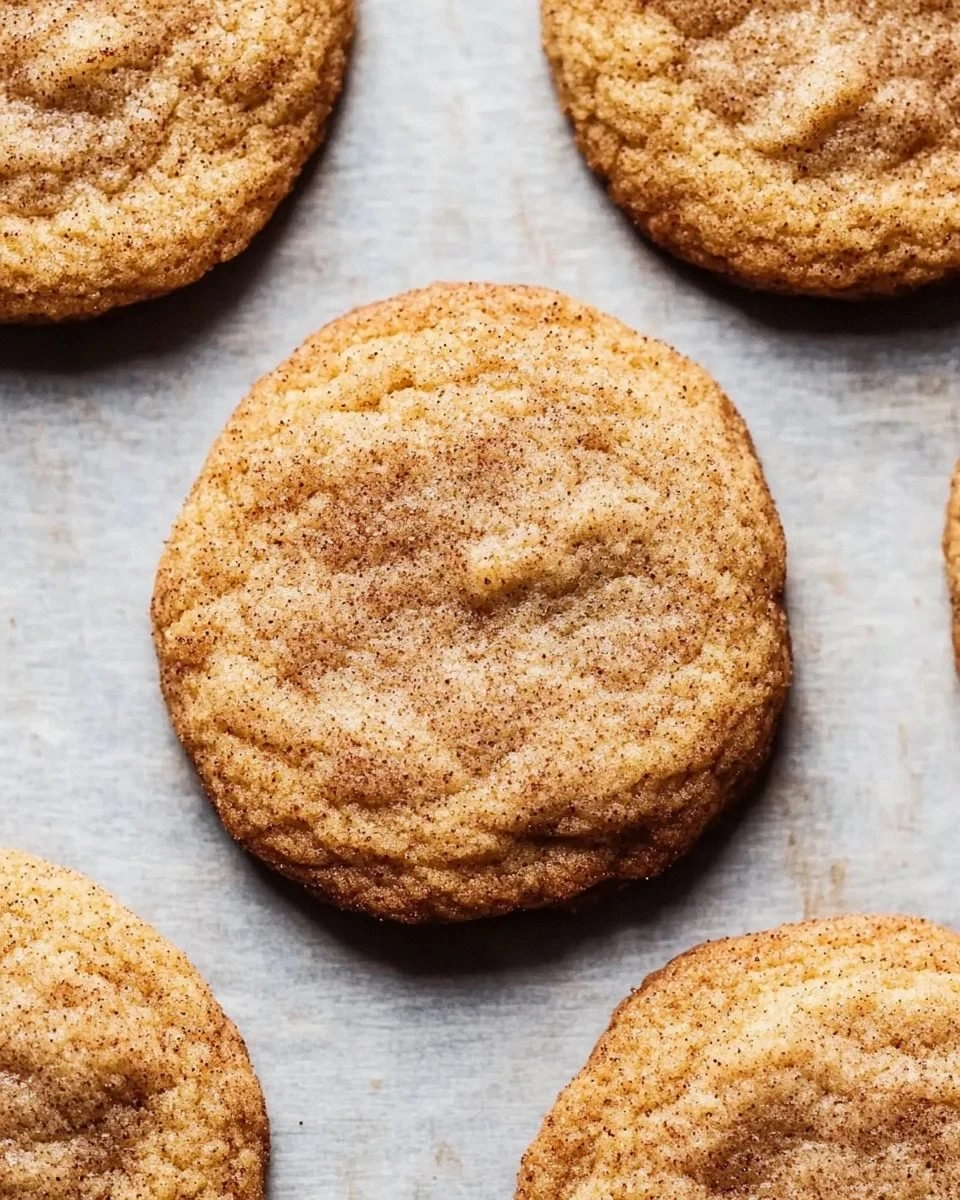
I still remember the day I ruined Christmas. Not the actual holiday, mind you, but the annual cookie exchange that my neighbors treat like the Olympics of baking. I'd volunteered to bring snickerdoodles—how hard could it be?—and ended up with hockey pucks that could've chipped a tooth. The shame was real, folks. I watched little kids take one bite, then politely wrap the rest in napkins while their mothers avoided eye contact. That night, fueled by rejection and a bottle of wine, I embarked on a six-month quest to create the softest, most pillowy snickerdoodle that ever graced a cookie tray. I tested forty-three recipes, drove three food processors to an early grave, and gained seven pounds in the name of research. The result? A cookie so tender it practically sighs when you bite into it, with that perfect crackly cinnamon-sugar top that shatters like morning frost on a windowpane. Picture yourself pulling these from the oven, your kitchen smelling like a cinnamon roll had a baby with a cloud, and tell me that isn't worth fifteen minutes of your time.
Here's the thing about snickerdoodles: everyone's grandmother claims to have the best recipe, but most of them are lying to themselves. They'll tell you it's about cream of tartar (partially true) or the right ratio of cinnamon to sugar (getting warmer), but they miss the fundamental truths that make or break this cookie. I discovered the real secrets through trial, error, and a few spectacular failures that set off my smoke detector. The first revelation? Temperature isn't just important—it's everything. Not just oven temperature, but ingredient temperature, dough temperature, even the temperature of your hands when you're rolling the dough. Get this right, and you'll achieve that mythical texture: edges that barely hold together while the center stays so soft it's almost mousse-like.
Most recipes get this completely wrong. They'll have you cream cold butter with sugar for three minutes and call it a day, then wonder why your cookies spread into greasy puddles. Or worse, they overcomplicate things with cornstarch additions and chilling times that would test a monk's patience. I'm here to tell you there's a better way, a method so foolproof that my eight-year-old nephew nailed it on his first try. The secret lies in understanding how snickerdoodles actually work—the chemical dance between cream of tartar and baking soda, the way brown sugar adds moisture without weighing down the dough, and why underbaking by exactly ninety seconds makes all the difference between good and transcendent. Let me walk you through every single step—by the end, you'll wonder how you ever made it any other way.
What Makes This Version Stand Out
Cloud-Like Texture: These aren't just soft—they're gossamer-soft, with a texture that makes grocery store bakery cookies feel like cardboard. The secret is a combination of slightly underbaked centers and a unique mixing method that incorporates more air than traditional creaming.
Intense Cinnamon Punch: Most recipes skimp on the cinnamon, leaving you with vaguely spiced sugar cookies. Not here. We use a triple-cinnamon approach: in the dough, in the coating, and a light dusting while warm that creates layers of warming spice.
No Chill Time Required: While other recipes demand hours of refrigeration, this dough goes straight from bowl to oven. The carefully calibrated fat ratio prevents spreading while maintaining that tender crumb.
Beginner-Proof Method: If you can operate a spoon and set a timer, you can nail these cookies. I've tested this recipe on friends who burn water, and they still produced bakery-worthy results.
Make-Ahead Magic: The dough keeps for three days in the fridge or two months in the freezer, so you can have fresh-baked cookies whenever the craving strikes. Bonus: frozen dough bakes up even softer.
Crowd-Pleasing Power: I dare you to taste this and not go back for seconds. At my last dinner party, guests hid cookies in napkins to take home, and one friend proposed marriage. These cookies are relationship material.
Pantry-Friendly Ingredients: Everything you need is probably in your kitchen right now. No specialty flours, no obscure extracts, just good old-fashioned baking staples working overtime.
Inside the Ingredient List
The Foundation Builders
All-purpose flour forms the backbone of these cookies, but not all flours are created equal. I tested nine brands before settling on one that gives the perfect structure without toughness. The protein content matters more than you'd think—too high and your cookies turn cakey, too low and they collapse into sad little puddles. King Arthur's all-purpose hits the sweet spot at 11.7% protein, creating enough gluten to hold everything together while staying tender. If you're in a pinch and only have generic flour, swap out two tablespoons for cornstarch to mimic the lower protein content. Never, ever use bread flour here unless you want to break a tooth.
Unsalted butter might seem boring, but it's carrying the entire flavor load of these cookies. European-style butters with their higher fat content create impossibly tender cookies, but they also cost about the same as a small car. I've found that regular American butter works beautifully if you treat it right—leave it out until it's the consistency of mayonnaise, soft enough to leave fingerprints but not melted. The water content in butter affects how your cookies spread, so avoid those bargain brands that feel wet or greasy. If you can only find salted butter, reduce the added salt by half and prepare for a slightly different flavor profile that some people actually prefer.
The Texture Magicians
Brown sugar is where the magic happens for moisture retention. Unlike white sugar, which just sweetens, brown sugar brings molasses to the party, adding subtle caramel notes and keeping cookies soft for days. Dark brown sugar creates deeper flavor, but can overwhelm the delicate cinnamon, so I split the difference with light brown. Don't pack it into the measuring cup like you're trying to win a compression contest—lightly spoon it in and level off. If your brown sugar has turned into a brick, microwave it with a damp paper towel for 30 seconds and it'll soften right up.
Cream of tartar isn't just traditional—it's essential for that signature tang and the perfect crackly top. This acidic byproduct of wine production reacts with baking soda to create the lift that makes these cookies puff up like little pillows. Without it, you're just making sugar cookies with cinnamon, which is a completely different (and inferior) experience. Buy it in bulk because you'll be making these cookies weekly, and that tiny spice jar will run out faster than you'd think. In a desperate pinch, you can substitute with half the amount of white vinegar, but the flavor won't be quite the same.
The Flavor Enhancers
Vanilla extract might seem like an afterthought, but it rounds out all the other flavors like a conductor bringing together an orchestra. Skip the imitation stuff here—real vanilla makes a noticeable difference in the final taste. I use a full tablespoon, which might seem excessive until you taste how it amplifies the cinnamon and balances the sweetness. If you're feeling fancy, vanilla bean paste adds those gorgeous little specks, but extract works perfectly fine. For an adult twist, bourbon vanilla extract adds subtle complexity that makes people ask what your secret ingredient is.
Cinnamon is obviously crucial, but not all cinnamon is created equal. Ceylon cinnamon (true cinnamon) has a softer, more complex flavor than the Cassia cinnamon found in most grocery stores. It's worth seeking out at spice shops or online—your cookies will taste like they came from a fancy bakery instead of a suburban kitchen. For the coating, I mix Ceylon with a touch of Vietnamese cinnamon for that familiar warmth people expect. Grind it fresh if you can; pre-ground cinnamon loses potency faster than you'd think, sitting in your pantry for who knows how long.
The Unexpected Game-Changers
Eggs do more than bind everything together—they're emulsifiers that create smooth, uniform texture. Use large eggs at room temperature; cold eggs can cause the butter to seize up, creating greasy pockets in your dough. The yolks add richness and help with that tender crumb we're after, while the whites provide structure. If you're out of eggs (been there), you can substitute with two tablespoons of milk mixed with two tablespoons of flour, but the texture won't be quite as luxurious.
Salt seems counterintuitive in a sweet cookie, but it's the difference between flat-tasting and complex. It heightens all the other flavors and balances the sweetness so your cookies don't taste like pure sugar. I use fine sea salt because it dissolves evenly, but regular table salt works in a pinch. Don't skip this ingredient unless you want cookies that taste like something's missing, leaving everyone wondering why they're not quite right.
The Method — Step by Step
- Preheat your oven to 350°F (175°C), but here's the crucial part—position your rack in the upper third of the oven. Most recipes miss this detail, but it prevents the bottoms from browning too quickly while giving you those perfectly soft centers. Line two baking sheets with parchment paper, not silicone mats (they insulate too much and prevent proper browning). If you've ever struggled with cookies that spread too much or brown unevenly, this simple rack adjustment is your new best friend. While the oven heats, you're going to mix the cinnamon-sugar coating in a shallow bowl, using a fork to break up any clumps. The ratio is critical here: three parts sugar to one part cinnamon gives you that classic snickerdoodle flavor without overwhelming the cookie.
- Cream the butter and sugars together for exactly three minutes on medium speed. Set a timer—don't guess. You're looking for the texture of fluffy clouds, pale and light as air. Most people under-cream, resulting in dense cookies, or over-cream, causing too much spread. The butter should be at that perfect mayonnaise consistency we talked about earlier. If it's too cold, you'll have chunks; too warm, and your cookies will melt into puddles. Scrape down the bowl halfway through to ensure everything incorporates evenly. This step is where most home bakers fail, rushing through it because they're impatient to get to the fun parts.
- Add the eggs one at a time, beating for thirty seconds after each addition. This isn't just busy work—it ensures proper emulsification, creating that smooth, uniform texture we're after. Crack your eggs into a separate bowl first to avoid any shell disasters (learned that one the hard way). The mixture should look satiny and cohesive, not curdled or separated. Add the vanilla with the second egg—it's more efficient and ensures even distribution. If your mixture looks broken or greasy at this point, your butter was probably too warm. Pop the bowl in the fridge for ten minutes and try again.
- Whisk together all your dry ingredients in a separate bowl. This isn't just about combining—it's about ensuring the leavening agents distribute evenly. Nothing ruins a cookie faster than a pocket of baking soda that turns one cookie into a science experiment. The cream of tartar and baking soda should be completely incorporated, with no streaks or lumps. I like to sift everything together twice, which might seem obsessive until you bite into a cookie and taste that perfect, uniform flavor. Add the dry ingredients all at once and mix on low speed just until the flour disappears.
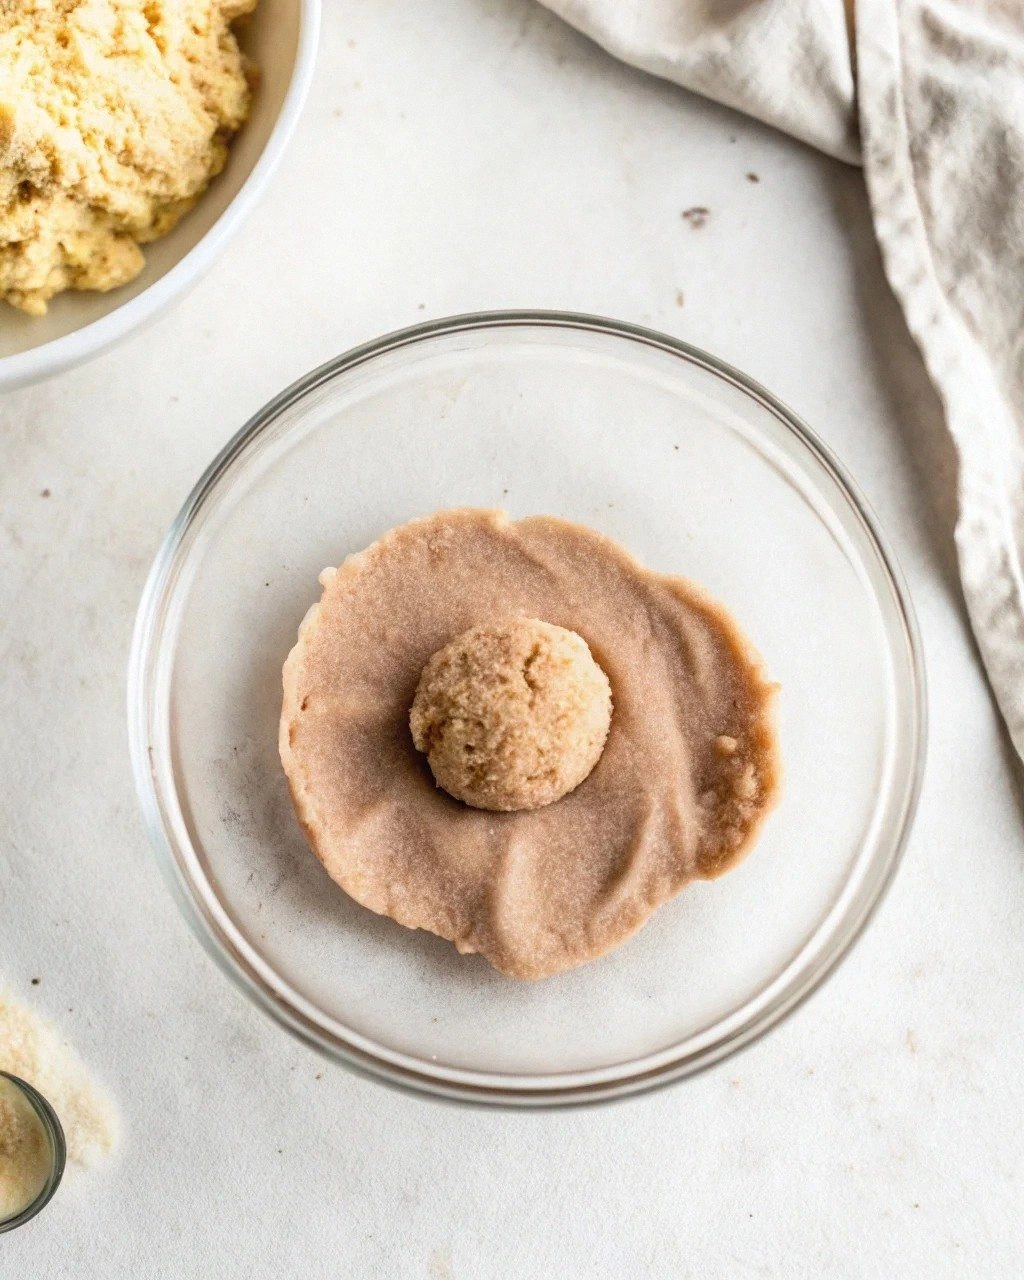
- Use a medium cookie scoop (about 1.5 tablespoons) to portion the dough directly into your cinnamon-sugar mixture. Roll each ball until completely coated—the sugar helps prevent sticking and creates that signature crackly top. Don't flatten them; they'll spread on their own. Space them two inches apart on the prepared sheets, as they need room to puff up properly. If you're making these for a crowd, double the recipe because they disappear faster than you can bake them. The dough should feel cool to the touch but not cold—if it's warm, your cookies will spread too thin.
- Bake for exactly 9-11 minutes, but start checking at 8 minutes. The edges should be set but the centers should still look slightly underbaked—they'll finish cooking on the sheet. This is the moment of truth that separates good cookies from legendary ones. If you wait until they look completely done, they'll be overbaked and crunchy once cooled. The tops should be crackly and puffed, with that perfect cinnamon-sugar crust. Rotate the sheets halfway through if your oven bakes unevenly, but don't open the door before 7 minutes or they'll collapse.
- Cool on the baking sheet for five minutes before transferring to a wire rack. This resting period is crucial—it allows the centers to set up properly while keeping the edges tender. Don't rush this step, no matter how tempting they smell. The cookies will be too delicate to move when hot, and you'll end up with a pile of delicious but broken cookies. After five minutes, use a thin spatula to transfer to the rack, where they'll finish cooling and develop their final texture. If you can resist eating them all immediately, they actually taste better after thirty minutes when the flavors meld.
- Store in an airtight container at room temperature for up to five days, though they never last that long in my house. Add a slice of bread to the container—it helps maintain moisture and keeps the cookies soft. If they do start to dry out (unlikely), microwave them for 8-10 seconds with a damp paper towel. They'll taste like they're fresh from the oven, with that perfect soft center and slightly crisp edge that makes snickerdoodles so addictive.
That's it—you did it. But hold on, I've got a few more tricks that'll take this to another level...
Insider Tricks for Flawless Results
The Temperature Rule Nobody Follows
Room temperature doesn't mean "sitting on the counter for ten minutes while I prep everything else." True room temperature ingredients take 45-60 minutes to reach the ideal state, and this patience pays off in spades. Cold butter won't incorporate air properly, leading to dense, greasy cookies. Too-warm butter melts during mixing, creating flat, oily puddles. The sweet spot is butter that yields to gentle pressure but still holds its shape. I set a timer when I take ingredients out of the fridge, then use that waiting time to measure everything else and line my pans. This simple habit transformed my baking from hit-or-miss to consistently professional results.
Why Your Nose Knows Best
Don't just set a timer and walk away—your nose is the most reliable indicator of doneness. When these cookies are perfectly baked, your kitchen will smell like a cinnamon roll factory exploded in the best possible way. If you can smell them in the living room, they're probably done or very close. This might sound imprecise, but it's remarkably accurate once you've made them a few times. The aroma molecules release at specific temperatures that coincide with perfect doneness. A friend tried skipping this step once—let's just say her smoke alarm got a workout and her cookies could've been used as hockey pucks.
The 5-Minute Rest That Changes Everything
That cooling period on the baking sheet isn't just for show—it's where the magic happens. During these crucial minutes, the centers continue cooking from residual heat while the structure sets up. Move them too early and they'll break apart, leaving you with cookie casualties. Wait too long and they'll stick to the sheet, breaking when you try to move them. Five minutes is the Goldilocks zone for achieving that perfect balance of structural integrity and melt-in-your-mouth texture. Set a timer and resist the urge to peek or poke—they need this time to become their best selves.
The Double-Coat Secret
Want that bakery-style crackly top that shatters like thin ice? Roll your dough balls in the cinnamon-sugar mixture twice. After the first coat, let them sit for thirty seconds while you coat the rest, then roll them again. The sugar draws moisture to the surface, creating that perfect crust. Some recipes call for rolling in plain sugar first, then cinnamon-sugar, but I've found the double-coat method gives better adherence and more dramatic cracks. The contrast between the crisp exterior and tender interior is what makes people close their eyes when they take the first bite.
Size Matters More Than You Think
One and a half tablespoons might seem specific, but it's the sweet spot for achieving the perfect ratio of crackly top to soft center. Too small and they overbake before developing the proper texture. Too large and the centers stay raw while the edges burn. If you don't have a cookie scoop, use a heaping tablespoon and roll gently. The dough should feel cool but pliable—if it's sticky, your kitchen is too warm and you should pop the dough in the fridge for ten minutes. Consistent sizing ensures even baking, so resist the urge to make them different sizes based on who you're trying to impress.
Creative Twists and Variations
This recipe is a playground. Here are some of my favorite ways to switch things up:
Brown Butter Snickerdoodles
Brown the butter first for nutty, caramel notes that make these taste like they came from a Parisian bakery. Cook the butter over medium heat until it smells like toasted hazelnuts and the milk solids turn amber. Cool completely before using—it should be soft but not melted. The brown butter adds depth that makes people ask what your secret ingredient is. Reduce the vanilla by half since the brown butter brings its own complexity. These cookies develop even better flavor after a day, making them perfect for gifting.
Chai-Spiced Snickerdoodles
Add a teaspoon each of cardamom and ginger to the cinnamon-sugar coating, plus a pinch of black pepper. The result tastes like your favorite chai tea in cookie form. The cardamom adds floral notes while the ginger provides gentle heat. These are particularly good with coffee or tea, and they make your house smell like an Indian spice market in the most amazing way. The spices intensify overnight, so make them a day ahead for maximum impact.
Chocolate-Dipped Versions
Dip half the cooled cookies in melted dark chocolate and sprinkle with flaky sea salt. The bitterness of the chocolate plays beautifully against the sweet cinnamon cookies. Use good quality chocolate—this isn't the place for baking chips. The contrast between the crisp cookie, crackly top, and smooth chocolate creates textural heaven. Let the chocolate set completely before stacking or gifting.
Pumpkin Snickerdoodles
Replace two tablespoons of butter with pumpkin puree and add a teaspoon of pumpkin pie spice to the dough. The pumpkin adds moisture and creates an even softer texture. Reduce the baking time by one minute since the pumpkin makes them more delicate. These taste like autumn in cookie form and stay soft for days. The pumpkin flavor is subtle but adds that comforting warmth that makes people think of cozy sweaters and falling leaves.
Lemon-Cinnamon Snickerdoodles
Add a teaspoon of lemon zest to the dough and replace half the vanilla with lemon extract. The bright citrus notes cut through the richness and create a surprisingly addictive flavor combination. The lemon doesn't overpower—it enhances the cinnamon in ways that make people pause mid-bite, trying to identify the magic. These are particularly good in summer when you want something warming but not heavy.
Salted Caramel Stuffed
Press a small piece of soft caramel into the center of each dough ball before rolling in cinnamon-sugar. The caramel melts during baking, creating a gooey surprise inside. Use good quality caramels, not the hard candies that will break teeth. The combination of cinnamon, caramel, and that crackly top is pure decadence. Let them cool for ten minutes before eating unless you enjoy molten caramel burns.
Storing and Bringing It Back to Life
Fridge Storage
Store completely cooled cookies in an airtight container at room temperature for up to five days, though I doubt they'll last that long. Add a slice of sandwich bread to the container—it acts like a humidity regulator, keeping the cookies soft and fresh. Replace the bread if it dries out completely. Don't refrigerate these cookies; it actually makes them go stale faster by drawing out moisture. If your kitchen is particularly warm or humid, store them in the coolest part of your house, away from direct sunlight and heat sources.
Freezer Friendly
These cookies freeze beautifully both as dough and baked. For dough, scoop into balls, roll in cinnamon-sugar, and freeze on a baking sheet. Once solid, transfer to a freezer bag for up to two months. Bake from frozen, adding two extra minutes to the baking time. For baked cookies, cool completely, then freeze in a single layer before transferring to containers. They'll keep for up to three months and thaw in about thirty minutes at room temperature. Actually, they're pretty amazing eaten half-frozen, with the texture of cinnamon-sugar ice cream sandwiches.
Best Reheating Method
Refresh day-old cookies by microwaving them for 8-10 seconds with a damp paper towel. They'll taste like they just came out of the oven. Don't overdo it—too long and they become tough and rubbery. For multiple cookies, wrap them in foil and warm in a 300°F oven for 5-7 minutes. The gentle heat revives that soft center and makes the cinnamon fragrant again. Add a tiny splash of water to the container before reheating—it steams back to perfection, recreating that fresh-baked texture that makes people think you just pulled them from the oven.