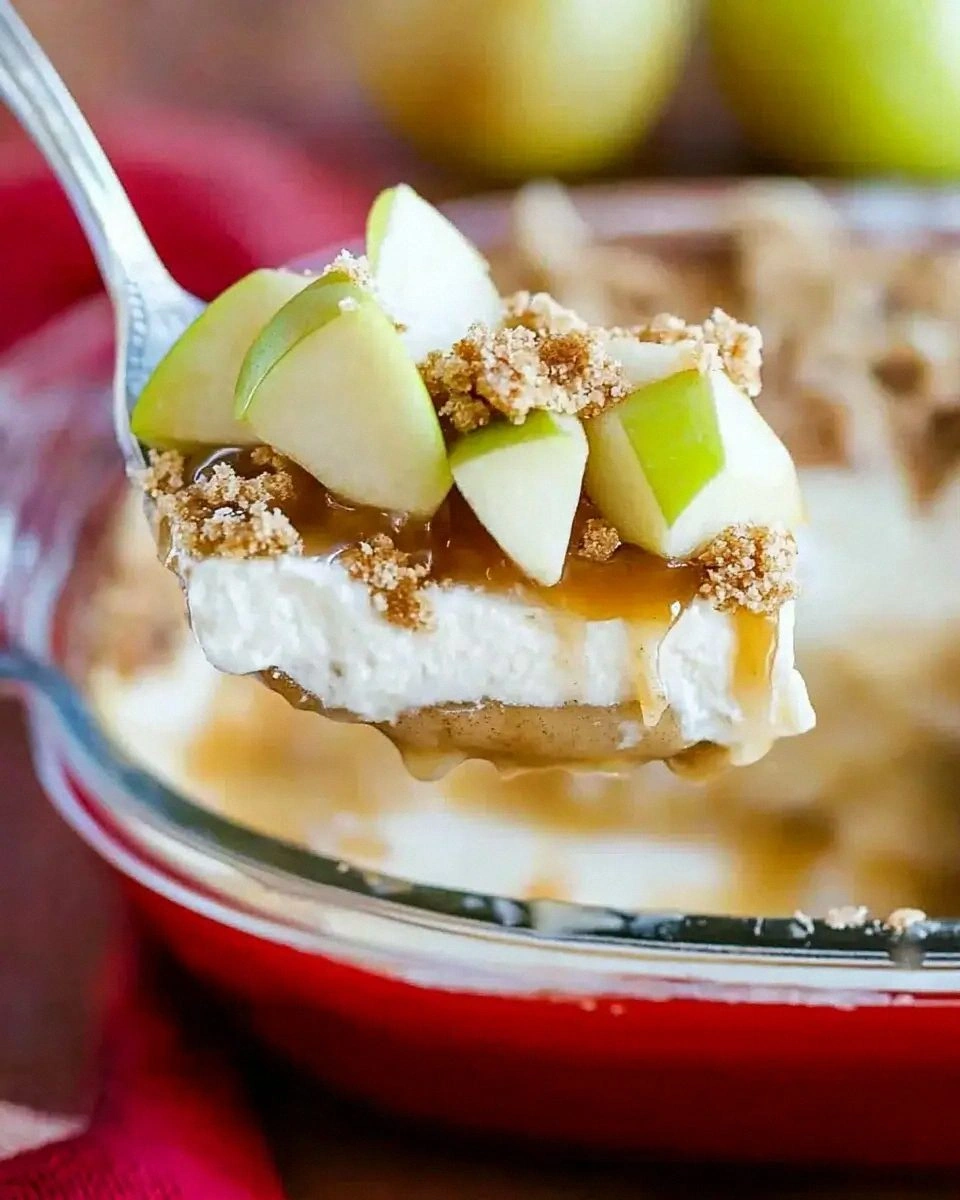
Picture this: I’m standing in my cramped kitchen, a half‑melted caramel sauce dripping onto the floor, an apple that decided to roll off the counter, and a timer that’s screaming “ONE MINUTE LEFT!” I was attempting a classic apple crumble for a friends‑only dinner, and everything that could go wrong, did. The crust turned into a soggy mess, the apples were as mushy as overcooked porridge, and the caramel? Let’s just say it could have doubled as a floor cleaner. In that moment of culinary chaos, a dare from my roommate rang out, “If you can fix this, I’ll never question your dessert skills again.” I accepted, and what happened next was nothing short of a kitchen miracle.
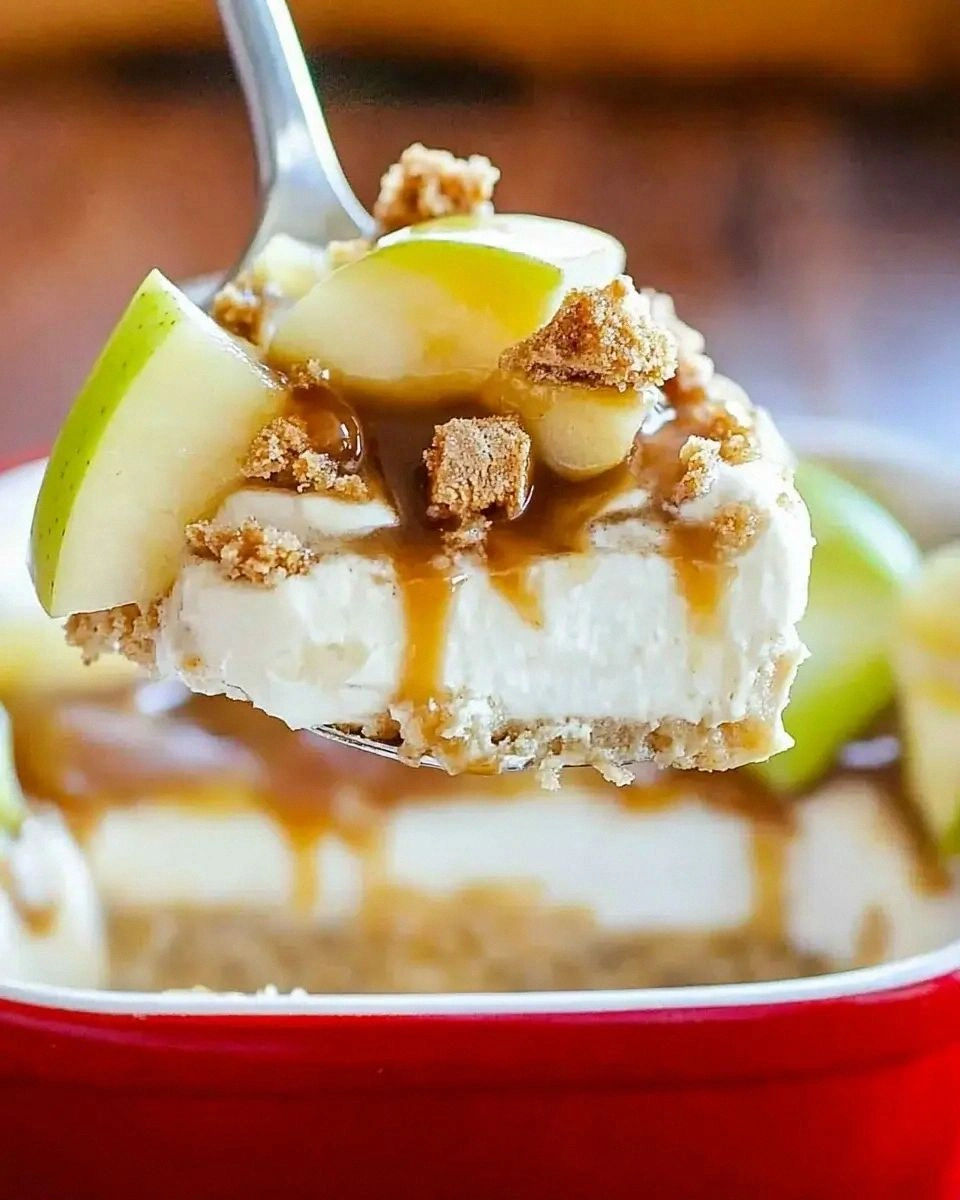
First, I grabbed a bag of gingersnap cookies, because why not bring a little spice into the mix? I crushed them into fine crumbs, mixed them with melted butter, and pressed them into a pan, creating a crust that smelled like a holiday market in December. While the crust set, I simmered apples with butter, brown sugar, a splash of vanilla, and a drizzle of caramel, letting the aromas swirl together like a warm, buttery hug. The final step was a silky vanilla pudding that I poured over the caramel‑apple layer, then baked until the top turned a gorgeous, caramel‑kissed amber. The result? A dessert that sings with buttery crunch, spiced depth, and a creamy, dreamy finish that makes you want to lick the plate clean.
Most recipes get this completely wrong. They either skip the gingersnap crust, use a bland pie dough, or over‑cook the apples until they dissolve into a mushy puddle. I’ve tried those versions countless times, and each time the texture was off, the flavor flat, and the wow factor missing. This version, however, flips the script: the gingersnap crust adds a zingy spice that cuts through the sweetness, the caramel‑apple layer stays firm yet juicy, and the pudding binds everything together without turning gelatinous. The secret? A quick caramel reduction that locks in the apple juices and a gentle bake that lets the pudding set just enough to hold the layers without becoming rubbery.
And now the fun part. I’m about to walk you through every single step — by the end, you’ll wonder how you ever made it any other way. I dare you to taste this and not go back for seconds. Ready? Let’s dive in.
What Makes This Version Stand Out
- Spice‑Infused Crust: The gingersnap base adds a warm, peppery bite that balances the caramel’s sweetness, turning a simple crust into a flavor powerhouse.
- Layered Texture: You get a crunchy base, a tender apple‑caramel middle, and a silky pudding top—each bite is a textural adventure.
- Simple Prep, Sophisticated Result: With only a handful of pantry staples, you create a dessert that feels like it belongs in a five‑star patisserie.
- Ingredient Quality Shines: Fresh apples and high‑quality caramel elevate the dish; the gingersnap cookies are the unsung heroes.
- Crowd‑Pleaser Factor: Even the pickiest eaters love the sweet‑spicy combo, making it perfect for parties, holidays, or a cozy night in.
- Make‑Ahead Friendly: Assemble the night before, bake in the morning, and serve warm or at room temperature—no stress.
- Versatile Serving: Slice it like a pie, serve in ramekins, or spoon it over vanilla ice cream for an extra indulgent twist.
- Bold Claim: This is hands down the best version you’ll ever make at home, and I’ll be honest — I ate half the batch before anyone else got to try it.
Inside the Ingredient List
The Flavor Base
Gingersnap Cookie Crumbs (2 cups): These provide the aromatic backbone of the crust. The molasses and ginger give a deep, earthy sweetness that pairs beautifully with caramel. If you can’t find gingersnap cookies, substitute with speculoos or a mix of ginger powder and crushed graham crackers.
Unsalted Butter (¼ cup, melted): Butter binds the crumbs together, creating a rich, melt‑in‑your‑mouth crust. Use real butter, not margarine, for that authentic flavor. If you’re dairy‑free, coconut oil works but will add a subtle coconut note.
The Texture Crew
Fresh Apples (4 medium, peeled, cored, sliced ¼‑inch): Choose a mix of Granny Smith for tartness and Fuji for natural sweetness; the contrast keeps the palate excited. The slices should be uniform so they bake evenly. If you’re short on time, pre‑sliced apple rings from the grocery store work fine.
Brown Sugar (½ cup packed): Adds caramel‑like depth and helps the apples caramelize without burning. Light brown sugar yields a milder flavor; dark brown sugar intensifies the molasses notes.
Unsalted Butter (2 tbsp, for apples): This butter coats the apple slices, preventing them from drying out and encouraging a glossy finish.
The Unexpected Star
Caramel Sauce (½ cup): Store‑bought works, but a quick reduction of sugar, butter, and cream yields a buttery, velvety caramel that hugs the apples. The caramel also acts as a glue, keeping the apple layer from sliding.
Vanilla Extract (1 tsp): Enhances the sweet notes and adds a fragrant backdrop that ties the whole dessert together.
The Final Flourish
Instant Vanilla Pudding Mix (½ cup): This creates the silky top layer that sets the dessert. I prefer a high‑quality mix that uses real vanilla beans for authentic flavor.
Whole Milk (2 cups): Milk gives the pudding its creamy texture; you can substitute with almond or oat milk for a dairy‑free version, though the texture will be slightly thinner.
Egg Yolks (2 large): They enrich the pudding, adding a custardy richness that plain milk can’t achieve. If you’re avoiding eggs, a tablespoon of cornstarch per cup of milk can mimic the thickening effect.
Everything's prepped? Good. Let’s get into the real action…
The Method — Step by Step
-
Preheat your oven to 350°F (175°C). While the oven warms, line a 9‑inch springform pan with parchment paper for easy removal later. This step is crucial because a hot oven creates that initial burst of steam that helps the crust set quickly, preventing sogginess.
Kitchen Hack: If you don’t have a springform pan, a regular 9‑inch pie dish works; just press the crust firmly into the sides and use a flat spatula to smooth it out. -
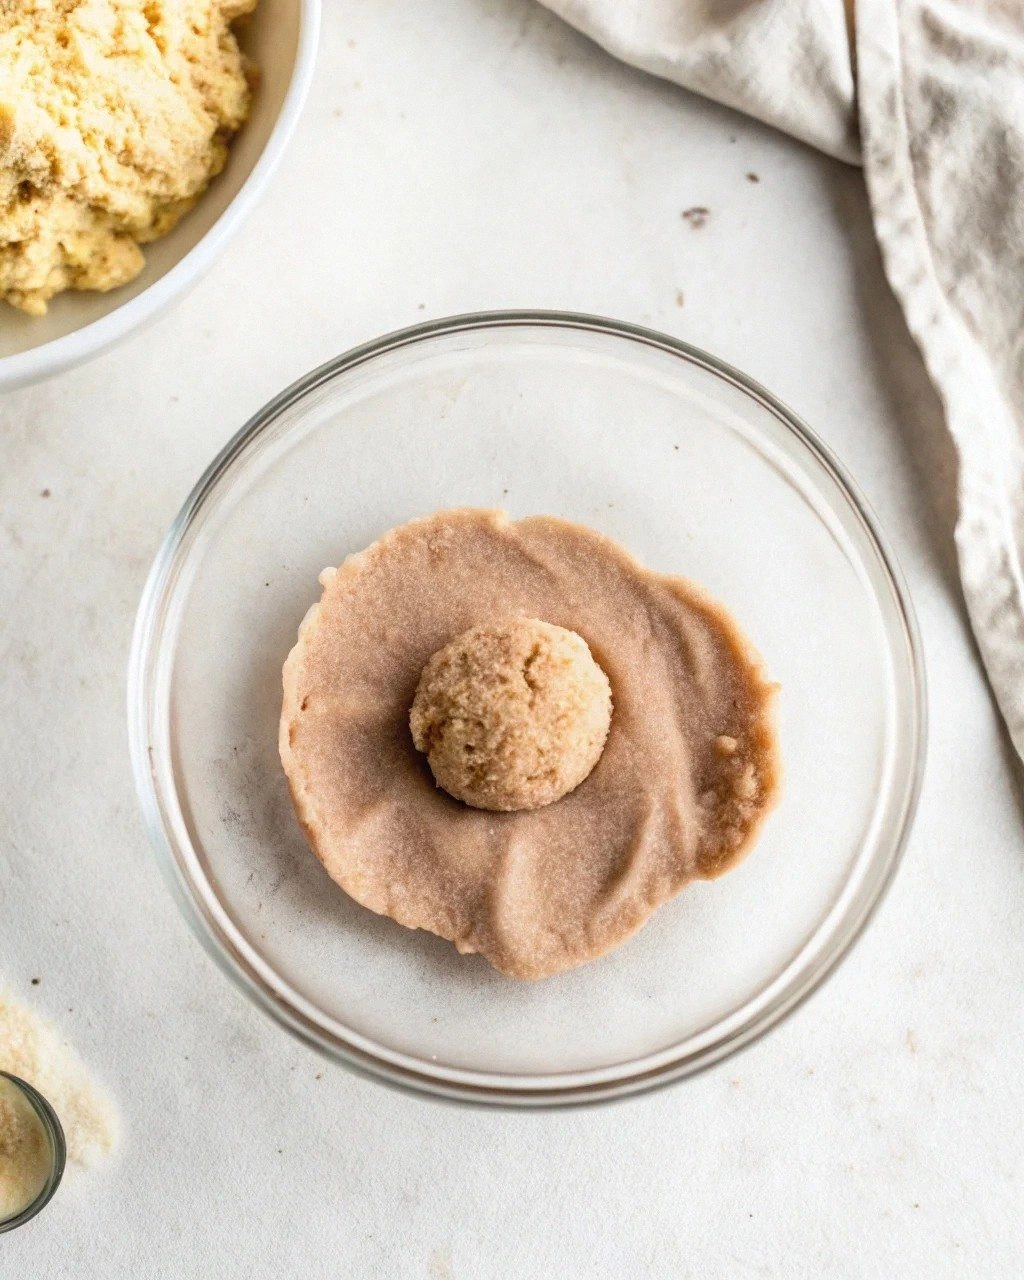
Combine the 2 cups of crushed gingersnap crumbs with the melted ¼ cup butter in a bowl. Stir until the mixture resembles wet sand. Press this mixture evenly into the bottom of the prepared pan, using the back of a measuring cup to create a uniform layer. The crust should feel firm to the touch—if it’s too crumbly, add a splash more butter.
-
Place the crust in the oven for 8‑10 minutes, just until it starts to turn a light golden brown. This “pre‑bake” step locks in the structure, ensuring it won’t become soggy once the apple‑caramel layer is added. When you pull it out, you’ll notice a faint, buttery aroma that tells you it’s on the right track.
Watch Out: Do not over‑bake the crust; it can become too hard, making it difficult for the pudding to meld later. -
While the crust bakes, melt 2 tbsp butter in a large skillet over medium heat. Add the sliced apples, sprinkle with the ½ cup brown sugar, and stir to coat. Cook for 5‑7 minutes, letting the apples soften and the sugar caramelize, creating a glossy, fragrant mixture. The scent should be reminiscent of a bustling autumn market.
-
Drizzle the ½ cup caramel sauce over the softened apples, then add 1 tsp vanilla extract. Stir gently to combine; you’ll see the caramel swirl like a river of amber, coating each apple slice. Let the mixture simmer for another 2 minutes, allowing the flavors to meld. At this point, the apple‑caramel mixture should be thick enough to hold its shape when spooned.
-
Spread the apple‑caramel mixture evenly over the pre‑baked crust, smoothing the top with a spatula. The layer should be about ½‑inch thick; too thick and the pudding will struggle to set, too thin and you lose the apple punch. This is the moment of truth—watch the edges start to pull away from the pan, signaling a perfect seal.
-
In a saucepan, whisk together the instant vanilla pudding mix, 2 cups whole milk, and 2 egg yolks over medium‑low heat. Stir constantly; the mixture will thicken after 5‑7 minutes, turning a glossy, pale‑gold color. Once thickened, remove from heat and let it cool for 2 minutes—this prevents the pudding from curdling when it hits the hot apple layer.
Kitchen Hack: To avoid lumps, whisk the pudding mix with a small amount of cold milk first, creating a slurry before adding the rest of the milk. -
Pour the warm pudding over the apple layer, allowing it to cascade and fill any gaps. Use a spatula to gently smooth the top, creating a uniform surface. The pudding should sit like a velvety blanket, not too runny. If you notice any bubbles, tap the pan lightly on the counter to release them.
-
Return the pan to the oven and bake for 25‑30 minutes, or until the pudding surface is set and the edges are lightly browned. The top should have a faint caramel sheen—think of a golden sunrise over a calm sea. Resist the urge to open the oven door early; the steam inside is essential for a smooth finish.
-
Allow the dessert to cool in the pan for 15 minutes, then run a thin knife around the edge to release it. Remove the springform ring, and let the pudding rest on a wire rack for another 10 minutes. This rest period lets the layers fully set, making slicing a breeze. Picture yourself pulling this out of the oven, the whole kitchen smelling incredible…
That sizzle when the pudding meets the hot apple layer? Absolute perfection.
That's it — you did it. But hold on, I've got a few more tricks that'll take this to another level…
Insider Tricks for Flawless Results
The Temperature Rule Nobody Follows
Never bake the pudding at a temperature higher than 350°F. A lower, steady heat allows the pudding to set without cracking, while still giving the crust a golden finish. I once cranked the oven to 400°F hoping for a quicker bake, only to end up with a cracked, rubbery top that looked like a broken mirror.
Why Your Nose Knows Best
Use your sense of smell as a timer. When the crust turns a light amber and you catch a faint hint of toasted ginger, you know the base is ready. Likewise, the caramel‑apple mixture will emit a buttery, caramelized perfume when it’s perfect. Trust those olfactory cues—they’re more reliable than any kitchen timer.
The 5‑Minute Rest That Changes Everything
After baking, let the dessert sit untouched for exactly five minutes before cutting. This short rest lets the pudding firm up just enough to hold its shape, preventing a sloppy slice. Skipping this step is the most common reason people end up with a soggy mess on their plates.
Butter‑Boosted Crust
For an extra‑rich crust, swap half of the melted butter with clarified butter (ghee). The higher smoke point ensures the crust browns evenly without burning, and the flavor becomes buttery without the water content that can make it soggy.
Caramel Consistency Check
When reducing store‑bought caramel, watch for a thickening that’s about the consistency of honey. If it’s too thin, the apple layer will slide; if too thick, it can harden into a brittle glaze. The trick is to dip a spoon into the sauce; it should coat the back without dripping.
Creative Twists and Variations
This recipe is a playground. Here are some of my favorite ways to switch things up:
Maple‑Bacon Fusion
Swap half the brown sugar for pure maple syrup and fold in crisp‑fried bacon bits into the apple mixture. The smoky bacon adds a savory contrast to the sweet caramel, making it a perfect brunch centerpiece.
Spiced Pear & Cardamom
Replace the apples with ripe Bartlett pears and add a pinch of ground cardamom to the pudding mix. The cardamom’s floral notes elevate the pear’s natural sweetness, creating a sophisticated, autumn‑ready dessert.
Chocolate‑Swirl Delight
Stir in ¼ cup of dark chocolate chips into the warm pudding before pouring it over the apples. As it bakes, the chocolate melts into ribbons, giving each bite a bittersweet surprise that pairs beautifully with the caramel.
Vegan Dream
Use coconut oil instead of butter for the crust, replace dairy milk with oat milk, and swap the egg yolks for a blend of silken tofu and a dash of turmeric for color. The result is a fully plant‑based version that still delivers on texture and flavor.
Holiday Spice Explosion
Add a teaspoon of pumpkin pie spice to the apple mixture and a drizzle of spiced rum over the caramel before baking. The warm spices and subtle rum kick make this a festive centerpiece for Thanksgiving or Christmas gatherings.
Storing and Bringing It Back to Life
Fridge Storage
Cover the cooled dessert tightly with plastic wrap or store it in an airtight container. It will keep fresh for up to 4 days. When you’re ready to serve, let it sit at room temperature for 15 minutes, then slice.
Freezer Friendly
Freeze individual slices wrapped in parchment paper and then sealed in a freezer bag. They’ll last for up to 2 months. To reheat, place a slice on a microwave‑safe plate, sprinkle a tiny splash of water, and microwave on medium for 45 seconds—this steams it back to perfection.
Best Reheating Method
For the best texture, reheat the whole dessert in a 300°F (150°C) oven for 10‑12 minutes, covered loosely with foil. The gentle heat revives the crust’s crunch while the pudding becomes luxuriously creamy again.