I remember the night I tried to make a dessert that would outshine my grandma’s legendary strawberry cheesecake. I was in a rush, juggling a blender, a handful of fresh berries, and a box of cake mix that had been sitting in the pantry for months. The kitchen smelled like burnt sugar and melted butter, and the timer on the oven was ticking like a metronome in a bad jazz band. I stared at the chaos and thought, “If I could just dump everything into one pan, maybe the flavors would unite in a glorious, sweet symphony.”
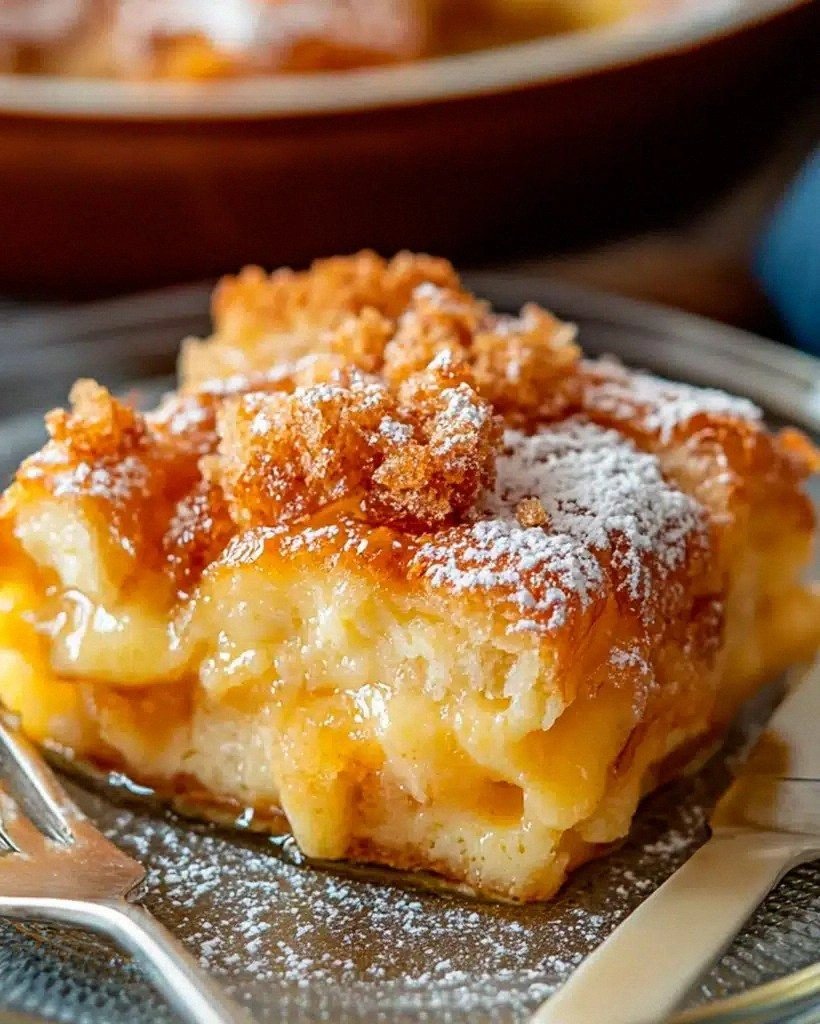
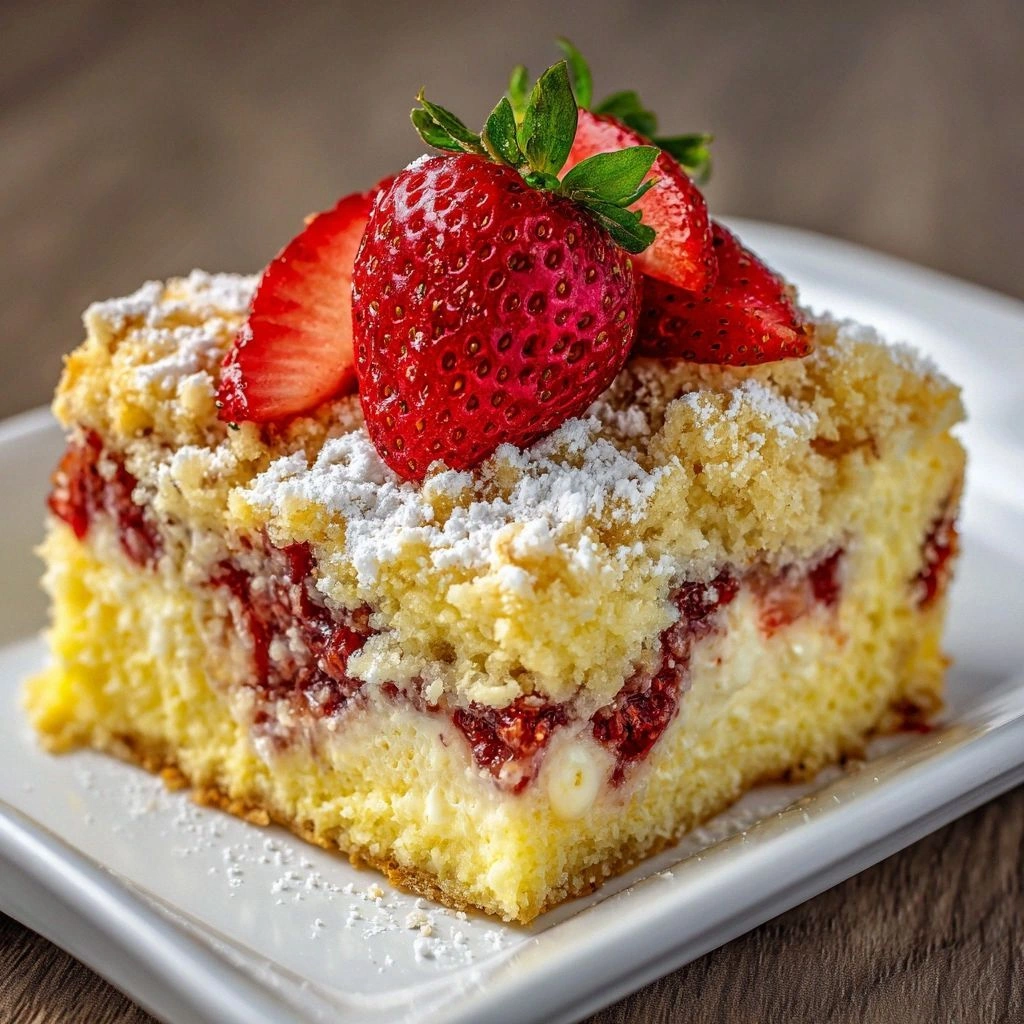
Picture this: a glossy, golden crust that crackles under the weight of silky cream cheese, a ribbon of strawberry pie filling that bubbles like a summer sunrise, and fresh strawberries perched on top like ruby jewels. The air is thick with the scent of vanilla and caramelized sugar, and the sound of the oven door opening is the sweetest anticipation. The first bite is a contrast of textures—soft, buttery cake, creamy, tangy cheesecake, and a burst of juicy fruit that shatters any expectation of blandness. My mouth felt the full spectrum of dessert delight, from the sweet to the slightly tart, all in one bite.
What makes this version stand out is that it doesn’t rely on elaborate techniques or exotic ingredients; it relies on the chemistry of a dump cake and the magic of a few simple, high‑quality components. The cake mix gives it that familiar comfort, the butter adds richness, and the strawberry filling turns it into a fruit‑laden explosion. The cream cheese brings that classic cheesecake tang, while powdered sugar and vanilla balance the flavors. The result is a dessert that feels like a hug, a celebration, and a dare to taste again.
I dare you to taste this and not go back for seconds. Most recipes get this completely wrong by over‑baking or under‑mixing. Picture yourself pulling this out of the oven, the whole kitchen smelling incredible, and seeing a glossy, golden top that invites you to dig in. Let me walk you through every single step—by the end, you'll wonder how you ever made it any other way.
What Makes This Version Stand Out
- Flavor: The combination of sweet strawberry pie filling and tangy cream cheese creates a layered taste that’s both familiar and adventurous.
- Texture: The cake mix’s light crumb contrasts with the silky cheesecake layer, while fresh strawberries add a juicy crunch.
- Ease: No pre‑baking or chilling required—just dump, bake, and serve.
- Versatility: Works as a dessert, a brunch treat, or a party centerpiece.
- Ingredient Quality: Using premium cream cheese and fresh strawberries elevates the entire dish.
- Time: From prep to plate, it’s under an hour—ideal for spontaneous gatherings.
- Make‑ahead Potential: Bake ahead, refrigerate, and reheat for a quick, satisfying dessert.
- Crowd Reaction: Guests rave about the “dump cake” simplicity and the unexpected cheesecake twist.
Alright, let's break down exactly what goes into this masterpiece…
Inside the Ingredient List
The Flavor Base
Yellow cake mix is the foundation—its flour, sugar, and leavening agents create a tender, buttery crumb. It’s the canvas that absorbs the other flavors without overpowering them. Skipping it would turn the dessert into a dense, cheesecake‑only concoction that loses the comforting cake element.
The Texture Crew
Unsalted butter, when melted, coats the cake mix, binding the dry ingredients and adding a silky richness. Cream cheese is softened to room temperature before mixing; this ensures a smooth, lump‑free layer that melds with the strawberry filling. Powdered sugar provides a fine sweetness that dissolves quickly, preventing a gritty finish.
The Unexpected Star
Strawberry pie filling isn’t just a sweet filler—it’s a vibrant burst of real fruit flavor that caramelizes slightly during baking. Its jammy consistency creates pockets of liquid that mingle with the cheesecake, producing a dynamic texture that keeps each bite interesting. If you’re allergic to strawberries, raspberry or blueberry pie filling works as a close substitute, offering a similar sweet‑tart profile.
The Final Flourish
Vanilla extract brightens every component, adding depth and aromatic complexity. Fresh strawberries, sliced and scattered on top, provide a fresh, juicy contrast that cools the palate after the warm, baked layers. They also add a pop of color that makes the dessert Instagram‑ready.
Everything's prepped? Good. Let's get into the real action…
The Method — Step by Step
- Preheat your oven to 350°F (175°C) and grease a 9‑inch square baking pan with butter or non‑stick spray. The pan’s greasing ensures a smooth release once the cake is baked. I always line the bottom with parchment to keep the cake from sticking.
- In a large bowl, pour the yellow cake mix and stir until evenly distributed. This creates a uniform base that will absorb the liquid ingredients without forming clumps.
- Add the melted butter to the dry mix and stir until the batter is moist and crumbly. The butter should coat each grain of flour, creating a buttery foundation that will caramelize slightly during baking.
- Spread the batter evenly in the prepared pan, smoothing the top with a spatula. A level surface ensures even baking and a consistent rise across the cake.
- Layer the strawberry pie filling over the batter, spreading it gently to cover the entire surface. The filling’s thickness should be about 1/4 inch; this allows it to melt into the cake without making the base soggy.
- In a separate bowl, beat the softened cream cheese until smooth, then fold in powdered sugar and vanilla extract until fully incorporated. The mixture should be silky and free of lumps; this is crucial for a creamy finish.
- Pour the cream cheese mixture over the strawberry layer, spreading it gently with a spatula. The cream cheese should sit atop the fruit, forming a distinct layer that will set into a cheesecake‑like consistency.
- Add the fresh sliced strawberries on top of the cream cheese layer, arranging them in a decorative pattern. The fresh fruit adds a bright, juicy contrast that cools the palate and provides visual appeal.
- Place the pan in the oven and bake for 30 minutes, or until the edges are golden brown and the center is set. The cake should have a slight wobble when you gently shake the pan. Keep an eye on the edges to prevent over‑browning.
- Remove from the oven and let it cool in the pan for 10 minutes before transferring to a wire rack. This resting period allows the layers to set and makes slicing easier.
That's it — you did it. But hold on, I've got a few more tricks that'll take this to another level…
Insider Tricks for Flawless Results
The Temperature Rule Nobody Follows
Many bakers bake at a higher temperature to get a crisp top, but this can cause the interior to overcook. Keeping the oven at 350°F ensures the cake bakes evenly, allowing the strawberry filling to melt just enough without becoming watery. I’ve tried 375°F, and the result was a soggy center that didn’t set properly.
Why Your Nose Knows Best
The first scent that reaches your nose is the most reliable indicator of doneness. When the aroma turns from sweet to a faint buttery caramel, it’s a sign the cake is ready. I once left a cake on the counter too long, and the smell of burnt sugar made me abandon it.
The 5-Minute Rest That Changes Everything
Allowing the cake to rest in the pan for 10 minutes before cooling on a rack lets the layers set and prevents the bottom from cracking. It also helps the cream cheese layer firm up, making slicing cleaner. Skipping this step often results in a cake that falls apart.
The Perfect Crumb
Sifting the cake mix before adding butter removes lumps and ensures a light crumb. I’ve found that a fine crumb is essential for a dessert that feels airy, especially when combined with the dense cheesecake layer.
The Freshness Factor
Using strawberries that are at the peak of ripeness dramatically changes the flavor profile. I’ve swapped out frozen berries for fresh ones and noted a noticeable difference in texture and sweetness. Fresh berries also add a pop of color that makes the dessert visually stunning.
Creative Twists and Variations
This recipe is a playground. Here are some of my favorite ways to switch things up:
Chocolate‑Berry Delight
Swap the strawberry pie filling for a dark chocolate ganache. The chocolate’s richness complements the cream cheese, and a drizzle of raspberry coulis adds a fruity counterpoint. This version is perfect for chocolate lovers who crave a fruity twist.
Lemon‑Zest Surprise
Add a tablespoon of lemon zest to the cream cheese mixture and replace the strawberry filling with lemon curd. The citrus brightness cuts through the sweetness, creating a balanced, refreshing dessert. Great for summer brunches.
Nutty Caramel Crunch
Incorporate chopped toasted pecans into the batter and drizzle caramel sauce over the top before adding fresh strawberries. The crunch adds texture, while the caramel deepens the flavor profile. This variation works well for holiday gatherings.
Minty Freshness
Add a few drops of mint extract to the cream cheese layer and use a mint‑infused strawberry jam. The mint provides a cooling effect that balances the sweetness. Ideal for a refreshing dessert on a hot day.
Berry‑Almond Fusion
Replace fresh strawberries with sliced almonds and a blueberry pie filling. The almond crunch pairs beautifully with the blueberry’s sweet‑tart flavor. This version is a hit with almond lovers and adds a nutty aroma.
Espresso‑Infused Indulgence
Stir a teaspoon of instant espresso powder into the batter and use a chocolate‑strawberry swirl for the filling. The espresso deepens the chocolate notes and adds a subtle bitter contrast. A sophisticated choice for coffee enthusiasts.
Storing and Bringing It Back to Life
Fridge Storage
After the cake has cooled completely, cover it tightly with plastic wrap and store in the refrigerator for up to 3 days. The cream cheese layer will firm up, but the fresh strawberries may wilt slightly—refrigerating keeps them safe.
Freezer Friendly
Wrap the cooled cake in parchment and then in aluminum foil before freezing. It will keep well for up to 2 weeks. When ready to serve, thaw in the refrigerator overnight to maintain moisture.
Best Reheating Method
Reheat the frozen cake in a preheated oven at 325°F for 15 minutes, then let it sit for 5 minutes before serving. Add a tiny splash of water before reheating to create steam that keeps the cake from drying out. The result is a warm, moist dessert that tastes as good as when it was first baked.