Picture this: I’m standing in a cramped kitchen, the oven’s already on, and my pantry feels like a treasure trove of cookie crumbs and peanut butter. I had a midnight craving for something that could double as a dessert and a crowd‑pleaser for a last‑minute dinner party. I grabbed 28 Oreo cookies, a tub of creamy peanut butter, and a handful of other ingredients, hoping for a simple twist on the classic Oreo pie. The result? A silky, buttery base that melts into a peanut‑butter‑laden filling, topped with whipped cream and a drizzle of hot fudge that makes every bite feel like a decadent surprise.
The first thing you notice is the aroma—rich chocolate, a hint of vanilla, and the unmistakable scent of toasted cookies. As the filling simmers, the butter starts to sizzle, releasing a buttery crackle that fills the kitchen with a comforting, almost nostalgic soundtrack. The texture shifts from a crumbly crust to a smooth, creamy center that clings to your spoon like a velvety blanket. Every bite is a symphony of crunch and melt, with the peanut butter adding a nutty undertone that cuts through the sweetness. The final drizzle of hot fudge glistens like a glossy finish on a masterpiece.
What makes this version stand out is not just the flavor profile but the sheer confidence it brings to the table. I’m not talking about a mediocre, run‑of‑the‑mill cookie pie; this is the kind of dessert that makes people ask if you’re a pastry chef. The combination of Oreo, peanut butter, and cream cheese creates a depth of flavor that feels both indulgent and comforting. The recipe’s simplicity—just a handful of ingredients and a single pan—means you can whip it up in under an hour. And the best part? It’s a showstopper that will have guests reaching for seconds, or even thirds.
I dare you to taste this and not go back for seconds. The secret? A perfectly balanced ratio of butter to cookies, a touch of vanilla to lift the flavors, and a generous swirl of whipped topping that keeps everything airy. Picture yourself pulling this out of the oven, the whole kitchen smelling incredible, and seeing the eyes light up as the first slice slides onto a plate. Let me walk you through every single step—by the end, you’ll wonder how you ever made it any other way.
What Makes This Version Stand Out
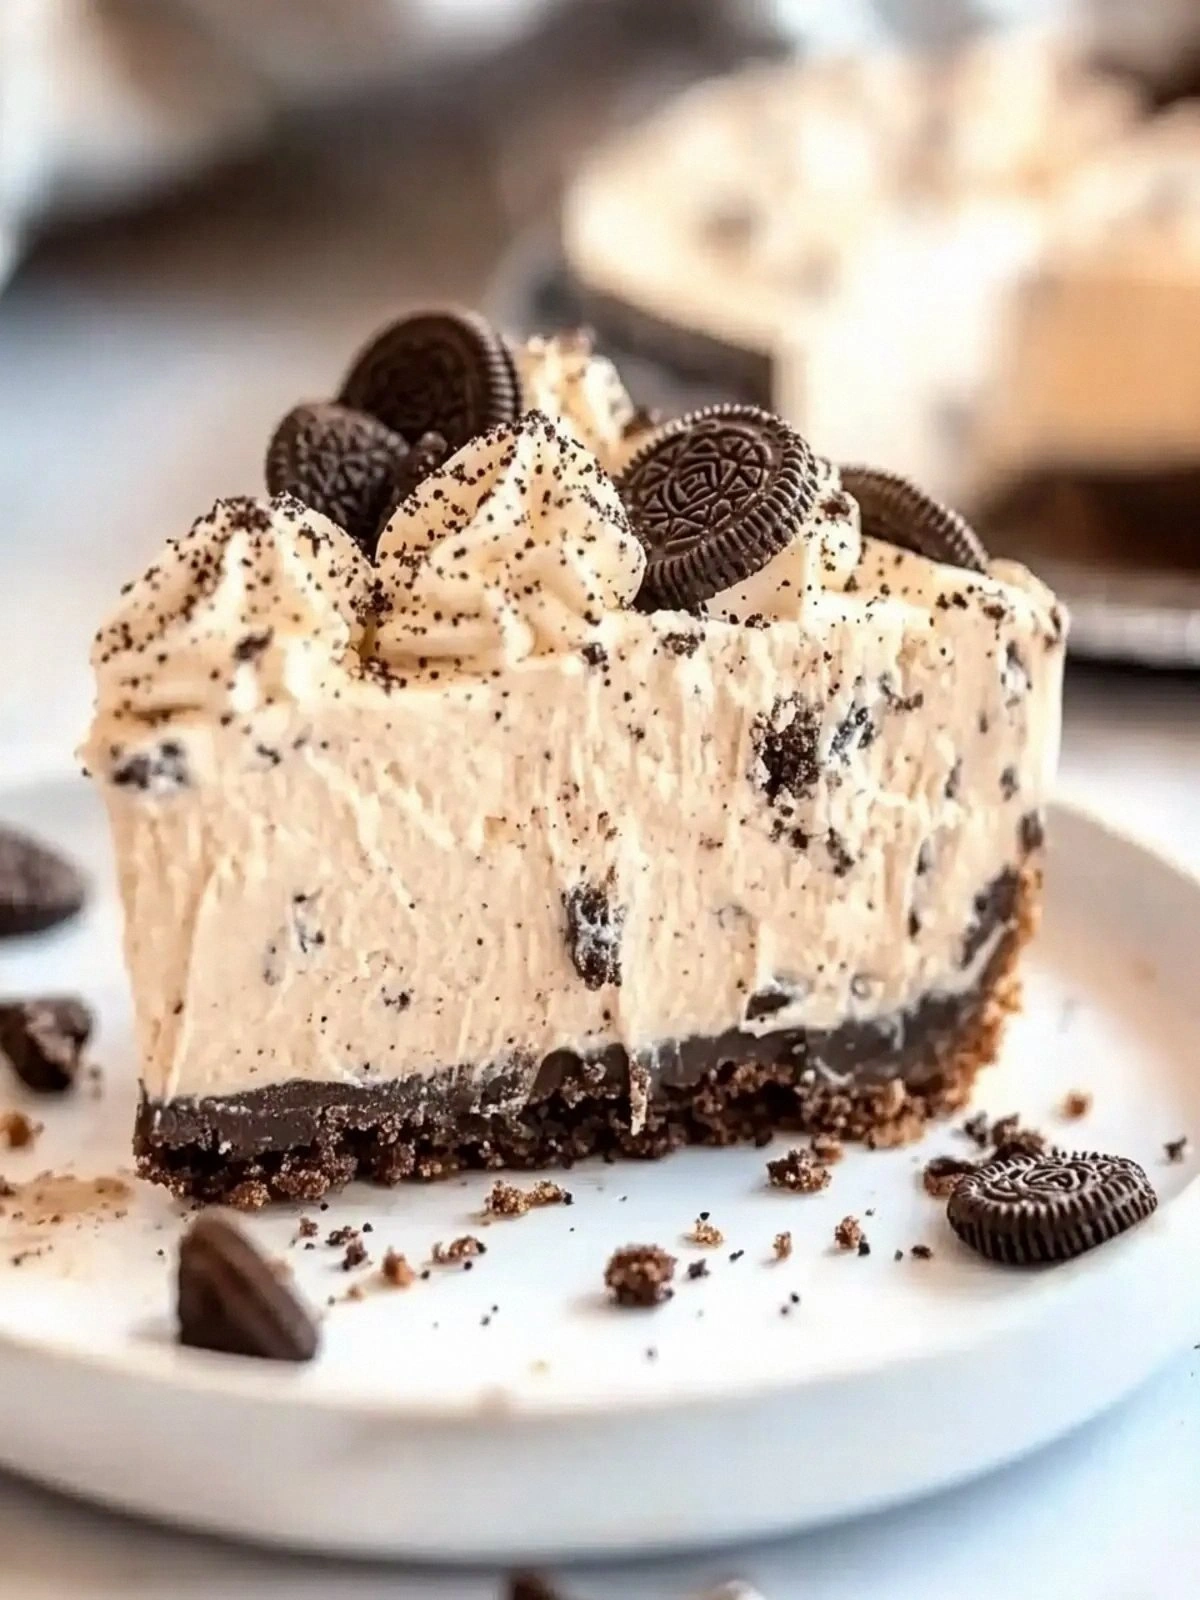
- Flavor: The blend of chocolate, peanut butter, and a hint of vanilla creates a multi‑layered taste that satisfies both sweet and savory cravings. It’s the kind of flavor that lingers on the palate, prompting that inevitable second bite.
- Texture: The crust delivers a satisfying crunch that gives way to a silky, creamy filling. The contrast feels like a dance of textures that never feels heavy or cloying.
- Visual Appeal: The glossy hot fudge drizzle and the swirled whipped topping create a dessert that looks as good as it tastes—think Instagram‑ready in every bite.
- Ease of Prep: With only nine ingredients and one pan, this recipe is a breeze for beginners and a quick win for seasoned cooks.
- Make‑Ahead Friendly: The pie can be assembled up to a day in advance, making it perfect for last‑minute parties or as a pre‑planned treat.
- Ingredient Quality: Using high‑quality Oreo cookies and natural peanut butter elevates the entire dish, ensuring each bite is packed with authentic flavor.
- Versatility: Whether you’re a peanut butter aficionado or a chocolate lover, this pie can be tweaked to suit your taste buds.
Alright, let’s break down exactly what goes into this masterpiece…
Inside the Ingredient List
The Flavor Base
The 28 Oreo cookies form the heart of the crust. Their chocolatey crunch adds depth and a subtle bitterness that balances the sweetness of the rest of the pie. If you skip them, you lose the signature Oreo flavor and the textural contrast that makes each bite memorable. Swap them for chocolate sandwich cookies or even a handful of chocolate chips for a slightly different crunch.
Butter, measured at 6 tablespoons, melts into the cookie crumbs, creating a cohesive base that holds together when sliced. It also adds a rich, buttery undertone that complements the chocolate and peanut butter. If you’re watching calories, try using a light butter or a butter substitute, but be aware the crust might be slightly less buttery.
The Texture Crew
Cream cheese, at 8 ounces, is the binder that turns the crumbly mix into a smooth, velvety filling. Its tang balances the sweetness of the powdered sugar and the richness of the peanut butter. Skipping it would leave the filling too loose and watery. For a vegan version, substitute with a plant‑based cream cheese or a thick coconut cream.
Powdered sugar, one cup, sweetens the filling without adding bulk. It dissolves quickly, giving the pie a silky finish. If you prefer a less sweet dessert, reduce the sugar by a quarter cup. For a gluten‑free option, use a gluten‑free powdered sugar, which is just as fine and dissolves just as well.
Milk, a quarter cup, helps thin the filling to the perfect consistency. It also adds a subtle creaminess that makes the pie feel lighter. If you’re lactose intolerant, a splash of almond milk or oat milk works just as well. Too much milk and the filling becomes watery; too little and it’s stiff.
The Unexpected Star
Vanilla extract, one teaspoon, is the secret that lifts all the flavors. A dash of vanilla brings out the chocolate’s depth and the peanut butter’s nuttiness, creating a harmonious flavor profile. If you’re vegan, choose a plant‑based vanilla extract or a splash of vanilla bean paste.
Peanut butter, half a cup of creamy variety, is the star that turns this pie from ordinary to unforgettable. It provides a rich, nutty flavor that complements the chocolate and gives the filling a luxurious mouthfeel. If you’re a fan of crunchy peanut butter, add a handful of chopped peanuts for an extra crunch. For a healthier twist, use natural peanut butter with no added sugars.
The Final Flourish
Whipped topping, eight ounces, is folded into the filling to add lightness and a sweet, airy texture. It also serves as a canvas for the hot fudge drizzle. If you’re looking for a low‑fat version, use a light whipped topping or a homemade whipped coconut cream.
Chopped Oreos, eight cookies, are sprinkled on top of the whipped topping for an extra crunch and visual appeal. They also reinforce the Oreo flavor in the final bite. If you’re a chocolate lover, add a handful of chocolate chips instead for a richer finish.
Hot fudge topping, to taste, is drizzled over the assembled pie to create a glossy, caramelized finish. The heat of the fudge melts slightly into the whipped topping, creating a sweet, chocolatey glaze that’s irresistible. If you’re not a fan of hot fudge, a chocolate ganache or a simple chocolate syrup works just as well.
Everything's prepped? Good. Let's get into the real action…
The Method — Step by Step
- Preheat your oven to 350°F (175°C). Line a 9‑inch pie pan with parchment paper to prevent sticking. This step sets the stage for a smooth crust that’s easy to lift out. While the oven warms, gather all your ingredients so you’re not scrambling mid‑bake.
- In a large bowl, combine the 28 Oreo cookies with 6 tablespoons of softened butter. Use a fork or your hands to crush the cookies into fine crumbs. The butter should coat the crumbs, forming a cohesive mixture. This is the moment when the aroma of chocolate and butter fills the kitchen.
- Press the crumb mixture firmly into the bottom of the prepared pie pan. Use the back of a spoon or the palm of your hand to create an even surface. The crust should be about 1/2 inch thick. Let it set in the refrigerator for 10 minutes while you prepare the filling.
- In a medium bowl, beat 8 ounces of cream cheese until smooth. Add 1 cup powdered sugar and 1/4 cup milk, and continue beating until the mixture is silky. The cream cheese should be at room temperature to prevent lumps. This filling will be the star of the show.
- Stir in 1 teaspoon vanilla extract and 1/2 cup creamy peanut butter until fully incorporated. The mixture should be glossy and free of streaks. The peanut butter adds a nutty depth that elevates the entire dessert.
- Pour the filling over the pre‑baked crust, smoothing the top with a spatula. The filling should be level, as this ensures even baking. The aroma will intensify as the pie bakes.
- Bake in the preheated oven for 25 minutes, or until the edges are set and the center is slightly jiggly. The pie should smell like warm chocolate and peanut butter. Remove from the oven and let it cool to room temperature, then refrigerate for at least 2 hours to set.
- Before serving, fold 8 ounces of whipped topping into the cooled filling. This step adds airiness and a sweet, light texture. Top with 8 chopped Oreos and drizzle hot fudge to taste. The final drizzle should be glossy and slightly melted for that perfect finish.
That's it — you did it. But hold on, I've got a few more tricks that'll take this to another level…
Insider Tricks for Flawless Results
The Temperature Rule Nobody Follows
Baking the crust at exactly 350°F is key. Too hot, and the cookies will burn; too cool, and the crust will be soggy. I’ve learned that a 5‑minute pre‑bake makes the crust firm and ready to hold the creamy filling. This small step saves the pie from collapsing during the final bake.
Why Your Nose Knows Best
Trust your nose when the filling starts to bubble and emit a rich, buttery aroma. That’s the signal that the butter has fully melted into the crumbs, creating a cohesive base. A friend once tried skipping this step and ended up with a crust that was still crumbly and uneven.
The 5-Minute Rest That Changes Everything
After removing the pie from the oven, let it rest on the counter for 5 minutes before chilling. This brief pause allows the filling to set slightly, making it easier to slice cleanly. Skipping it can result in a gooey, messy slice that’s hard to handle.
The Sweet‑Heat Balance
When drizzling hot fudge, pour slowly in a circular motion to create a uniform glaze. The fudge should be warm enough to melt slightly into the whipped topping but not so hot that it liquefies the entire top layer. A friend once drizzled too hot fudge and it ran off the sides, ruining the presentation.
The Final Touch of Crunch
Sprinkle the chopped Oreos just before serving. This preserves their crunch and adds a textural contrast that elevates every bite. If you prefer a smoother finish, reserve a handful of Oreos for a garnish on the side.
Creative Twists and Variations
This recipe is a playground. Here are some of my favorite ways to switch things up:
Nutty Crunch Variation
Add a cup of chopped toasted almonds or walnuts to the filling. The nutty crunch pairs beautifully with the peanut butter, creating a new layer of texture and a slightly earthy flavor that balances the sweetness.
Coconut Cream Surprise
Swap the cream cheese for a blend of coconut cream and Greek yogurt. This gives the pie a tropical twist while keeping the filling silky. The coconut adds a subtle warmth that pairs well with the chocolate.
Minty Fresh Twist
Stir in 1 teaspoon of peppermint extract into the filling. The mint adds a refreshing kick that cuts through the richness, making it perfect for summer gatherings or holiday parties.
Dark Chocolate Depth
Use dark chocolate Oreos and dark chocolate for the fudge drizzle. The bittersweet notes of dark chocolate elevate the pie, making it a sophisticated dessert for chocolate connoisseurs.
Vegan Version
Replace the cream cheese with a vegan cream cheese substitute, use plant‑based whipped topping, and choose a vegan peanut butter. The result is a luscious, dairy‑free dessert that still delivers on flavor.
Coffee Infusion
Add 1 tablespoon of instant espresso powder to the filling. The coffee accentuates the chocolate and peanut butter flavors, giving the pie a bold, adult‑friendly profile.
Storing and Bringing It Back to Life
Fridge Storage
Store the pie in an airtight container in the refrigerator for up to 4 days. The creamy filling stays firm, and the crust remains slightly crisp. When you’re ready to serve, let it sit at room temperature for 15 minutes to soften the whipped topping.
Freezer Friendly
For longer storage, wrap the pie tightly in plastic wrap and then in aluminum foil before freezing. It can stay in the freezer for up to 2 months. Thaw overnight in the fridge before reheating.
Best Reheating Method
Reheat the frozen pie at 325°F for 15 minutes, or until warmed through. Add a splash of milk or water before reheating to create steam; this keeps the filling from drying out. Finish with a fresh drizzle of hot fudge for that glossy finish.