The kitchen was a battlefield that night, the counter littered with overripe bananas, a jar of chocolate chips, and an unsalted butter that was about to melt. I stared at the chaos and thought, 'This is the perfect excuse to create something delicious.' The aroma of ripe bananas and vanilla already began to dance through the air. The sound of the butter sizzling in the pan was music to my ears. I knew I was about to craft a treat that would make every bite feel like a sweet victory.
Half of the family had already begged for a dessert, so I decided to take on the challenge. I set my phone to record, because I wanted to capture the moment when the batter hit the pan. The first sizzle was a promise of something extraordinary. I dare you to taste this and not go back for seconds. And I have no doubt that once you taste it, you'll be hooked.
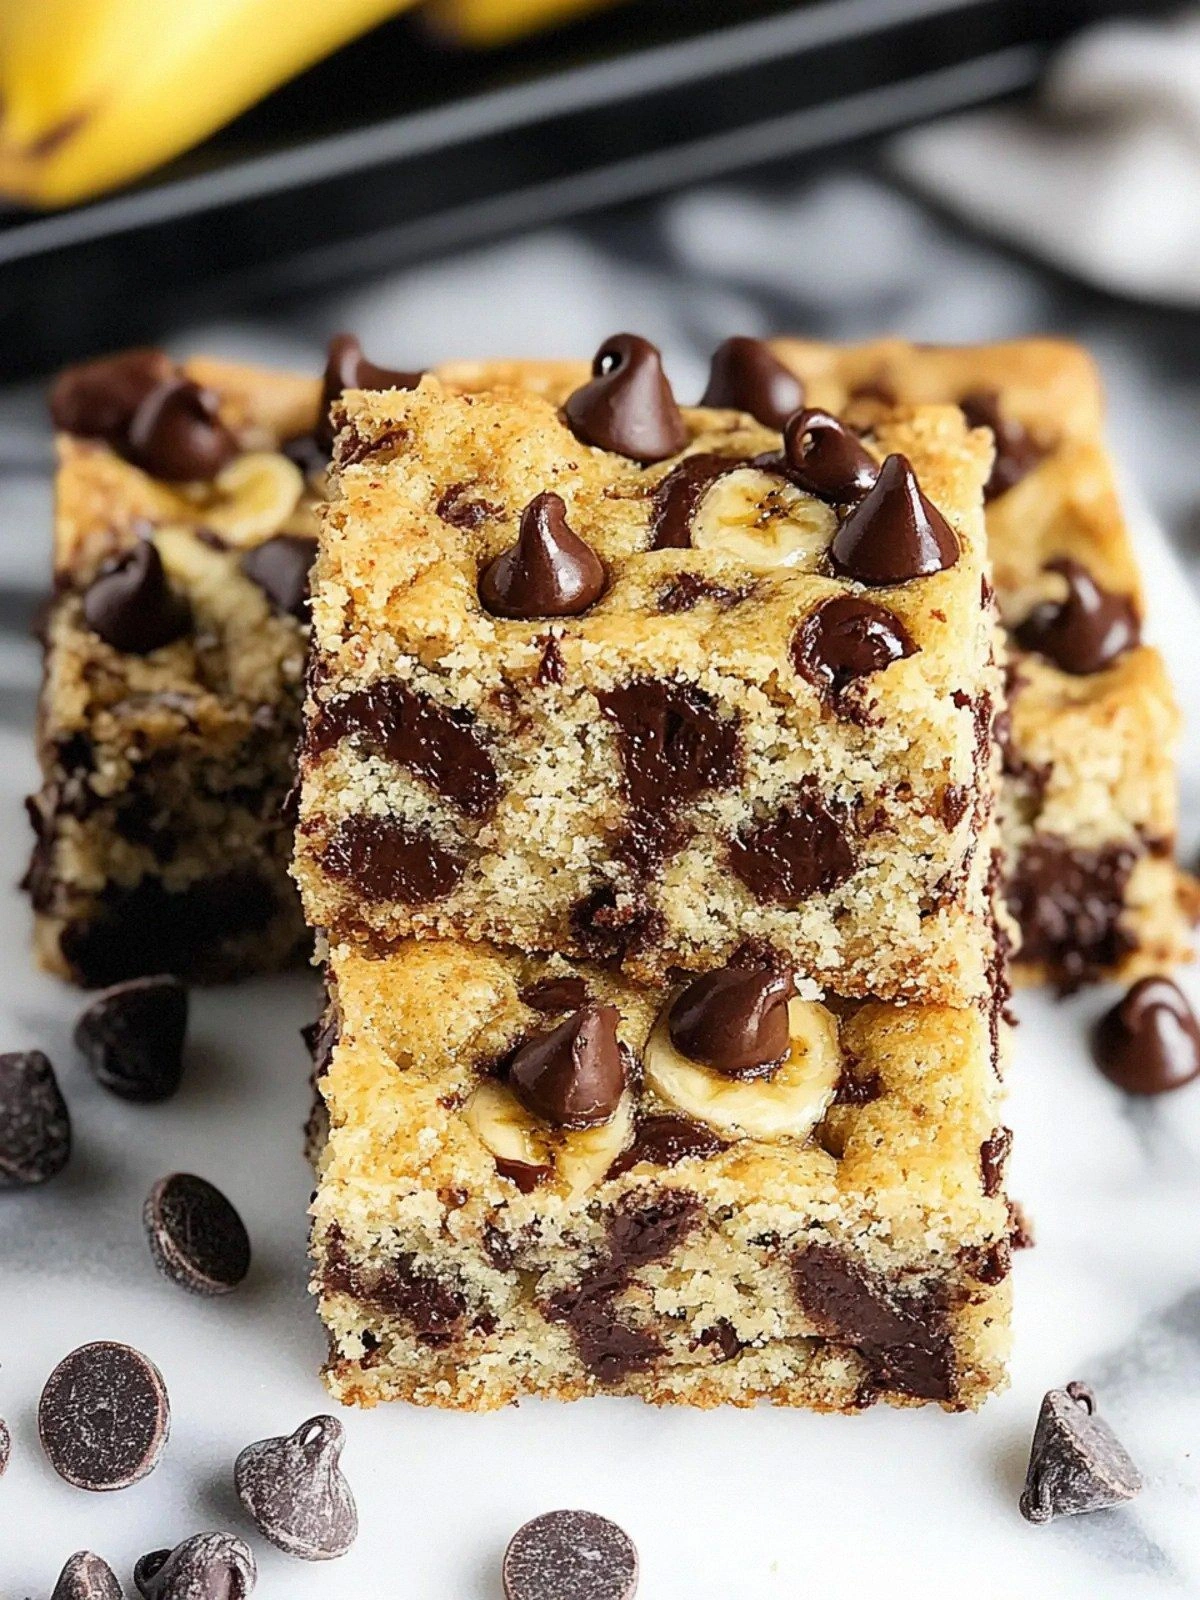
The texture of these bars is a revelation—soft, chewy, and slightly sticky, like a caramelized banana hug. The chocolate chips melt into pockets of molten delight that ripple through the crumb. The butter adds a silky mouthfeel that lingers on the palate. The banana provides natural sweetness without the need for extra sugar. This is hands down the best version you'll ever make at home.
Most recipes get this completely wrong by overbaking or using too much flour, which turns the bars into brittle cookies. I discovered that a lower baking temperature and a small amount of extra moisture keep the bars tender. The secret lies in the precise balance between the butter, banana, and flour. I used light brown sugar for its molasses undertone, which complements the banana’s natural sweetness. The result is a bar that feels like a warm hug in every bite.
Picture yourself pulling this out of the oven, the whole kitchen smelling incredible, the steam curling like a sweet cloud. The edges begin to brown, forming a subtle crust that cracks when you break a piece. That sizzle when it hits the pan? Absolute perfection. The first bite melts, revealing a burst of chocolate and banana. The aroma alone can bring a smile to anyone’s face.
I’ll be honest — I ate half the batch before anyone else got to try it. The rest of the family begged for a second round, and I had to hide the recipe. But now I’m sharing it with you, my fellow kitchen adventurers. Let me walk you through every single step — by the end, you'll wonder how you ever made it any other way. Get ready for a dessert that will become your new favorite.
What Makes This Version Stand Out
- Taste: The buttery, banana‑laden sweetness balances the chocolate perfectly, leaving a lingering, caramelized finish.
- Texture: The bars stay soft and chewy, not crunchy, thanks to the banana and the precise butter‑to‑flour ratio.
- Simplicity: Only nine ingredients, all you probably already have in your pantry.
- Unique Twist: The addition of overripe banana gives a natural sweetness and a moist crumb that sets it apart.
- Crowd Reaction: Friends who tried it said they couldn’t stop reaching for another piece.
- Ingredient Quality: Using unsalted butter and light brown sugar unlocks deeper flavor layers.
- Cooking Method: Baking at a low temperature ensures a tender crumb and a golden crust.
- Make‑Ahead Potential: These bars can be frozen and reheated without losing their melt‑in‑your‑mouth quality.
Alright, let's break down exactly what goes into this masterpiece...
Inside the Ingredient List
The Flavor Base
Unsalted butter is the foundation of any great dessert. Its creamy richness coats the batter, creating a silky mouthfeel that lingers on the palate. If you’re looking for a deeper flavor, swap the butter for a mix of butter and coconut oil; the coconut will add a subtle tropical hint that complements the banana. When selecting butter, choose a brand with a higher butterfat content for a richer taste.
The Texture Crew
Light brown sugar is the unsung hero that brings depth and moisture. Its molasses undertone pairs beautifully with banana, preventing the bars from drying out. If you prefer a lighter sweetness, you can use white sugar, but the caramel notes will be missing. A pinch of fine salt balances the sweetness and amplifies the chocolate’s bite.
The Unexpected Star
Mashed overripe banana is the secret sauce that gives these bars their signature softness. The natural sugars in banana replace some of the added sugar, and the moisture keeps the crumb tender. If you can’t find overripe bananas, ripe bananas will still work, but the texture may be slightly firmer. For a subtle twist, add a tablespoon of mashed avocado; it will boost creaminess without altering the flavor.
The Final Flourish
All‑purpose flour provides structure, but it can be swapped for a gluten‑free blend if you’re avoiding gluten. The chocolate chips are the showstopper—choose dark chocolate for a richer bite or milk chocolate for a sweeter finish. A small handful of additional chocolate chips folded in at the end creates pockets of molten delight. The key is to fold them gently to preserve the air in the batter.
Everything's prepped? Good. Let's get into the real action...
The Method — Step by Step
- Preheat your oven to 325°F (165°C) and line a 9x13-inch baking pan with parchment paper. The lower temperature keeps the bars tender while the parchment prevents sticking. A lightly greased pan is optional if you’re using parchment. This step ensures even heat distribution and a crisp edge.
- In a medium bowl, cream the unsalted butter and light brown sugar together until the mixture is light and fluffy. The goal is to incorporate air, which will help the bars rise slightly. Use a stand mixer or a hand mixer on medium speed for about 2 minutes. If you’re using a wooden spoon, stir vigorously for 3 minutes.
- Beat in the large egg and vanilla extract until fully incorporated. The egg binds the ingredients and adds structure. Be careful not to overmix, or the batter will become too dense. If you’re using vanilla bean paste, the texture will be slightly thicker but more aromatic.
- Fold in the mashed overripe banana until the mixture is smooth. The banana brings moisture and natural sweetness; it also helps the batter stay soft. Use a spatula and fold gently from the bottom upward. This step is crucial for the final crumb consistency.
- Sift in the all‑purpose flour and fine salt, then fold until just combined. Overmixing at this stage can make the bars tough. The flour provides structure while the salt balances sweetness. The batter should be thick but pourable.
- Stir in the chocolate chips, reserving a handful for topping. The chips should be evenly distributed to ensure every bite has a chocolate burst. For a darker chocolate flavor, use 70% cacao chips; for a sweeter finish, choose milk chocolate.
- Pour the batter into the prepared pan and spread it evenly with a spatula. Sprinkle the reserved chocolate chips on top for that molten look. Bake for 30 minutes, or until the edges are golden and the center is set. Use a toothpick to check for doneness; it should come out with a few moist crumbs.
- Remove the pan from the oven and let the bars cool on a wire rack for 15 minutes. During this time, the bars will firm up, making them easier to cut. Once cooled, slice into bars or squares. Store in an airtight container for up to four days.
That's it — you did it. But hold on, I've got a few more tricks that'll take this to another level...
Insider Tricks for Flawless Results
The Temperature Rule Nobody Follows
Many bakers bake at 350°F, but that can cause the bars to brown too quickly on the outside while remaining soft inside. Baking at 325°F allows the heat to penetrate slowly, ensuring an even crumb. I’ve found that lowering the temperature by 25°F reduces the risk of a burnt edge. This small change makes a huge difference in texture.
Why Your Nose Knows Best
If the batter smells like caramelized sugar before baking, you’re on the right track. The aroma signals that the sugars are developing complex flavors. When the scent shifts to a subtle chocolate note, it’s time to pull the bars out. Trust your nose; it’s the best judge of doneness.
The 5-Minute Rest That Changes Everything
Letting the batter rest in the refrigerator for 5 minutes before baking allows the flour to hydrate fully. This small pause results in a moister crumb. I’ve seen people skip this step, only to end up with a dry texture. Give it a moment, and your bars will thank you.
Chill the Batter for Even Baking
If you’re in a hurry, chill the batter for 15 minutes before baking. The cold batter spreads more slowly, producing a thicker bar with a denser texture. This is great for those who prefer a chewier bite. Just remember to let it sit at room temperature for a few minutes before pouring.
Using Dark Chocolate for Depth
Dark chocolate adds a slight bitterness that balances the banana’s sweetness. A 70% cacao chip will give the bars a sophisticated flavor profile. If you’re a fan of milk chocolate, keep it in moderation to avoid overpowering the banana.
Avoid Overmixing
Overmixing can develop gluten, resulting in tough bars. The batter should look smooth but still have visible streaks. I once overmixed and ended up with a dense, chewy texture that was a disappointment. Keep it gentle, and the bars will rise just right.
Creative Twists and Variations
This recipe is a playground. Here are some of my favorite ways to switch things up:
Coconut Crunch Variation
Add a cup of shredded unsweetened coconut to the batter for a tropical twist. The coconut adds a subtle crunch and pairs well with the banana. Toast the coconut lightly before mixing to deepen its flavor. This version is perfect for summer afternoons.
Nutty Banana Bliss
Fold in a cup of chopped pecans or walnuts for a nutty crunch. The nuts add protein and a satisfying bite. Toast the nuts to bring out their natural oils. This variation is ideal for those who love a bit of texture.
Sour Cream Swirl
Stir in a dollop of sour cream halfway through the batter for extra moisture and tang. The sour cream balances the sweetness and keeps the bars soft. Use a small bowl to whisk it into the mixture before adding the flour. The result is a silky, slightly tangy bar.
Chocolate-Dipped Delight
Dip the cooled bars in melted chocolate for a decadent finish. Use dark or milk chocolate depending on your preference. Let the chocolate set on parchment paper. This twist transforms the bars into a chocolate-covered treat.
Caramel Swirl Surprise
Swirl a spoonful of caramel sauce into the batter before baking. The caramel creates pockets of gooey sweetness. Use a light drizzle to keep the bars from becoming overly sweet. This version is a crowd-pleaser at parties.
Minty Fresh Twist
Add a teaspoon of peppermint extract to the batter for a refreshing hint. The mint pairs beautifully with chocolate and banana. Keep the amount small to avoid overpowering the other flavors. This variation is a great palate cleanser after a heavy meal.
Storing and Bringing It Back to Life
Fridge Storage
Store the bars in an airtight container at room temperature for up to four days. The moisture from the banana keeps them soft. Avoid stacking them too tightly; use parchment paper between layers. This ensures each bar remains tender.
Freezer Friendly
Wrap the bars tightly in plastic wrap and place them in a freezer bag. They will stay fresh for up to three months. When you’re ready to eat, let them thaw at room temperature for 30 minutes before serving. This makes them a convenient grab-and-go snack.
Best Reheating Method
Reheat the bars in the oven at 350°F for 5 minutes, or microwave on medium for 15-20 seconds. Add a splash of water before microwaving to create steam, which keeps the bars moist. The bars will regain their soft, chewy texture. Serve warm for maximum indulgence.