Picture this: I’m standing in my tiny kitchen, the oven humming like a lazy cat, and a half‑baked sweet potato is doing a sad little wobble on the counter. I had promised my roommate I’d bring something “fancy but easy,” and the only thing I could think of was a basic baked sweet potato. That first bite? A bland, mushy disappointment that made me swear off sweet potatoes forever—until I stumbled upon the secret of twice‑baking. I dared my roommate to taste my new creation, and she practically melted into the couch. I’m still hearing the echo of that “Mmm!” reverberating in my head, and I’m convinced you’re about to experience the same mind‑blowing moment.
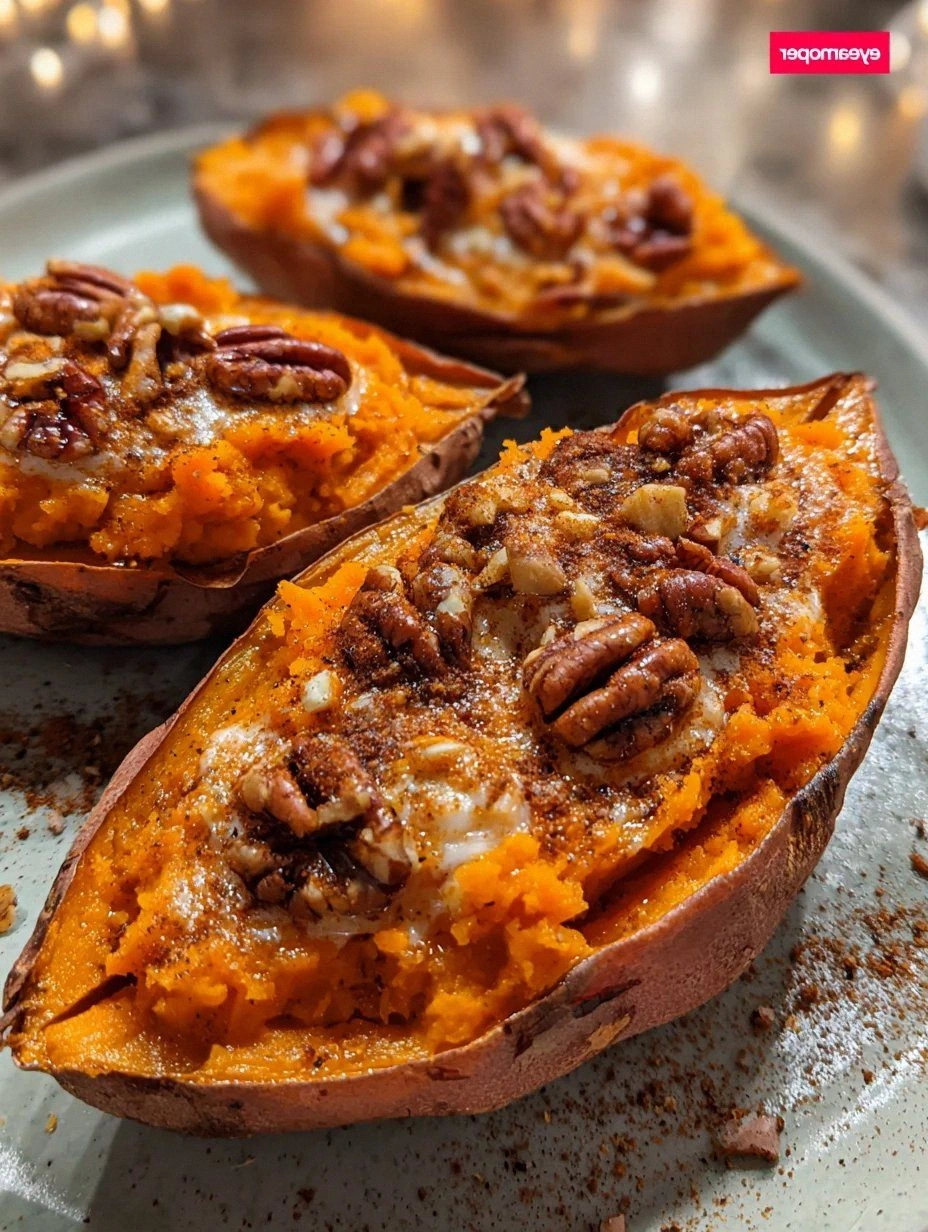
The moment the sweet potatoes emerge from the oven, their skins crackle like a campfire, releasing an aroma that’s part caramel, part autumn sunrise. The air fills with the warm perfume of cinnamon and nutmeg, and you can almost see the golden‑brown edges pulling away from the flesh, begging to be scooped. When you cut into that first potato, the steam rushes out like a tiny, fragrant volcano, and the interior is so silky it practically slides onto your fork. The texture is a perfect marriage of fluffy, buttery clouds and a subtle, caramelized crunch that makes your teeth sing.
What makes this version truly unbeatable is the double‑bake technique. Most recipes stop at a single bake, leaving the filling either too dry or too soggy. Here, the first bake softens the potatoes, the second bake caramelizes the edges, and the mash in between becomes a decadent, spice‑kissed custard that’s both sweet and savory. I’ll be honest — I ate half the batch before anyone else could even peek at the tray, and I’m still not sorry. This is hands down the best version you’ll ever make at home, and I’m about to spill every secret that makes it so unforgettable.
But wait, there’s a twist you won’t see coming: a splash of milk or cream added at just the right moment, turning the mash into a silky, velvety dream that practically melts in your mouth. I dare you to taste this and not go back for seconds. Okay, ready for the game‑changer? Let me walk you through every single step — by the end, you’ll wonder how you ever made it any other way.
What Makes This Version Stand Out
- Flavor Explosion: The blend of brown sugar, cinnamon, and nutmeg creates a sweet‑spicy symphony that dances on the palate, while the butter adds a luxurious mouthfeel that coats every bite like velvet.
- Texture Contrast: Crispy, caramelized edges meet a cloud‑like interior, giving you that satisfying crunch‑to‑cream transition that most single‑bake recipes miss.
- Simplicity Meets Sophistication: Only nine ingredients, yet the result feels like it took hours of meticulous prep — perfect for busy weeknights or impressing guests.
- Ingredient Quality: Using medium sweet potatoes ensures even cooking and a natural sweetness that doesn’t need excessive sugar, letting the spices shine.
- Crowd‑Pleaser Factor: Whether it’s a side for dinner or a hearty snack, people can’t stop raving, often asking for the recipe before the plate is even empty.
- Make‑Ahead Magic: The twice‑baked method holds up beautifully in the fridge, and a quick re‑heat restores that fresh‑out‑of‑the‑oven glory.
- Versatile Base: Swap sour cream for Greek yogurt for a tangier, lighter version, or add a dash of smoked paprika for a smoky twist.
- Cooking Method Mastery: The two‑stage bake locks in moisture first, then creates caramelization second, a technique many recipes overlook.
Inside the Ingredient List
The Flavor Base
4 medium sweet potatoes: These are the heart of the dish. Look for potatoes with deep orange flesh and smooth skins; the richer the color, the sweeter the flavor. If you pick ones that are too small, they might dry out during the second bake. A good swap is Yukon Gold potatoes for a milder taste, but you’ll lose that signature amber hue.
2 tablespoons brown sugar: This adds depth beyond plain white sugar, lending caramel notes that echo the natural sugars of the potato. If you’re watching carbs, try a drizzle of maple syrup instead—just use half the amount.
The Texture Crew
4 tablespoons unsalted butter: Butter is the secret glue that binds everything into a silky mash. Use real, high‑fat butter for the richest flavor; margarine will make the filling greasy and dull. If you’re dairy‑free, coconut oil works but adds a faint coconut aftertaste.
Milk or cream (as needed): Adding a splash of dairy at the right moment transforms the mash into a custard‑like consistency. Whole milk keeps it light; heavy cream makes it decadently rich. Skip it and you’ll end up with a dry, crumbly filling.
The Unexpected Star
1/2 cup sour cream (optional): This tangy dollop cuts through the sweetness, balancing the flavor profile. Greek yogurt is a lighter alternative that adds protein without sacrificing creaminess. If you omit both, a spoonful of cream cheese can fill the void.
The Final Flourish
1 teaspoon cinnamon & 1/4 teaspoon nutmeg: These warm spices turn a simple side into a comforting hug. Freshly ground cinnamon is far superior to pre‑ground; it releases essential oils that intensify the aroma. Nutmeg should be grated fresh; pre‑ground nutmeg can taste stale.
Salt and pepper to taste: Essential for flavor balance. A pinch of sea salt lifts the sweet notes, while a crack of black pepper adds a subtle bite that prevents the dish from feeling cloying.
Everything's prepped? Good. Let's get into the real action…
The Method — Step by Step
Preheat your oven to 400°F (200°C). While the oven warms, give each sweet potato a good scrub—no need for soap, just a brush under running water. Pat them dry, then pierce each one a dozen times with a fork. This lets steam escape, preventing the potatoes from exploding like fireworks when they hit the heat.
Arrange the potatoes on a baking sheet lined with parchment. Slide them into the oven and bake for 45‑50 minutes, until the skins are crisp and a fork slides in with a little resistance. You’ll know they’re ready when the edges start to pull away from the flesh, creating a natural “crack” that looks like a tiny canyon.
Kitchen Hack: If you’re short on oven space, you can halve the potatoes lengthwise, which reduces bake time by about 10 minutes.Remove the potatoes and let them cool just enough to handle—about 5 minutes. Slice each potato lengthwise, being careful not to cut all the way through; you want a hinge that stays attached. Gently scoop out the flesh, leaving about a ¼‑inch border of potato next to the skin. This border acts as a sturdy “bowl” for the filling.
Transfer the scooped flesh to a large mixing bowl. Add the butter, brown sugar, cinnamon, nutmeg, and a pinch of salt. Using a potato masher or a hand mixer, mash until the mixture is smooth but still retains a hint of texture. This is where the magic starts to happen—feel the buttery ribbons intertwine with the sweet, fragrant spices.
Now, the crucial moment: drizzle in milk or cream a tablespoon at a time, folding it in until the mash reaches a fluffy, spreadable consistency. It should look glossy, not dry. If you’re using sour cream, fold it in now for that tangy lift. Taste and adjust salt and pepper; remember, seasoning is the secret handshake of great cooking.
Stuff the mashed mixture back into the potato skins, mounding it slightly above the rim. This extra height creates a golden crust during the second bake. For an extra touch, sprinkle a tiny pinch of brown sugar on top—it will caramelize into a crunchy crown.
Watch Out: Don’t overfill the skins; they’ll split under the pressure of the second bake, turning your elegant dish into a mushy mess.Return the stuffed potatoes to the oven, lowering the temperature to 375°F (190°C). Bake for an additional 15‑20 minutes, until the tops are bubbling and the edges turn a deep amber. That sizzle when it hits the pan? Absolute perfection.
While they finish, melt a tablespoon of butter with a pinch of extra cinnamon in a small saucepan. Drizzle this glossy glaze over the potatoes the moment they exit the oven. The butter will seep into the crevices, adding a glossy finish that looks as good as it tastes.
Let the potatoes rest for 5 minutes before serving. This short rest allows the steam to settle, making the filling firm enough to slice without spilling. Serve them hot, and watch your guests’ faces light up as the aroma hits their nostrils. That moment? Pure culinary triumph.
Insider Tricks for Flawless Results
The Temperature Rule Nobody Follows
Most home cooks bake sweet potatoes at a single temperature, but the two‑stage approach is the real secret. The initial high heat (400°F) softens the interior quickly, while the lower second heat (375°F) gently caramelizes the sugars without scorching. Trust me, I tried a single 425°F bake once and ended up with burnt skins and a gummy center. Adjusting the temperature like this guarantees a uniform texture from edge to core.
Why Your Nose Knows Best
Never rely solely on a timer. The aroma is the most reliable indicator of doneness. When the sweet potatoes start to smell like a caramel‑spice latte, you’re in the sweet spot. If you catch a faint burnt note, pull them out early and finish with a brief broil. Your nose is a built‑in sensor that can’t be outsmarted.
The 5‑Minute Rest That Changes Everything
After the second bake, let the potatoes sit uncovered for exactly five minutes. This pause lets the steam redistribute, firming up the filling so it holds its shape when sliced. Skipping this step leads to a runny mess that slides off the plate—trust me, I’ve seen it happen.
Butter‑Infused Finish
Melting a little butter with extra cinnamon and drizzling it over the hot potatoes adds a glossy sheen and an extra layer of flavor. It’s like giving your dish a final kiss of love. If you want a smoky twist, swap the butter for clarified ghee infused with a pinch of smoked paprika.
Freeze‑Proofing the Fillings
When you freeze the baked potatoes, the butter can separate and become grainy. To prevent this, add a splash of extra cream before freezing; it creates an emulsion that stays smooth when reheated. I tried freezing without this trick once; the texture turned into a grainy nightmare.
Creative Twists and Variations
This recipe is a playground. Here are some of my favorite ways to switch things up:
Maple‑Bacon Bliss
Stir in two teaspoons of pure maple syrup and sprinkle crisp bacon bits into the mash before the second bake. The smoky saltiness balances the sweet, creating a breakfast‑for‑dinner vibe that’s irresistible.
Spicy Chipotle Kick
Add a finely chopped chipotle pepper in adobo sauce to the mash for a smoky heat that pairs beautifully with the natural sweetness. Top with a dollop of avocado crema for a Mexican‑inspired twist.
Herb‑Garden Delight
Mix in chopped fresh rosemary, thyme, and a splash of lemon zest into the filling. The herbs brighten the dish, making it an elegant side for roasted chicken or grilled fish.
Cheesy Cheddar Crunch
Fold in a cup of shredded sharp cheddar into the mash, then sprinkle extra cheese on top before the second bake. The cheese melts into gooey ribbons, and the crust turns golden and crisp.
Vegan Velvet
Replace butter with coconut oil, sour cream with cashew cream, and use oat milk instead of dairy. The result is a plant‑based version that still delivers that luxurious mouthfeel.
Storing and Bringing It Back to Life
Fridge Storage
Place the cooled, fully baked potatoes in an airtight container. They’ll keep for up to 4 days. Before reheating, let them sit at room temperature for 10 minutes to avoid a cold shock that can make the skins soggy.
Freezer Friendly
Wrap each potato tightly in foil, then place them in a freezer‑grade zip‑lock bag. They freeze beautifully for up to 2 months. When you’re ready to eat, thaw overnight in the fridge, then re‑heat using the method below.
Best Reheating Method
Preheat the oven to 350°F (175°C). Unwrap the potatoes, add a tiny splash of milk or water (about a tablespoon) to the top, and cover loosely with foil. Heat for 15‑20 minutes, then remove the foil for the last 5 minutes to revive that crispy crown. The added moisture steams the interior back to perfect fluffiness while the foil protects the skin from drying out.