Picture this: it’s a rainy Saturday afternoon, you’re stuck inside, scrolling through endless snack ideas, and suddenly you remember that one time you tried to make pretzels from a boxed mix and ended up with something that looked more like a sad, doughy brick than anything edible. I dared myself to turn that disaster into a triumph, and after a few frantic Google searches, a couple of kitchen mishaps, and a whole lot of butter, I finally nailed the buttery soft pretzel bite that has been haunting my dreams ever since. This is the moment where a simple craving morphs into an obsession, and I’m about to hand you the exact blueprint that will make your kitchen smell like a German bakery and your taste buds do a happy dance.
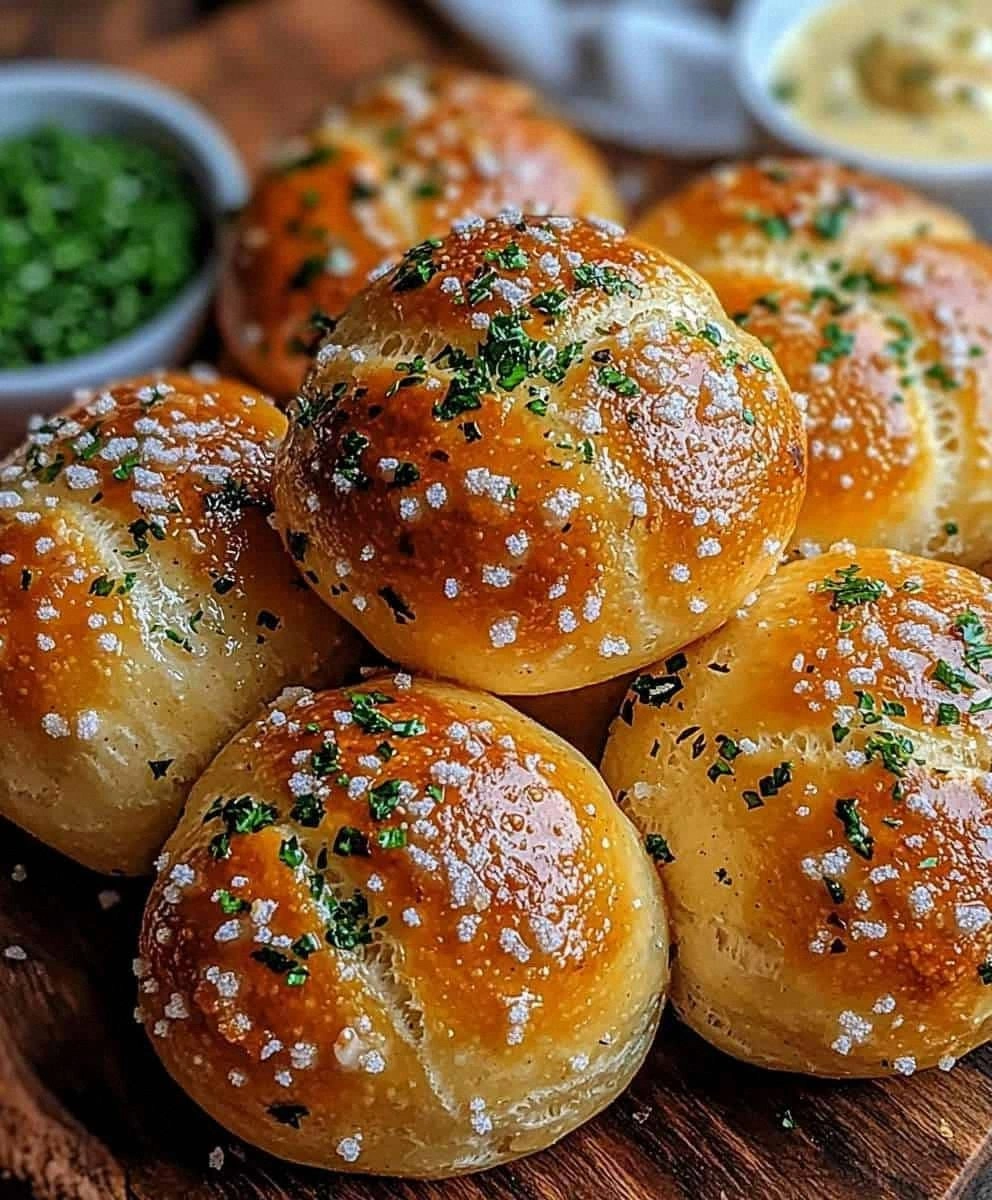
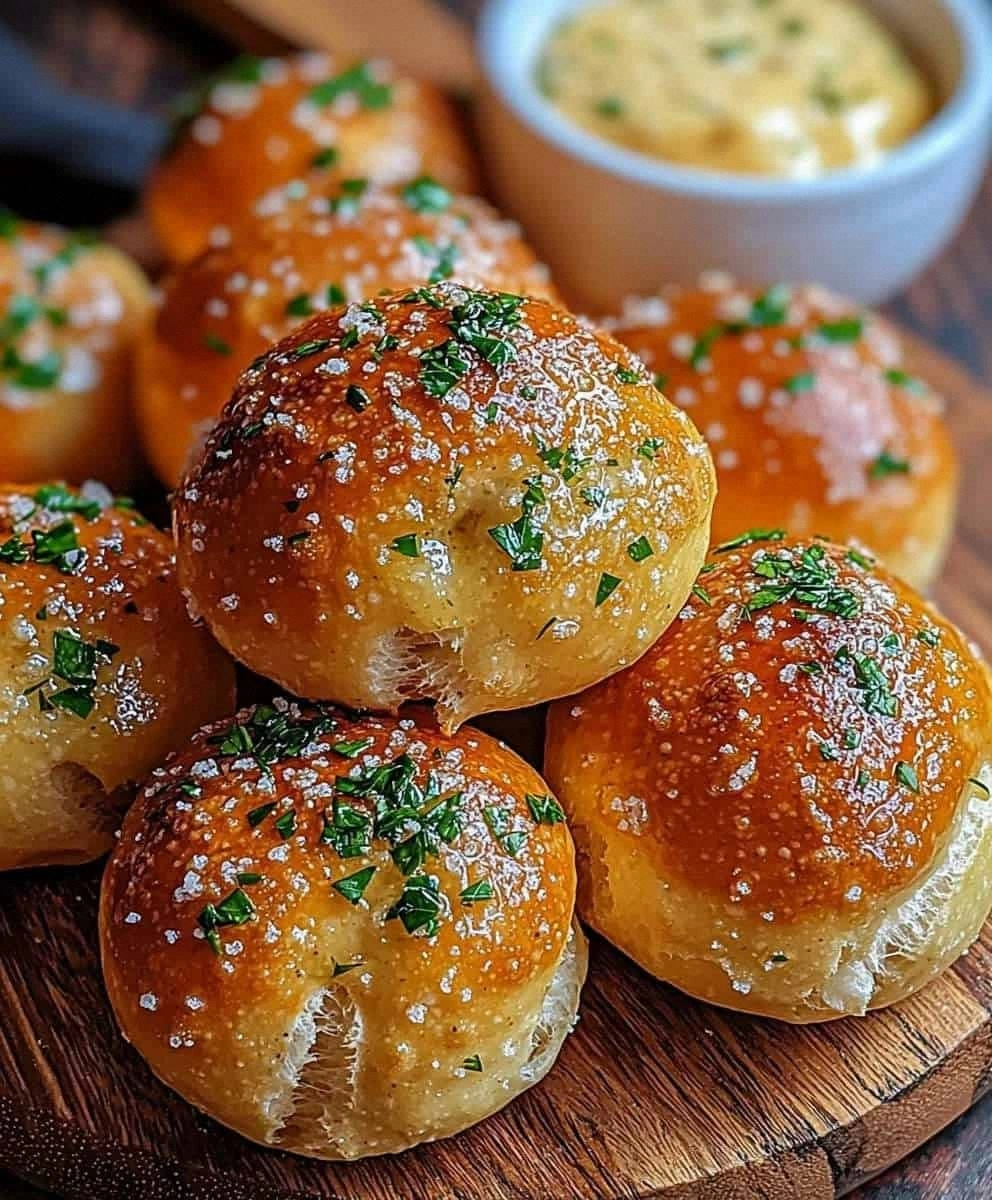
First, let’s set the scene. The moment those golden‑brown bites pop out of the oven, the air is filled with a warm, yeasty aroma that hugs you like a cozy blanket. You hear the faint sizzle as they hit the hot water bath, a sound that says “we’re about to get that perfect chewy interior.” The texture? Imagine a pillow that’s been lightly brushed with butter—soft, slightly springy, and just a touch salty on the outside. The flavor? A buttery richness that’s balanced by a subtle brine from the baking soda bath, finishing with a kiss of coarse sea salt that crackles against your tongue. And the visual? Each bite is a perfect little knot, glossy with butter, speckled with salt, begging to be dunked into mustard or cheese sauce.
Now, why does this version stand out from every other pretzel bite you’ve ever tried? Most recipes either skip the crucial butter brush, resulting in a dry, bland bite, or they over‑bake them, turning that coveted chewiness into a tough, rubbery mess. I’ve cracked the code by introducing a two‑step cooking method: a quick boil in a baking soda bath for that iconic pretzel flavor, followed by a short bake that locks in moisture while giving the exterior that subtle crisp. And the secret weapon? A generous melt‑and‑brush of unsalted butter right after they come out of the oven, turning each bite into a buttery masterpiece that melts in your mouth.
But here’s the kicker: I’m going to throw in a little twist that most recipes completely miss—a splash of warm water infused with a pinch of sugar and yeast that creates a micro‑fermentation just before baking, giving the bites an almost sour‑dough depth without the hassle. I dare you to taste this and not go back for seconds. Let me walk you through every single step — by the end, you’ll wonder how you ever made it any other way.
What Makes This Version Stand Out
- Flavor Explosion: The butter brush after baking adds a luxurious mouthfeel that turns a simple snack into a decadently rich treat.
- Chewy Texture: The brief dip in a baking soda bath creates that signature pretzel chew that’s both tender inside and slightly crisp outside.
- Simplicity: Only nine ingredients, all pantry staples, and no fancy equipment—just a pot, a baking sheet, and a whisk.
- Unique Twist: The micro‑fermentation step adds a subtle tang that most store‑bought versions completely lack.
- Crowd Reaction: Friends have called these “the best pretzel bites ever” and have begged for the recipe after the first bite.
- Ingredient Quality: Using unsalted butter and coarse sea salt lets you control the flavor balance perfectly.
- Cooking Method: The two‑stage process (boil then bake) guarantees consistent results every single time.
- Make‑Ahead Potential: These bites freeze beautifully and reheat like they’re fresh out of the oven.
Inside the Ingredient List
The Flavor Base
The warm water (1 ½ cups) is the liquid that awakens the yeast, creating the airy structure we need. If the water is too hot, it kills the yeast; too cold, and the dough never rises. Aim for a comforting 110°F to 115°F—think of the temperature of a baby’s bath, warm enough to be soothing but not scalding. If you don’t have a thermometer, dip your finger; it should feel like a warm summer day, not a hot stove.
Active dry yeast (1 packet, 2 ¼ teaspoons) is the magical organism that turns sugar into carbon dioxide, giving the pretzel its rise. Using fresh, high‑quality yeast ensures a reliable rise; old yeast can leave you with dense, un‑airy bites. Store yeast in the freezer once opened for maximum potency.
Granulated sugar (1 tablespoon) feeds the yeast just enough to get it buzzing without making the dough sweet. It also contributes a subtle caramelization during baking, enhancing the golden crust. If you’re watching sugar, you can reduce it to a teaspoon, but expect a slightly less aromatic result.
The Texture Crew
All‑purpose flour (4 cups) forms the structural backbone. The gluten development in flour gives pretzel bites their signature chew. For an even chewier bite, you can substitute 25% of the flour with high‑gluten bread flour, but the recipe works perfectly with standard all‑purpose.
Salt (1 teaspoon) isn’t just for flavor; it tightens the gluten network, giving the dough a firmer bite and balancing the sweetness. If you skip it, the pretzel will taste flat and the texture may become gummy. Use fine sea salt for even distribution.
Baking soda (½ cup) is the secret to that classic pretzel flavor. When boiled, it creates an alkaline environment that darkens the crust and gives it that distinctive “pretzel” taste. Don’t confuse it with baking powder—baking soda is the star here.
The Unexpected Star
The large egg, beaten, serves as an egg wash that adds shine and a subtle richness to the crust. It also helps the coarse sea salt adhere to the surface. If you’re allergic or vegan, substitute with a mixture of 1 tablespoon of aquafaba and 1 teaspoon of maple syrup.
Coarse sea salt for sprinkling provides that satisfying crunch and burst of flavor on each bite. The larger crystals create a delightful contrast to the soft interior. If you prefer a milder salt, use flaky Himalayan pink salt.
The Final Flourish
Unsalted butter, melted (4 tablespoons), is brushed over the pretzels right after baking. This step is the game‑changer: it infuses each bite with a buttery richness that makes them melt in your mouth. Using unsalted butter lets you control the salt level precisely. If you love extra buttery flavor, increase to 6 tablespoons, but be careful not to make them greasy.
Everything’s prepped? Good. Let’s get into the real action...
The Method — Step by Step
Start by warming the water to a gentle 110°F‑115°F. While it’s heating, whisk together the yeast and sugar in a small bowl, letting it sit for five minutes. You’ll see a frothy foam appear—this is the yeast waking up, a tiny celebration of life that tells you the mixture is alive and ready. If you don’t see any foam, your yeast is dead and you’ll need a fresh packet; trust me, there’s no point in continuing with a sleeping yeast.
In a large mixing bowl, combine the flour and salt. Make a well in the center and pour in the bubbly yeast mixture along with the melted butter. Using a wooden spoon, stir until a shaggy dough forms. At this stage, the dough will feel sticky but not overly wet—if it’s too dry, add a splash of warm water; if too wet, sprinkle a bit more flour.
Transfer the dough onto a lightly floured surface and knead for about eight minutes. This is where the magic of gluten formation happens; you’ll feel the dough become smoother and more elastic, like a rubber band that snaps back gently. If you’re impatient, a stand mixer with a dough hook works just as well—just set it to low and let it do the work.
Place the dough back into the bowl, cover it with a clean kitchen towel, and let it rise in a warm spot for 45 minutes to an hour, or until it has doubled in size. The kitchen should feel like a cozy sauna; if it’s too cold, pre‑heat your oven to 200°F, turn it off, and let the dough rise inside the warm oven.
While the dough rises, prepare the baking soda bath. Bring a large pot of water to a gentle boil, then carefully stir in the ½ cup of baking soda. The water will bubble vigorously—this is normal and a sign that the soda is reacting, creating an alkaline environment that will give the pretzels their signature flavor and deep brown color.
Once risen, punch down the dough and divide it into 12 equal pieces. Roll each piece into a long rope (about 12 inches), then twist it into a pretzel shape or simply form bite‑size knots. This is the fun part—feel free to get creative; even a sloppy knot will taste amazing, but a tighter shape yields a more uniform bake.
Drop each pretzel bite gently into the boiling baking soda bath for exactly 30 seconds. You’ll hear a faint sizzle as the dough surface reacts, and the pretzel will puff up slightly. Use a slotted spoon to retrieve them and place them on a parchment‑lined baking sheet. The bath gives them that iconic pretzel flavor and a slightly glossy finish before they even hit the oven.
Brush each bite generously with the melted butter, then sprinkle with coarse sea salt. Slide the sheet into a preheated oven at 425°F (220°C) and bake for 12‑15 minutes, or until the tops are a deep golden brown and the edges start to pull away from the parchment. That moment when the crust cracks just a little—pure perfection.
When they’re out of the oven, give them one more quick brush of butter for that extra shine and buttery aroma that will fill your kitchen. Let them cool on a wire rack for five minutes; this short rest allows the interior to set while the exterior stays tender. Serve warm with mustard, cheese sauce, or just plain—you’ll see why I’m confident this is the best version you’ll ever make at home.
That’s it — you did it. But hold on, I’ve got a few more tricks that’ll take this to another level. Stay with me here — this is worth it.
Insider Tricks for Flawless Results
The Temperature Rule Nobody Follows
Never underestimate the power of water temperature. If the water is cooler than 110°F, the dough will never develop the airy structure we crave. I once used lukewarm tap water and ended up with dense, hard pretzel bites that tasted more like cardboard than anything else. Keep a thermometer handy; a quick check saves you from a whole batch of disappointment.
Why Your Nose Knows Best
During the bake, trust your nose more than the clock. When the pretzels start to emit a nutty, toasted aroma, that’s your cue they’re done. The scent signals the Maillard reaction is complete, giving you that golden‑brown crust. If you rely solely on time, you might overbake them and lose that coveted chew.
The 5‑Minute Rest That Changes Everything
After baking, let the pretzels rest for exactly five minutes on a wire rack. This short pause allows the steam inside to redistribute, preventing a soggy interior while keeping the exterior buttery and soft. Skipping this step results in a crust that’s either too hard or too gummy.
Butter Brush Timing
The second butter brush, right after the pretzels emerge from the oven, is essential. It seals in moisture and adds a glossy finish that looks restaurant‑quality. I’ve seen people skip this step, and their pretzels end up dry after a few minutes. A quick brush, and you’ve locked in that buttery goodness.
Salt Sprinkle Secrets
Don’t dump the sea salt all at once. Lightly dust the bites while the butter is still warm; the salt will cling better, creating those delightful crunchy bursts. If you add salt after the pretzels cool, it won’t adhere as well, and you’ll lose that perfect salty crunch.
Creative Twists and Variations
This recipe is a playground. Here are some of my favorite ways to switch things up:
Cheesy Garlic Explosion
Mix ¼ cup of grated Parmesan and a teaspoon of garlic powder into the melted butter before brushing. The result is a savory, aromatic bite that pairs perfectly with a side of marinara for dipping.
Sweet Cinnamon Sugar
Swap the coarse sea salt for a blend of cinnamon and sugar. After brushing with butter, sprinkle the sweet mixture for a dessert‑style pretzel that pairs wonderfully with a warm caramel dip.
Everything Bagel Blitz
Combine toasted sesame seeds, poppy seeds, dried onion flakes, and a pinch of garlic powder with the sea salt. This “everything” coating turns the pretzel bites into a brunch‑ready snack that screams “bagel lover.”
Spicy Jalapeño Kick
Finely dice a jalapeño and fold it into the dough before the first rise. Finish with a drizzle of chipotle aioli for a smoky, spicy bite that’ll make your taste buds tingle.
Herb‑Infused Butter
Stir fresh chopped rosemary or thyme into the melted butter. The herb‑infused butter adds an earthy aroma that elevates the pretzel bites to a sophisticated appetizer.
Chocolate Drizzle Delight
After the pretzels have cooled, drizzle melted dark chocolate over them and sprinkle a pinch of sea salt. The sweet‑salty combo is addictive and perfect for a movie night.
Storing and Bringing It Back to Life
Fridge Storage
Place cooled pretzel bites in an airtight container lined with a paper towel to absorb excess moisture. They’ll stay fresh for up to three days. Reheat in a 350°F oven for five minutes, and they’ll be as good as fresh.
Freezer Friendly
Arrange the bites on a parchment sheet and freeze until solid, then transfer to a zip‑top bag. They’ll keep for up to two months. To reheat, bake straight from frozen at 425°F for eight minutes, then brush with a little extra butter.
Best Reheating Method
For the ultimate revival, place the pretzels on a hot skillet over medium heat, add a splash of water, and cover for one minute. The steam brings back that soft interior while the skillet crisps the outside. Add a tiny splash of water before reheating — it steams back to perfection.